MECHANICAL
FUEL
PUMP
(Spec
A-E)
A
diaphragm type fuel pump is used. If fuel does not
reach carburetor, check the fuel pump. Be sure there
is fuel in the tank.
If
line is open and no fuel comes
through, pump isdefective. Failureof pump isusually
due to a leaking diaphragm valve or valve gasket, a
weak or broken spring, or wear in the drive linkage.
Oil diluted with gasoline may indicate a faulty
diaphragm.
Removal
1.
Remove the fuel inlet and outlet lines from the
pump.
2.
Remove the two capscrews holding the pump to
the engine.
3.
Remove the pump, spacer (if used) and gasket
from the engine and discard the gasket.
Installation
1.
Remove all gasket material from mounting faces
and spacer (if used). Apply oil-resistant sealer to
both sides of the gasket(s) and to the threads
of
the attaching capscrews.
2.
Place the gasket (and spacer if used) on the
mounting face of the pump. Slide the mounting
capscrews through the pump and gasket (and
spacer) to prevent the gasket from slipping out of
place.
3.
Lightly place the pump in position on the engine,
making sure the rocker arm is riding on the cam-
shaft lobe. Start both capscrews and check for
proper gasket placement. Alternately torque cap-
screws to specifications.
4.
Connect the fuel inlet and outlet lines.
5.
Operate the engine and check for leaks.
VALVE.GASKET-
VALVE
CAGE
RETAINER
DIAPHRAGM ASSEMBLY
MOUNTING GASKET
LOWER
SIDE
APHRAGMGASK PHRAGM RETURN
ROCKER ARM
ROCKER ARM LIN
LOWER
SIDE
APHRAGMGASK PHRAGM RETURN
ROCKER ARM
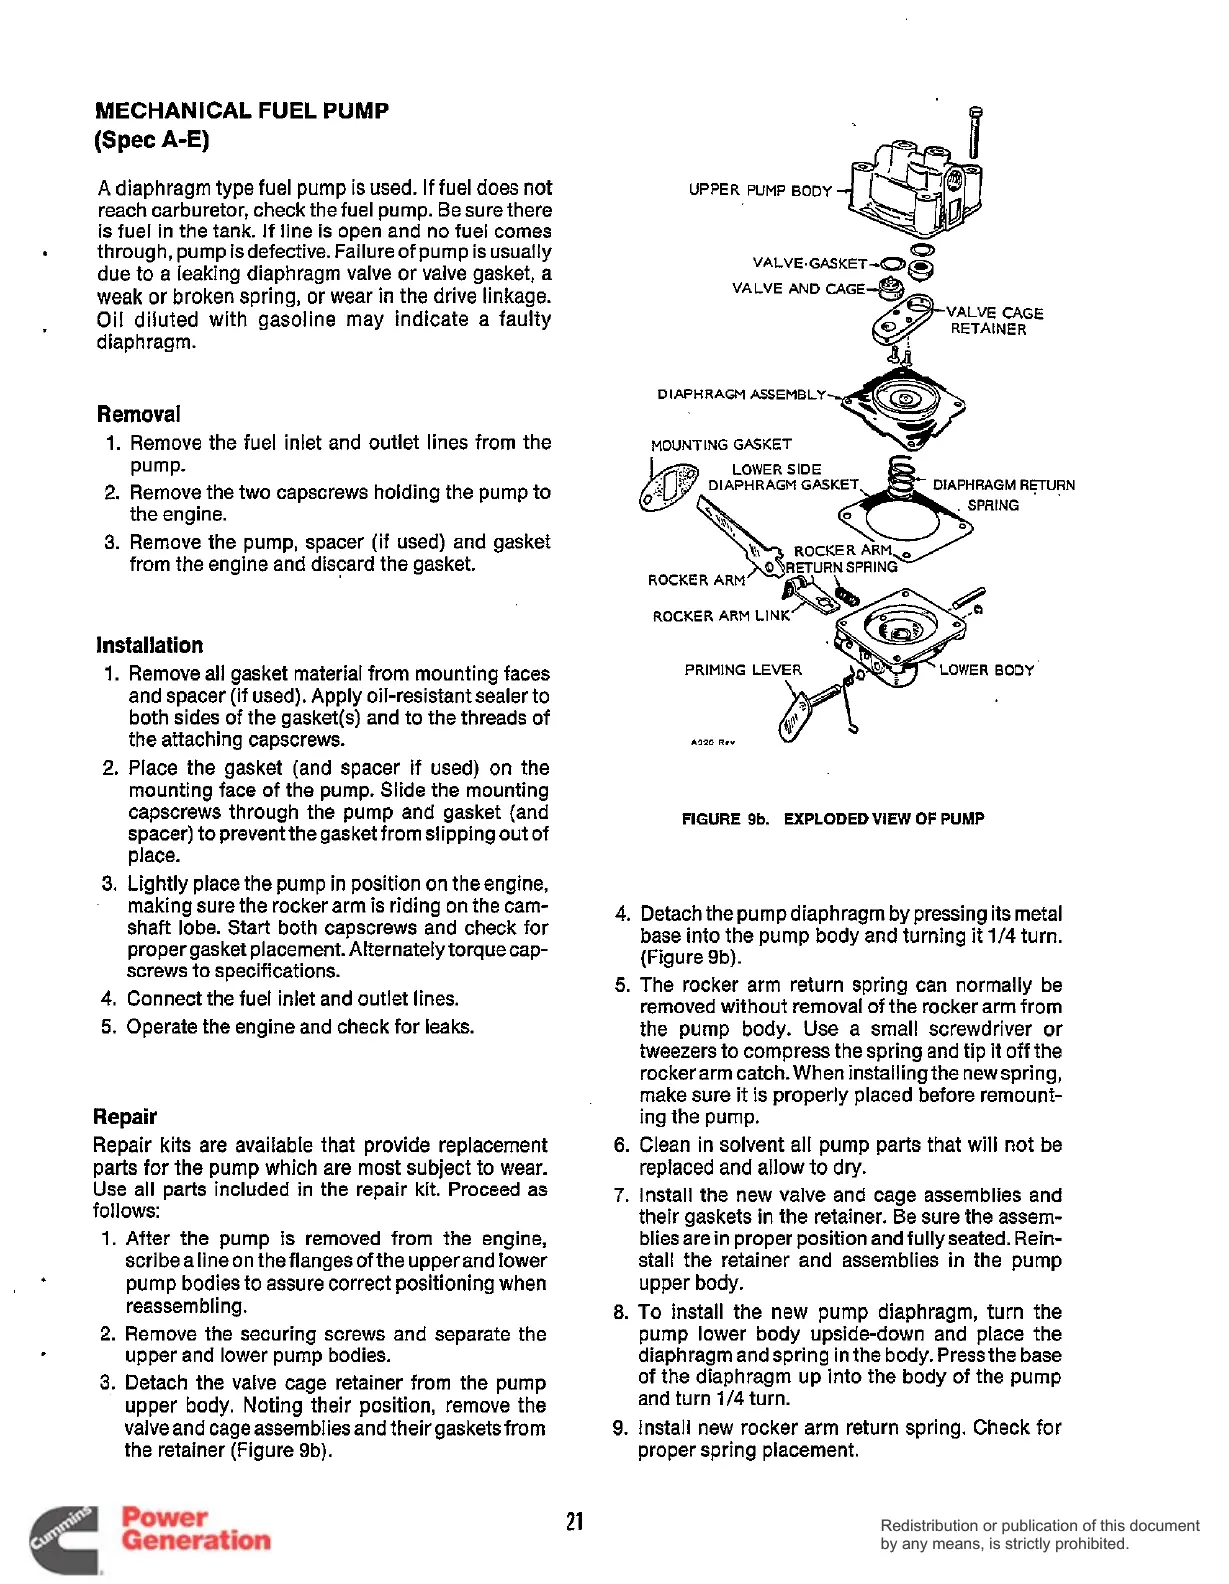
FIGURE
9b.
EXPLODED VIEW
OF
PUMP
4.
Detach the pump diaphragm by pressing its metal
base into the pump body and turning
it
1/4
turn.
(Figure 9b).
5.
The rocker arm return spring can normally be
removed without removal of the rocker arm from
the pump body. Use a small screwdriver or
tweezers to compress the spring and tip it
off
the
rocker arm catch. When installing the new spring,
make sure
it
is properly placed before remount-
6.
Clean in solvent all pump parts that will not be
replaced and allow to
dry.
7.
Install the new valve and cage assemblies and
their gaskets in the retainer. Be sure the assem-
Repair
ing the pump.
Repair kits are available that provide replacement
parts for the pump which are most subject to wear.
Use all parts included in the repair kit. Proceed as
follows:
1.
2.
3.
After the pump is removed from the engine,
scribealineon the flangesofthe upperand lower
pump bodies to assure correct positioning when
reassembling.
Remove the securing screws and separate the
upper and lower pump bodies.
Detach the valve cage retainer from the pump
upper body. Noting their position, remove the
valve and cage assemblies and their gasketsfrom
the retainer (Figure 9b).
blies are in proper position and fullyseated. Rein-
stall the retainer and assemblies
in
the pump
upper body.
8.
To
install the new pump diaphragm, turn the
pump lower body upside-down and place the
diaphragm and spring in the body. Pressthe base
of the diaphragm up into the body of the pump
and turn
1/4
turn.
9.
Install new rocker arm return spring. Check for
proper spring placement.
21
Redistribution or publication of this document
by any means, is strictly prohibited.
Redistribution or publication of this document
by any means, is strictly prohibited.
 Loading...


