86 . Frontier IR Single-range Spectrometers User's Guide
Replacing the laser and power supply (External Beam
Pack option fitted)
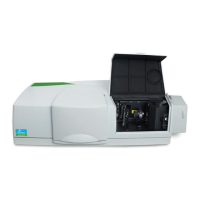
1. Open the main cover of the instrument as detailed on page 70 and identify the laser
and laser power supply (Figure 52).
2. Snip, and remove, the cable tie surrounding the power supply, noting how it secures the
laser cables (Figure 55).
The laser power supply fixings are accessible from the left of the instrument.
Figure 55 Laser power supply fixings (from left of instrument)
3. Slacken the two screws securing the laser power supply.
4. Unscrew and remove the cable clip that secures the thin black and red PSU laser cable
at the rear of the instrument, underneath the laser assembly (Figure 56).
Figure 56 Laser board connector and cable clip (from top of instrument)
5. Disconnect the black and red PSU laser cable from the board.
Instrument cover rear hinge