15698200.B Introduction 7
Relocating the Laptop and/or Scanner
The laptop can be unplugged and moved as needed. The software does not need to be shut down. The scanner can
be disconnected at any time.
System Information and Upgrades
Software and Hardware
System software and hardware upgrades are initiated through Planmeca only. Nosoftware or hardware should be
added or deleted to/from the Planmeca systems without prior approval of Planmeca. Doing so may result in damage
to the system and will void the product warranty.
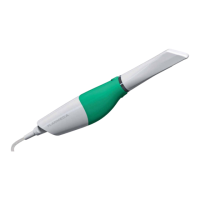
Connecting the Scanning Tip
(After disinfection if scanning intraorally. See insert with scanning tips for
further details.)
1 Grasp the body of the scanner with one hand.
2 Use the other hand to slide the scanning tip onto the scanner as
shown. Line the mark on the tip up to the smaller mark on the
scanner body. Twist the scanner tip to lock it into place. Ensure the
marks on the tip and the base are aligned.
Failure to follow this procedure can damage the scanningtip.
Disconnecting the Scanning Tip
1 Grasp the body of the scanner with one hand.
2 With the other hand, twist the scanner tip to the unlocked position and remove it.
When the scanner is not in use, place the non-functional protective scanner tip on the scanner. (Included with the
scanner during shipping.)
START
STOP