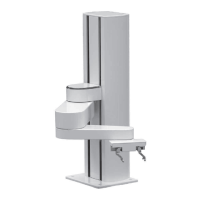
PreciseFlex_Robot
100
Replacing Belts and Motors
The timing belts and motors are designed to last the life of the robot. It is not expected that they will need
to be replaced in the field. In most cases, if a belt or a motor needs to be replaced, the robot should be
returned to the factory. While there are procedures at the end of this manual for replacing belts and
motors, only experienced service technicians should attempt these procedures.
General Belt Tensioning
The PreciseFlex 400 has been designed to make belt tensioning very simple. Prior to 2014 each axis had
a spring preload system that sets the correct belt tension when the axis motor mount plate screws are
loosened. After 2014 the springs were removed from the inner and outer links and access hatches were
added to make belt tensioning more accurate. See Appendix D for belt tension specifications.
Tensioning the J1 (Z Column) Belts
DANGER: Before tensioning the timing belts or replacing any motors, the
AC power should be disconnected. Removing the front cover allows
access to the AC power terminals.
Tensioning the 1
st
Stage Belt
Tools Required:
1. 3.0mm hex driver or hex L wrench
To adjust tension in the 1
st
Stage Belt the user must:
1. Turn off robot power and remove the AC power cord.
2. Remove the Top Plate of the robot by removing the 4 M5 socket head screws from the top plate
of the robot that attach the top plate to the Z column. Lift up the Top Plate.
3. Remove the Front Cover by lifting it out vertically.
4. Loosen the 2 M4 locking screws on the J1 Motor Mount Bracket to allow the Mount Bracket to
slide up and down.
5. Adjust the M4 Tension Screw compressing the spring assembly. The tension spring should be
compressed until the spring length is 5.5mm under the washer.
6. After adjusting the Tension Screw, the M4 locking screws should be tightened to lock the
assembly in place and the Front Cover and Top Plate should be replaced.