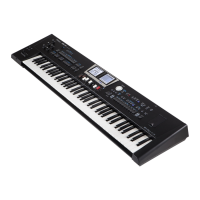
Panel Description
16
32
MAKEUP TOOL button
Press this button to modify the settings of the current song or
rhythm. See page 97.
33
MFX button
This button enables (lights) or disables the eector.
By pressing and holding it you can access the display pages where
you can set the eects parameters.
34
MELODY INTELL button
This buttons is used to add an automatic countermelody (second
or third voice) to your solos or melodies.
Pressing and holding it calls up a display page where you can view
the “Melody Intelligent” parameters.
Press and hold it while pressing the [LYRICS] button and you will
activate/deactivate the Visual Control (p. 161).
35
LYRICS button
If you select a (MIDI or audio) song with Lyrics data, pressing this
button will display the words of that song on the internal display.
The BK-9 will also display the chords of such Standard MIDI les
(SMF). For more details see ““ p. 47
36
TRACK MUTE/CENTER CANCEL button
This button lets you mute the accompaniment parts of the selected
rhythm, so that only the bass and drum parts are played back. It
also lets you mute the melody part of the selected MIDI File, or
attenuate the vocal part at the center of an audio le (WAVE or
mp3), allowing you to sing or play that part yourself.
Pressing and holding this button calls up a display page where you
can select the Standard MIDI File or rhythm part(s) that you don’t
want to hear.
37
USB MEMORY button
Press this button to call up a list of the les stored in the USB
memory connected to BK-9‘s USB MEMORY port.
38
DEC/-, INC/+
These buttons can be used to set the values or select the Tones and
Rhythms.
39
EXIT button
This button is used to return to a higher menu level.
Press and hold it to return to BK-9’s main display page.
40
MIXER button
This button allows you to specify that the ten sliders are assigned
to the MIXER function (Reak Time Parts or Rhythm Parts) (button
lights). For more details see ““ p. 33
41
SPLIT button
Press the [SPLIT] button if you want to play dierent sounds with
your left and right hands. See ““ p. 32.
Press and hold this button to jump directly to the “split” page.
42
OCTAVE button
Press this button to open the OCTAVE temporary page and change
the octave up or down in octave steps. See ““ p. 52
43
PART ON/OFF buttons
These buttons allow you to switch the desired keyboard parts
(UPPER1, UPPER2, LOWER, M. BASS) on and o.
To change the tone assignment (the part to which you wish to
assign a dierent sound) press and hold the desired keyboard part.
See “Change a tone for a real-time part” (p. 28).
44
MODE buttons
These buttons allow you to congure the BK-9 by pressing just one
button.
Select [PIANO] to assign a piano sound to the entire keyboard.
Select [ORGAN] to assign organ sounds to the left and right hand in
a split keyboard.
45
KEY button
This button calls up the BK-9’s transposition function.
Its settings can be applied to Rhythms, Songs and the real-time
Parts (UPPER1, UPPER2, LOWER, M. BASS).
If the button indicator doesn’t light, the Rhythm, Songs and the
real-time Parts use their normal pitch.
Pressing and holding this button locks the key. See p. 52.
46
ONE TOUCH button
This button is used to recall One Touch memories page. Pressing
and holding it calls up a display page where you can edit and save
One Touch memories.
MEMO
Use the TONE buttons [1]~[4] to select or deselect a One Touch memory
(p. 41).
47
HARM BAR button
Press this button to activate the Harmonic Bar section, whose
sound can be set using the assignable sliders that double as virtual
harmonic bars.
48
USER TONE/SuperNATURAL button
This button allows you to select SuperNATURAL and User Tone
sounds.
The User Tone sounds are only available after installing optional
new sounds into the BK-9. See p. 28
49
FAVORITE button
Press this button if you want to use the TONE [0]~[9] buttons to
recall your favorite sounds (p. 35) or performances (p. 58).
50
TONE buttons (Tone selection)/[0]~[9] (numeric buttons)
These buttons allow you to select Tones by category (p. 28).
You can also use them to input numeric values. To do so, rst
activate the [NUMERIC] button.
Pressing and holding any of these buttons locks the Tone (p. 63).
51
NUMERIC button
Press this button if you want to use the TONE [0]~[9] buttons to
enter numeric values (p. 32).
52
AUDIO KEY button
By pressing this button the rightmost keys of the BK-9’s keyboard
will be used to control audio phrases. See “16. Using Audio Phrases
(Audio Key)” (p. 65)
53
USB MEMORY compartment
Connect an optional USB memory here.
NOTE
* Carefully insert the USB memory all the way in-until it is rmly in place.
* Use USB memory sold by Roland. We cannot guarantee operation if any
another USB memory is used.
* Roland does not recommend using USB hubs, irrespective of whether they
are active or passive. Please connect only one USB memory to this port.
 Loading...