UMSITRPDS3-1 Installation
November 2005
4-25
3. Thread ½" nipples, 3 inches (or less) in length, into the high- and low-pressure ports of the orifice
flanges. Thread sealant must be used.
4. Thread the process connection blocks directly onto the nipples. Thread sealant must be used. The 1/2
NPT tapped hole in a process connection block is off center to accommodate 2-inch or 2.25-inch
centers. For 2.13" pipe centers, the tapped holes should be offset to the right side.
5. Place the supplied Teflon gaskets on the connection blocks and bolt them to the manifold. Tighten the
mounting bolts according to the manifold manufacturer’s recommendations.
6. Rotate the enclosure or reposition the optional display as necessary. Refer to Section 4.5.
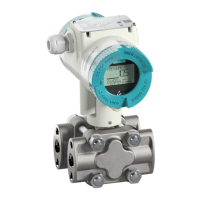
4.4.3 Flange Mounting, Model 7MF4633/7MF4912
A liquid level transmitter can be flange mounted directly to the point of measurement on a vessel. The
flange-mounted diaphragm is factory assembled to the high-pressure side of the transmitter measuring
cell.
Figure 9-4 shows a typical flanged level transmitter. Table 4-2 includes the following mounting
information:
• Flange thickness
• Flange diameter and pressure rating
• Number of flange mounting holes
• Flange mounting hole diameter
• Flange bolt circle diameter
Refer to Figure 9-4 and Table 4-2 when performing the following procedure:
1. Determine needed bolt length. The user must supply mounting bolts, nuts, and washers. Bolt length is
determined by the combined thickness of the flange mounted on the vessel and the transmitter’s
flange.
2. As necessary, loosen the enclosure rotation set screw and rotate the enclosure for clearance and best
viewing of the optional display.
3. Bolt the transmitter’s flange to the vessel’s flange. Four mounting positions (90° increments) are
possible with 2-inch flanges and eight positions (45° increments) are possible with 4-inch flanges.
4. Rotate the enclosure or reposition the optional display as necessary. Refer to Section 4.5.
 Loading...