SOLO BETA User Manual
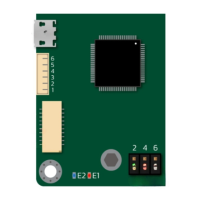
Section 10, 11 _ Status / Error LEDs:
There are two LEDs on the bottom right side of SOLO, which are named as “E1” and “E2”
and each of them has a functionality as below:
- E2 : This is the status LED indicator, after the device startup, in case of having a
safe boot up with no errors like over-current, over voltage and etc, it will start
blinking and remains in blinking state as long as there is no error occurred.
- E1: This is the Error indicator, and in case of an error, it will act as below:
- Over voltage Error:
Starts Blinking
- Over Current Error:
Stays ON
- Over Temperature Error:
Stays ON
Section 12 _ Power Up LED:
There is a LED here named “A1” which just indicates if SOLO has been powered up correctly or
not. So when it’s ON, it means you have correctly connected the input Supply terminals of SOLO to
Positive and Negative of your power supply or battery. If you put SOLO into reverse polarity
connection, this LED will remain OFF.
www.solomotorcontrollers.com
January 2021 - Revision V_1.0.5 Copyright © 2020, All right Reversed. SOLO motor controllers.
32