
 To Next Page


F
fostervictorSep 6, 2025
What does 'Voltage Low' mean on my Sony DVR?
- CCarol RoweSep 6, 2025
The 'Voltage Low' message on your Sony DVR means the DC IN voltage has become low (stage 1). Check the power supply.

What does 'Voltage Low' mean on my Sony DVR?
The 'Voltage Low' message on your Sony DVR means the DC IN voltage has become low (stage 1). Check the power supply.
What does 'Media Error Media(A) a) Needs to be Restored' mean on my Sony DVR?
The error message 'Media Error Media(A) a) Needs to be Restored' on your Sony DVR indicates that an error occurred with the memory card. Remove the card, load it again, and restore it.
Why is the image on the monitor screen too dark when using my Sony DVR?
If the image on the monitor screen is too dark, and you're using a video signal loop-through connection of multiple video monitors, the 75 ? termination switches for video input on monitors other than the loop-end monitor might be in the ON position. Set the 75 ? termination switches to OFF on all monitors other than the loop-end monitor.
Why don't the REC LEVEL controls work on my Sony DVR?
If the REC LEVEL controls do not work on your Sony DVR, the audio recording levels might be set to the preset values. Set 'Rec Level' in 'Audio Input' of the AUDIO SET menu to 'Manual'.
What does 'Video Format Mismatch' mean on my Sony DVR?
The 'Video Format Mismatch' message on your Sony DVR indicates that the external signal input via the i.LINK connection cannot be recorded because the Video Format setting is different from the signal format of the external input signal. Change 'Video Format' of the OTHERS menu to match that of the external signal.
Why is the image on the monitor screen too bright when using my Sony DVR?
If the image on the monitor screen is too bright, the 75 ? termination switch for video input on the monitor might be in the OFF position, or a 75 ? terminator is not fitted to its video input connector. Set the 75 ? termination switch to ON or connect a terminator.
Why doesn't my Sony DVR start recording when I press the REC button?
There are several reasons why your Sony DVR might not start recording: * The SxS memory card is write-protected. Release the write protection or replace the card. * The SxS memory card is full. Replace the card with one having sufficient space. * The SxS memory card needs restoration. Restore the memory card. * The video format of the input signal does not match the video format set on the unit. Set the unit to the same video format as that of the input signal.
Why is audio recording not possible on my Sony DVR?
If audio recording is not possible on your Sony DVR, the REC LEVEL controls might be set to the minimum level. Adjust the audio recording levels with the REC LEVEL controls and record again.
Why is the recorded sound distorted on my Sony DVR?
If the recorded sound is distorted on your Sony DVR, it is likely because the audio level is too high. Change the AUDIO INPUT LEVEL switch setting and record again.
How to display data on the monitor screen of my Sony DVR?
If data is not superimposed on the monitor screen of your Sony DVR, check the following: * The DISPLAY button is turned off. Turn the DISPLAY button on. * Superimposition is disabled. Set 'HDMI/CMPNT/SDI Out DISP' or 'CMPST/ S Out Display' of the VIDEO SET menu to 'On'.
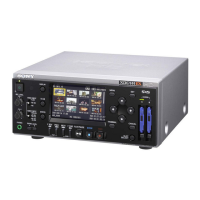
Highlights the PMW-EX30's features including HD recording, bit rates, long recording time, multiple formats, and audio.
Details operational aspects like down-conversion, various interfaces, repeat playback, and VCR-like front panel design.
Describes the 16:9 color LCD monitor and the unit's compact, vertically installable body.
Instructions for using the CD-ROM, reading manuals, and system requirements for software.
Identifies and explains the function of front panel buttons, indicators, and displays.
Details the various connectors and switches located on the rear panel of the unit.
Explains the functions of the buttons on the supplied IR remote commander.
Covers connecting power, starting the unit, and setting the internal clock and time zone.
Details adjusting the LCD display and configuring the video format for recording and output.
Explains how the unit handles timecode/user bit data and selects input/output signals.
Covers guidelines for using, inserting, formatting, and restoring SxS memory cards.
Instructions for connecting external hard disks and using media adaptors.
Details on IR remote operation, battery replacement, and vertical unit placement.
Covers settings and steps for starting and performing recording operations.
Details settings and steps for playing back recorded clips.
Explains how to stop recording and use shot marks for editing.
Covers playback modes, stopping, and using the clip operation menu.
How to play back clips using the thumbnail screen and index frames.
Selecting clips and navigating through them during playback.
Covers repeat playback, skipping clips, and cancelling playback.
Introduces clip operation menus and their basic usage.
Viewing detailed clip information and adding OK marks to clips.
Procedures for deleting clips and copying them to other memory cards.
Displaying EXPAND CLIP and SHOT MARK screens for detailed views.
Adding/deleting shot marks and changing clip index frames.
Methods for recording timecode and user bit data, including preset modes.
Details on Regen mode and external synchronization for timecode.
Steps required to synchronize the internal timecode to an external source.
How to connect video monitors to view output signals and superimposed text.
Connecting the unit to a computer for clip management and editing.
Examples of connecting devices using the HD SDI interface for dubbing and live systems.
Using the i.LINK interface for dubbing clips and connecting to editing systems.
Notes regarding computer interaction, search times, and potential signal interruptions.
How to access, switch between, and clear different unit status screens.
Details displayed on the audio and video status screens.
Information on IR remote status, battery levels, and media remaining space.
Introduction to the unit's setup menus and their hierarchical structure.
Step-by-step guide on how to navigate and set options within the menus.
Settings related to audio inputs, outputs, and levels.
Settings for video outputs, signal selection, and down-converter modes.
Adjustments for LCD display properties like color, contrast, brightness, and backlight.
Settings for timecode modes, user bits, and timecode format.
Settings for factory reset, setup data storage/recall, and time zone.
Settings for clock, language, usage hours, remote control, and region.
Configuring video formats and managing clip naming and deletion.
Procedures for copying clips between cards and formatting memory media.
General guidelines for operation, cleaning, storage, and shipping.
Information on the digital hours meter for tracking usage and maintenance.
Solutions for common problems encountered during recording and playback.
Solutions for issues with time data settings and external video monitor display.
Solutions for i.LINK device issues and common alarm messages.
Steps to take when internal error messages are detected by the self-diagnostic function.
Explanation of i.LINK features, data transfer speed, and unit operation.
Lists the unit's general technical specifications including power, dimensions, and temperature.
Details recording formats, display specifications, and input/output connectors.
Lists supplied and optional accessories, and important liability disclaimers.
Information regarding licensing terms for MPEG-2 video encoding and playback.
Licensing terms for AVC and VC-1 video standards usage.
 General