60
Using as an Editor
Selecting audio-split editing
You have to set the setup menu item 25 to AUDIO IN.
For detailed information, see “SPLIT ED” (see page 77)
in “Items in the Setup Menu.”
To perform audio-split editing, use a PDW-1500 with a
PDBZ-E1500 installed, the HDW-2000 series, or an
HDW-S280.
Determining Edit Points (IN/OUT
Points)
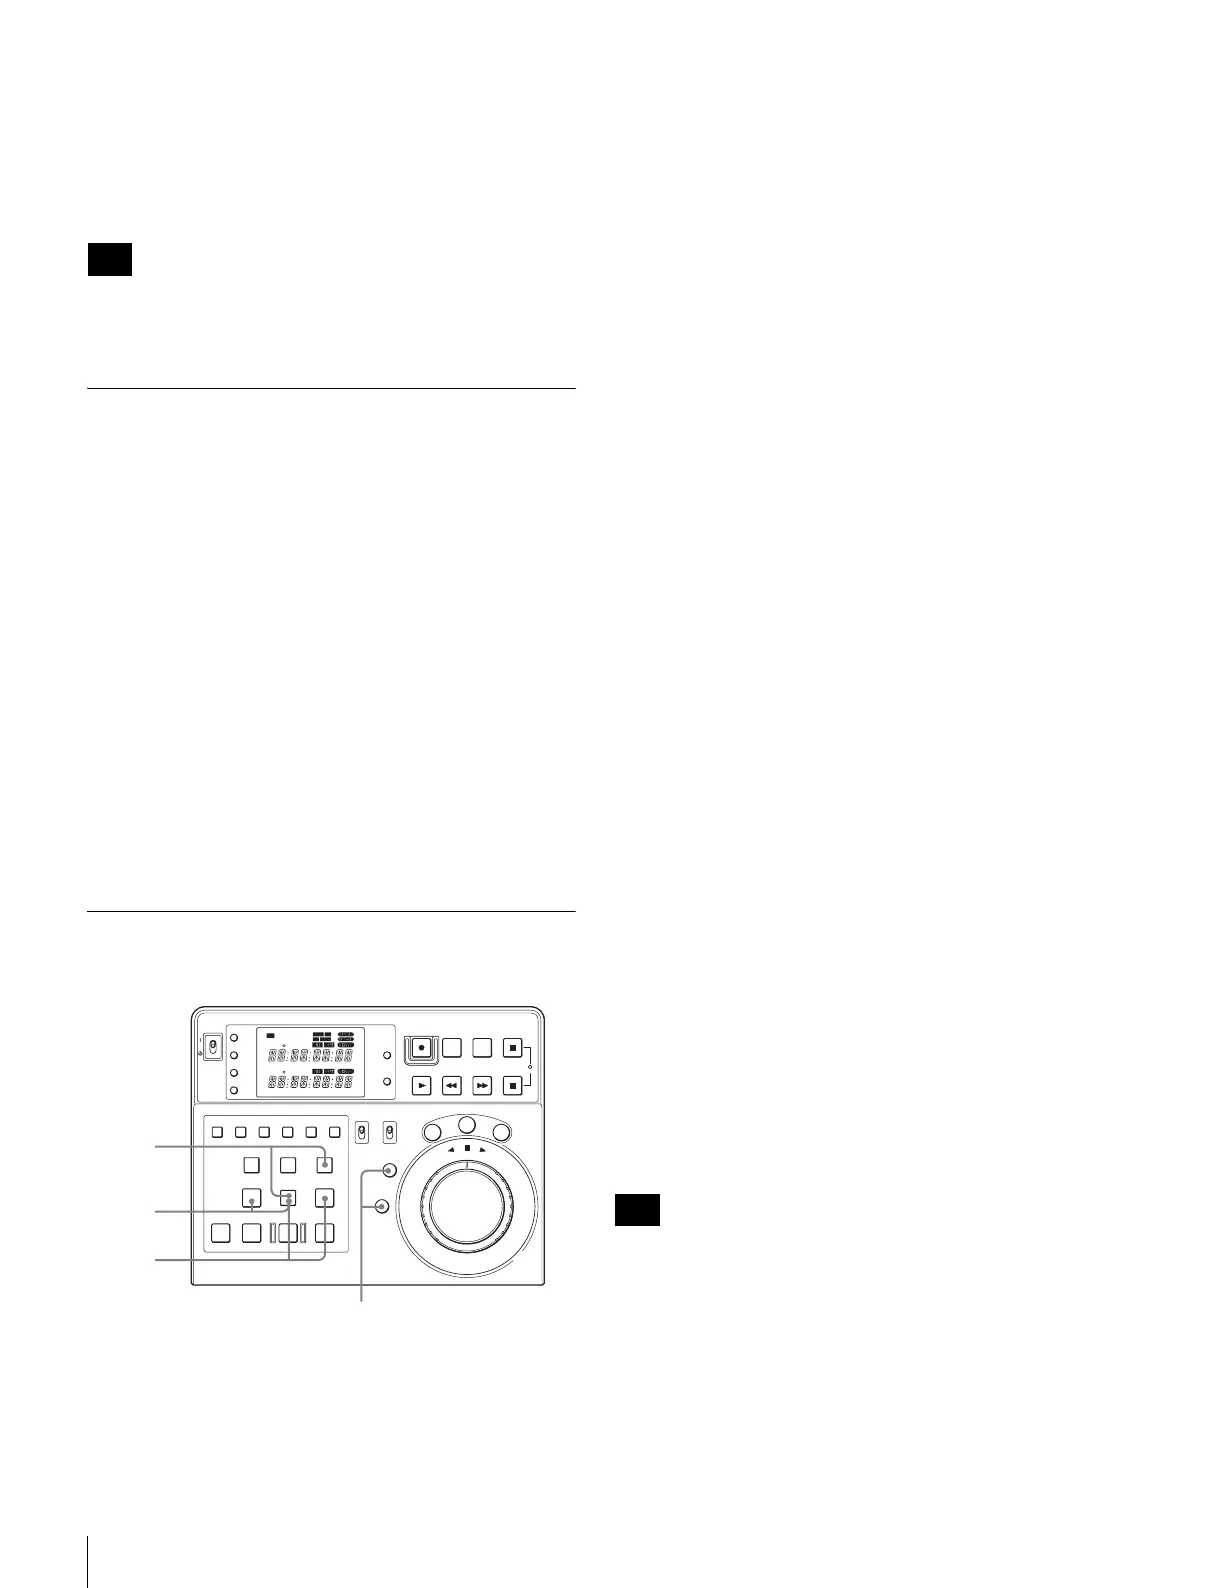
Using the search dial
Press the SHTL/JOG/VAR button to select the desired
search mode: shuttle, jog, or variable mode. Then turn the
search dial to search an edit point.
Shuttle and variable mode are useful to search for an
approximate edit point. Jog mode is useful to precisely find
the frame of a desired edit point.
For details on the search dial, see the page 52.
Using the PLAY/REW/FF buttons
You can search for the desired tape point by pressing the
PLAY/REW/FF buttons.
Press the STOP button to stop the tape when you find the
desired scene on the monitor.
Entering the Edit Points
1
Enter the IN points for the player and the recorder.
1 Select the device to enter the IN point with the
PLAYER/RECORDER button.
2 Press the IN button simultaneously with the
ENTRY button at the desired point.
The corresponding IN indicator lights up.
3 Repeat the steps 1 and 2 to enter the IN points for
both the player and the recorder.
2
Enter an OUT point for the player or the recorder.
1 Select the device to enter the OUT point with the
PLAYER/RECORDER button.
2 Press the OUT button simultaneously with the
ENTRY button at the desired point.
The corresponding OUT indicator lights up.
Go to step 3 when you enter the IN point of the audio-
split edit.
3
Enter the audio IN point of the audio-split edit for the
player or the recorder.
1 Select the device to enter the audio IN point with
the PLAYER/RECORDER button.
2 Press the GO TO/SPLIT IN button simultaneously
with the ENTRY button at the desired point.
Only when the device on which the audio IN point has
been set is selected, will the GO TO/SPLIT IN button
light up. When the audio IN point has been set, the
ENTRY button lights up, regardless of the device
selected.
To input edit points using ten-key inputs
By pressing the following pairs of buttons simultaneously,
you can configure edit points using the ten-key input
function.
Input to RECORDER IN: Press the IN button while
pressing the RECORDER (DEVICE 1) button.
Input to RECORDER OUT: Press the OUT button while
pressing the RECORDER (DEVICE 1) button.
Input to PLAYER IN: Press the IN button while pressing
the PLAYER (DEVICE 2) button.
Input to PLAYER OUT: Press the OUT button while
pressing the PLAYER (DEVICE 2) button.
For details, see “Using the Ten-Key Input Function” (see
page 83).
Input to SPLIT IN is not supported.
To modify the edit points
Enter the correct edit points following steps 1, 2 and 3
described in “Entering the Edit Points” on page 60.
When the IN and OUT indicators flash
The unit is informing you that the OUT point is entered
before the IN point. Enter the correct edit points.
Note
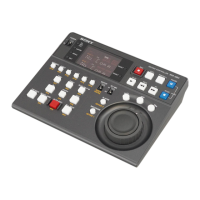
POWER
TC
IN OUT
PLAYER
RTCTL
DEVICE 2
RTC
CTL
LEARN
RESET
REC EDIT
JOG
SHTL
VA
R
EDITING CONTROLLER
RM
-
280
PREROLL PAUSE
PLAY REW FF STOP
STANDBY
RESET
MENU
SET
ASSEMBLE
VIDEO
TRIM
-
TRIM+
GO TO/SPLIT IN
PF7 PF8 PF9
PF4 PF5 PF6
PF1 PF2 PF3
IN ENTRY OUT
REVIEW / JUMP
PREVIEW AUTO EDIT ALL STOP
A1 A2 A3 A4
PF10 PF11 PF12 PF13 PF14 PF15
EDITOR
PLAYER
DEVICE 2
DEVICE 1
RECORDER
REMOTE
CONTROL
KEY INHI
ON
OFF
RECORDER
RTCTL
DEVICE 1
3
1 , 2 , 3
1
2
2
2
111
2
Note