52
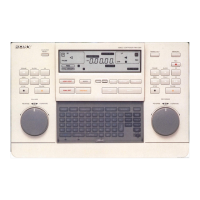
Locations and Functions of Parts
a VTR operation buttons
Press these buttons to operate the VTR connected to this
unit. The function of these buttons is the same as those on
the connected VTR.
REC (record) button
PAUSE button
PLAY button
REW (rewind) button
FF (fast forward) button
STOP button
b EDIT button
Press this button simultaneously with the PLAY button to
perform a manual editing (see page 62).
To monitor in E-E mode*
While pressing this button, you can monitor input signals
that you select with the ASSEMBLE button or INSERT
(VIDEO, A1 to A4) buttons in E-E mode.
* Abbreviation for Electric-to-electric mode. Input video and/or audio
signals pass through electric circuits only and then come out from the
output connectors, without passing through electromagnetic conversion
circuits such as recording heads.
c PREROLL button
Press to cue up the point before the IN point that was set as
the preroll time in setup menu item 01 (see page 75). This
unit then starts playing back.
When this unit is in the audio-split editing mode, press this
button simultaneously with the GO TO/SPLIT IN button
to cue up the IN point of the audio.
d STANDBY indicator
Lights up when the drum of the VTR rotates and tape
tension is applied (standby-on mode). Turns off when the
drum stops and tape tension is relaxed (standby-off mode).
To set the unit to the standby-off mode manually, press the
STOP button and the PAUSE button simultaneously when
the VTR is in stop mode.
e PLAYER (DEVICE 2)/RECORDER (DEVICE 1)
buttons
Press the desired button to select the device to control from
this unit.
You can switch between a player and a recorder in editor
mode, or between DEVICE 1 and DEVICE 2 in remote
control mode.
In remote control mode, set the setup menu item 20 to ON
and press both buttons simultaneously to enter the parallel
running mode. This allows you to control DEVICE 1 and
DEVICE 2 simultaneously.
f Search dial and indicators
The outer ring is for shuttle or variable playback, and the
inner dial is for jog playback.
Turning the dial clockwise plays the tape in the forward
direction (the B indicator lights). Turning the dial
counterclockwise plays the tape in the reverse direction
(the b indicator lights). When the tape stops, the x
indicator lights.
The playback speed range is from –10 to +10 times in
shuttle mode. In shuttle mode, the playback speed range
can be changed using setup item 28 (see page 78) in
variable mode. In shuttle mode, pressing the SHTL button
with the search dial turned fully in the clockwise or
counterclockwise direction accelerates the shuttle
playback speed further.
g SHTL/JOG/VAR (shuttle/jog/variable) buttons
Press the desired button to select the playback mode of the
search dial.
You can play back in the shuttle, jog, or variable mode by
pressing the appropriate button.
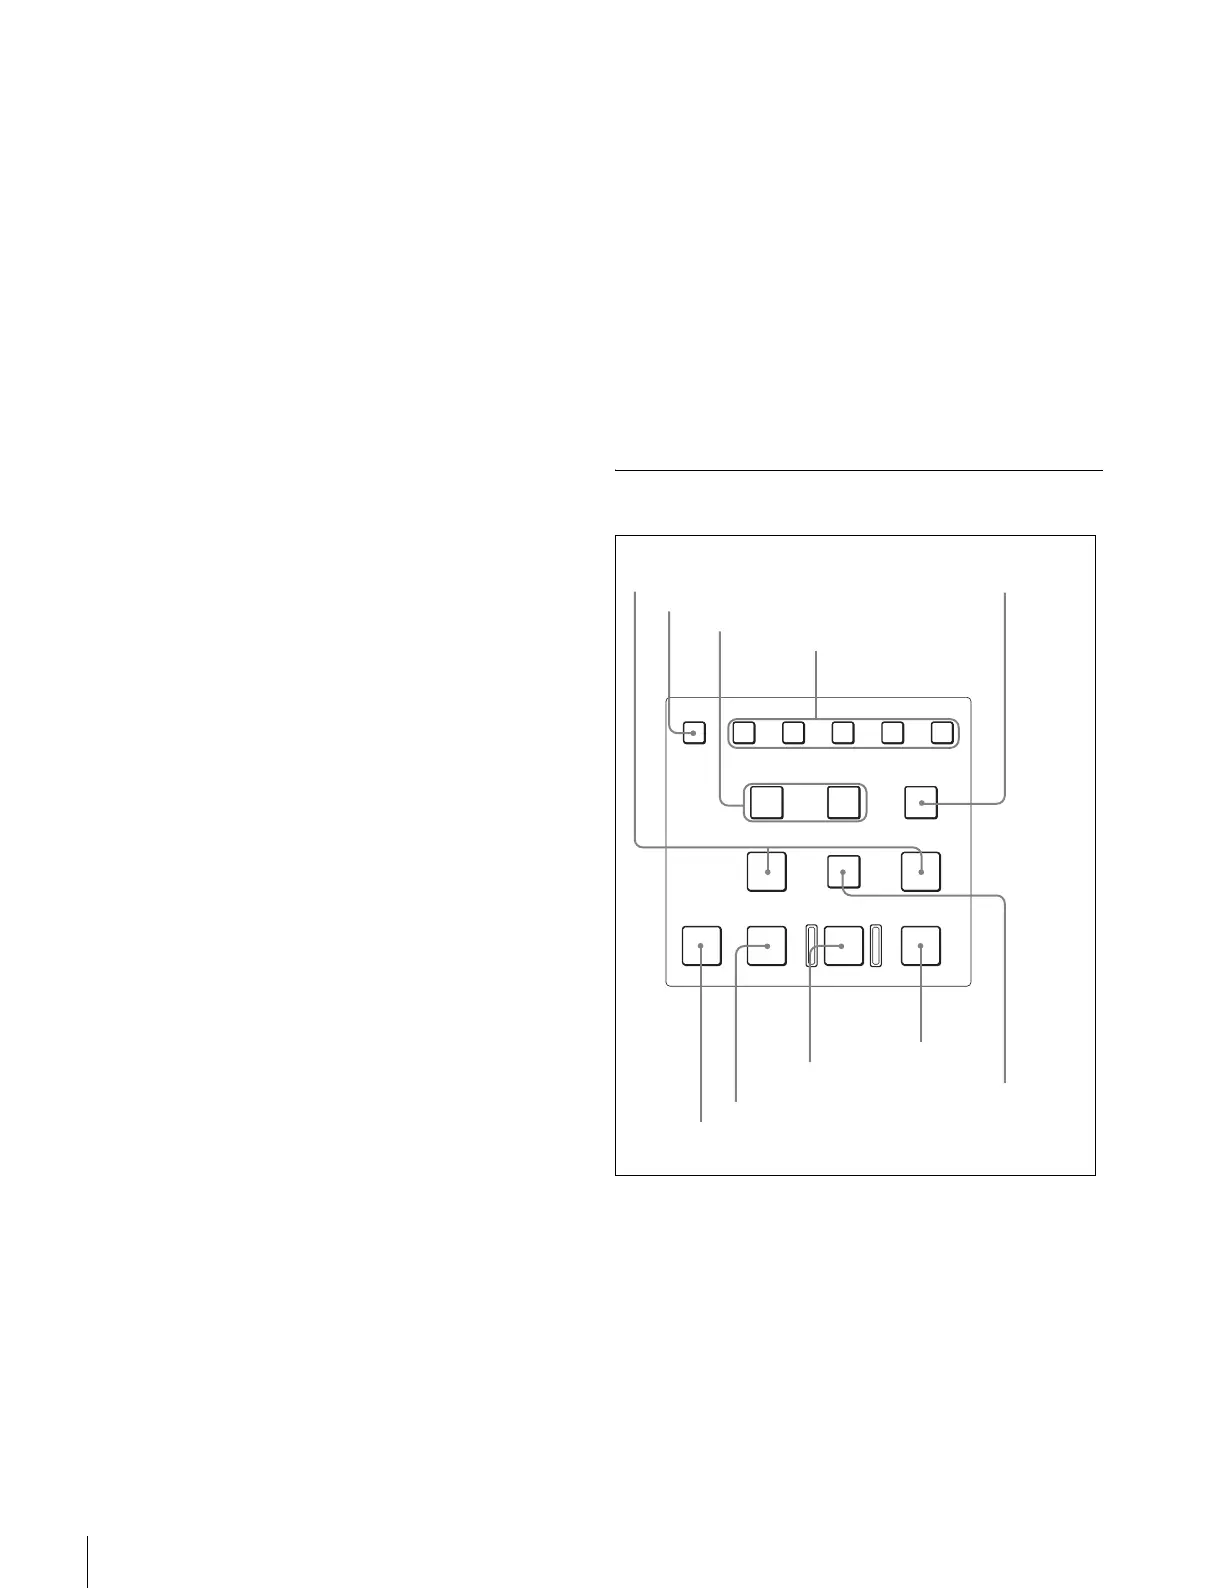
3 Editing Control Area
a IN/OUT buttons
Press either of the buttons simultaneously with the
ENTRY button to enter the IN or OUT point.
Press after setting the IN/OUT points to display the time
data of the IN or OUT point.
In addition, pressing the buttons simultaneously with the
RECORDER (DEVICE 1) / PLAYER (DEVICE 2)
buttons allows configurations when using the ten-key
input function (see page 83).
ASSEMBLE
VIDEO
TRIM
-
TRIM+
GO TO/SPLIT IN
PF7 PF8 PF9
PF4 PF5 PF6
PF1 PF2 PF3
IN ENTRY OUT
REVIEW / JUMP
PREVIEW AUTO EDIT ALL STOP
A1 A2 A3 A4
PF10 PF11 PF12 PF13 PF14
PF15
EDITO
EMOTE
NTR
F
3 TRIM +/TRIM – buttons
4 INSERT buttons
1 IN/OUT buttons
2 ASSEMBLE button
5 GO TO/SPLIT IN
button
7 REVIEW/JUMP button
6 PREVIEW button
8 AUTO EDIT button
9 ALL STOP button
0 ENTRY button