K80v / K120v BOWL CUTTERS
EN-23
Warning! THIS UNIT IS DESIGNED EXCLUSIVELY FOR FOOD PROCESSING; ANY USE OTHER THAN FOOD
PROCESSING IS NOT IN ACCORDANCE WITH THE MACHINE’S INTENDED APPLICATION, IS STRICTLY
PROHIBITED AND SHALL VOID OUR WARRANTY. TALSA ASSUMES NO RESPONSIBILITY FOR ANY DAMAGE
OR INJURY RESULTING FROM IMPROPER USE OF THIS MACHINE.
Important!
It is not recommended to start processing with big frozen meat blocks. Indeed, you could damage the knives’
edges or overcharge the knives shaft bearing. Cut the meat previously to reduce it to a reasonable size.
To avoid damaging the control panel’s plastic surface, use only the pads of your fingertips to press the
buttons; never use your fingernails or any sharp-edged/pointed object.
1. Before first use, clean the cutter carefully as outlined in section 7 (CLEANING).
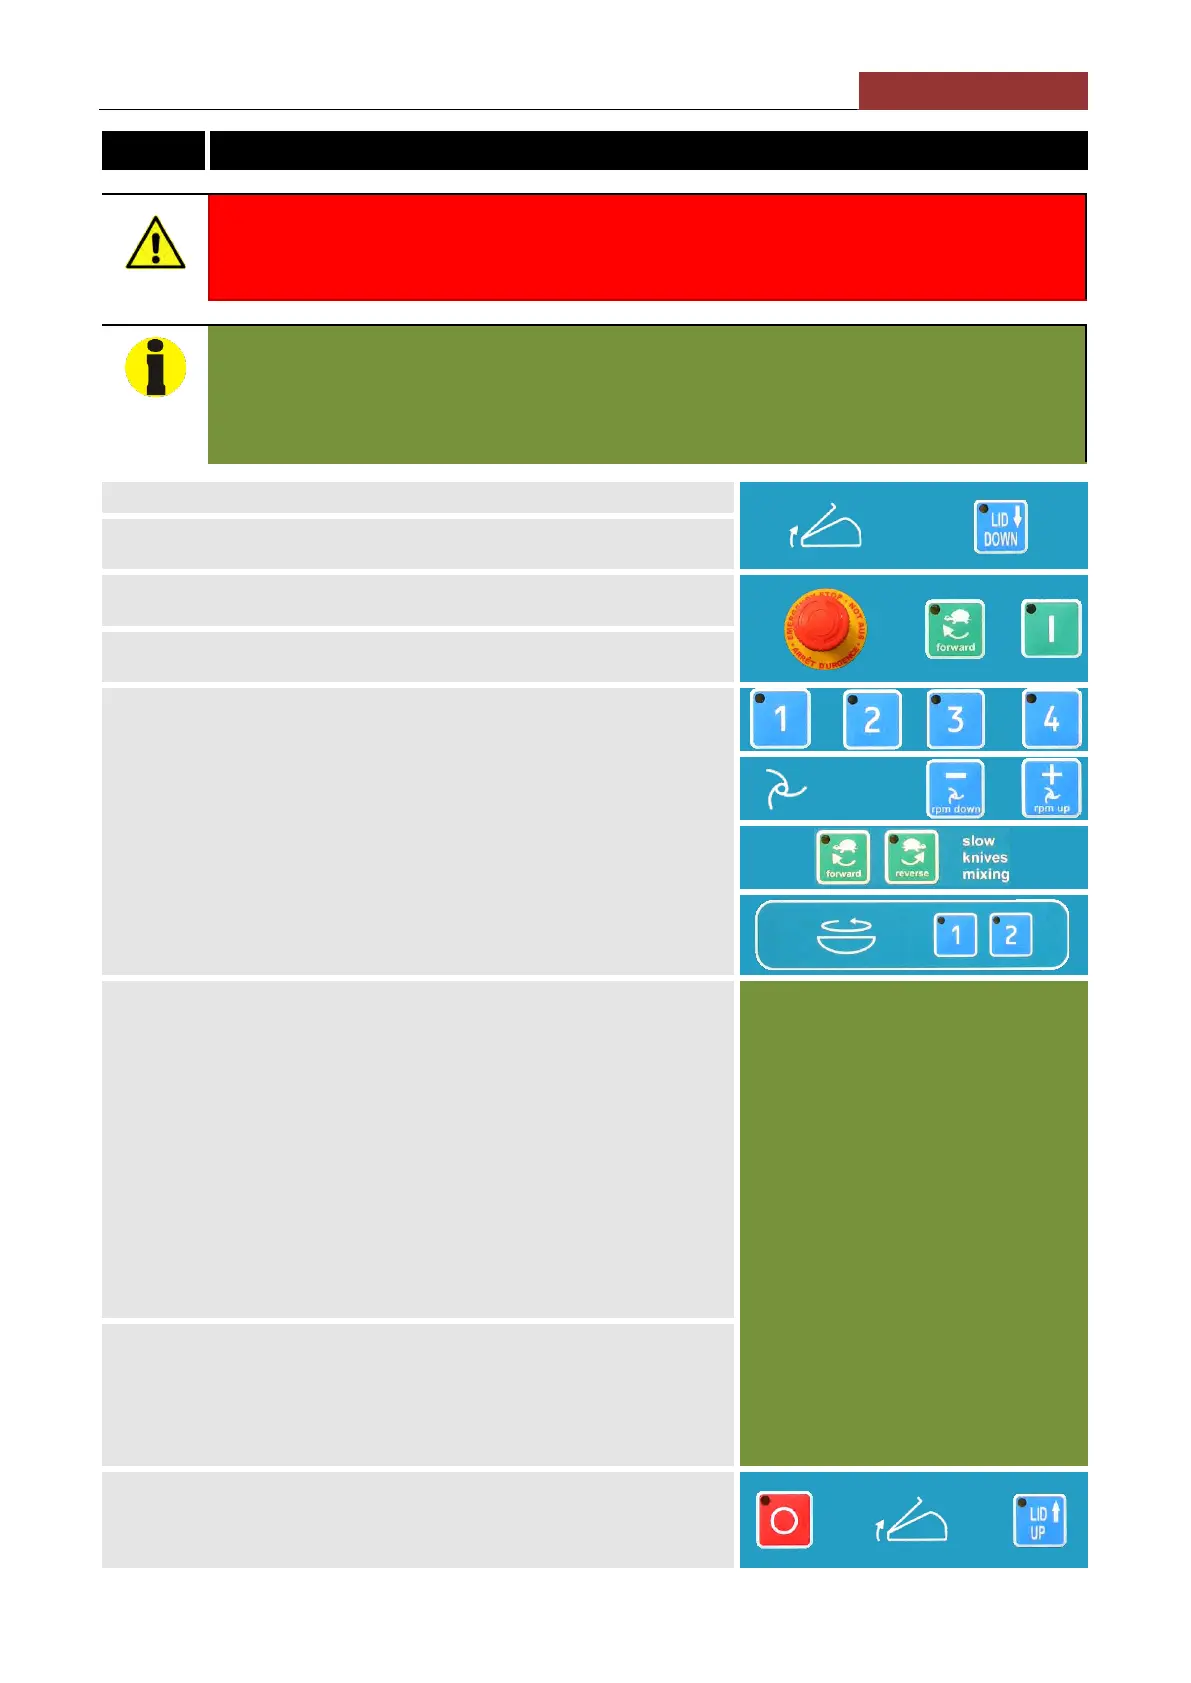
2. Close the steel knives lid by pressing the LID DOWN button and then the plastic
bowl cover, being careful not to crush your hands under either.
3. Disengage the red mushroom-shaped EMERGENCY STOP (No. 1 on the
control panel graphic) by turning it slightly to the right.
4. Select the FORWARD (clockwise) MIXING button (No. 8) on the control panel
and then press the START button. The knives and bowl will begin to turn.
5. Once the machine is running, select the desired knife and bowl speeds.
The knife speed can be set from a low of 100 rpm (intended for mixing) to a
maximum of 4,000 rpm. For convenience, the control panel features four buttons
(No. 4) numbered 1 through 4 with preprogrammed speeds of 1,000 to 4,000
rpm, respectively.
The speed can be easily increased or reduced in 100 rpm increments within this
wide range using the RPM UP and DOWN buttons (No. 5 & 6).
There are 2 buttons (No. 7 & 8) with which you can select the turning direction
of the knives at mixing speed of 100 rpm (see instructions in section 6.1.).
The control panel also permits easy selection of either slow or fast bowl speeds
(No. 9 & 10).
6. Introduce the pre-cut food product into the bowl. When filling the bowl, do not
rest the food container on the bowl’s edge or on the safety guard since this may
cause mechanical damage or result in an accident. DO NOT overfill the bowl; the
mixture should not rise above the bowl’s rim. Be cautious when filling or
emptying the bowl; NEVER put your hands near the knives or reach with
your hand into the bowl.
If necessary, use ice chips to reduce the mixture’s temperature. DO NOT use big
cubes, chunks of ice as these can damage the knives’ edges.
When the anti-noise bowl cover is raised while cutting at high speeds the knife
speed automatically decreases to 1,000 rpm in order to reduce noise levels
which might otherwise be harmful to the user. When the bowl cover is closed,
the machine resumes the user-programmed speed. (IMG. 7)
The knives and bowl turn simultaneously when the machine is powered on; it is
impossible for one to function without the other.
Tips:
The meat should be boned and precut
before being introduced into the bowl
for chopping. Use only prime
ingredients suitable for the intended
application.
Previously cut and reduce big frozen
meat blocks to a reasonable size.
When cutting or chopping, always start
the machine at the lowest knife speed
(1,000 rpm).
When the bowl is heavily loaded, or the
cutting process is just beginning (the
meat pieces are still relatively large, ice
chips have been introduced, etc.), we
recommend a minimum knife speed of
3,000 rpm and the fast bowl speed.
7. Press the red STOP button (No. 13) to halt the machine completely; the knives
and bowl will stop rotating. A safeguard prevents the knife lid from opening until
the bowl and knives have stopped completely. IMPORTANT! The red
mushroom-shaped button should ONLY be used to stop the machine in
emergencies; it should NEVER be used to stop the machine under normal
circumstances.
8. In order to open the knives lid, wait until the bowl and knives have stopped
completely, then maintain pressed the LID UP button, the lid will be lifted
automatically. When finished using the machine, shut it off completely by turning
the main power switch to the OFF position.
 Loading...