Do you have a question about the Wasp 3MT HDP and is the answer not in the manual?
Explains the purpose and importance of the instruction manual for safe and correct operation.
Details how to navigate and understand the manual's structure, index, and figures.
Specifies requirements for keeping the manual accessible and intact for security purposes.
Outlines the process for updating the manual with new or altered parts.
Provides manufacturer contact details and location information.
Explains the printer's identification label and its compliance with directives.
Locates the printer's identification label on its back profile.
States that the printer is tested by the manufacturer during assembly.
Details the warranty period, coverage, and exclusions for the printers.
Mandates the use of specific personal protective devices (PPE) for current operations.
Identifies the intended audience for the manual: users, mechanical, and electrical technicians.
Describes automatic protection systems like door sensors and overheating blocks.
Details residual risks like scalding and precautions to take.
Warns about tension on the control unit and safe maintenance procedures.
Specifies that maintenance must be done by authorized personnel after disconnecting power.
Explains the importance of checking and maintaining safety stickers on the printer.
Defines the professional profiles and responsibilities of operators for the printer.
Explains the meaning of editorial pictograms (DANGER, WARNING, NOTE) used in the manual.
Details the components and indicators of the printer's control panel and material storage.
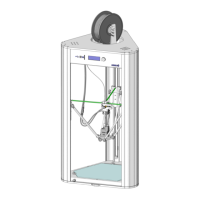
Illustrates and labels the key components within the printer's work area.
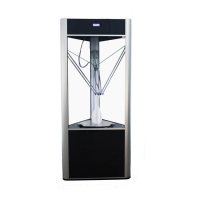
Identifies and labels the external components and connections of the printer.
Describes the extruder assembly, including its components and functions.
Explains the Vacuum Active Control System and its components.
Provides detailed technical specifications for the printer, including dimensions, power, and software.
Specifies the noise level of the printer and customer responsibility for noise risk assessment.
Defines the primary purpose of the printer and materials it supports.
Lists prohibited uses and the consequences of improper operation or maintenance.
Stresses the need for authorized personnel and PPE during transport and handling operations.
Provides guidelines for inspecting the printer upon delivery for damage or tampering.
Lists the items included with the printer shipment.
Details safety precautions and procedures for unpacking, lifting, and handling the printer.
Emphasizes authorized personnel and PPE for installation tasks.
Specifies requirements for the printer's installation location and environment.
Outlines safety precautions and requirements for connecting the printer's power supply.
Details safety and technical requirements for connecting the printer's pneumatic system.
Reinforces the need for authorized personnel and PPE for pre-use operations.
Describes the main interface screen, its elements, and status indicators.
Details the main interface screen, its elements, and status indicators.
Details the commands available in the PRINT menu for launching print jobs.
Explains the functions within the PREPARE menu, including Free Zeta and motor disabling.
Covers advanced tools and settings, including Delta, Extruder, and Motion configurations.
Guides the user through connecting the machine to a Wi-Fi network.
Explains how to select and launch GCODE files for printing from USB or internal drive.
Describes the interface displayed during printing, with controls for tuning and status monitoring.
Details the TUNE menu for adjusting parameters like feedrate, flow, and fan speed during printing.
Explains the function of the digit window for entering numeric values.
Reiterates safety precautions for first-time use, emphasizing PPE and authorized personnel.
Provides guidelines for preparing 3D models for optimal slicing and printing.
Explains the role of slicing software and the process of creating .gcode files.
Details procedures for Z Max calibration and manual leveling for print adhesion.
Guides the user through loading thermoplastic pellets into the printer's tank.
Explains how to correctly place the printing plate on the vacuum bed.
Describes how to select GCODE files for printing from USB or internal storage.
Details the process for deactivating the vacuum and removing the printing plate.
Instructs on safely detaching printed parts from the plate.
Reiterates safety precautions for maintenance, emphasizing authorized personnel and PPE.
Outlines the schedule and procedures for routine maintenance tasks.
Provides instructions for cleaning or replacing the pellet filter on the extruder.
Covers cleaning and integrity checks for the VACS components.
Provides instructions and safety warnings for changing the printer's nozzle.
Emphasizes that extraordinary maintenance must be performed by manufacturer-authorized personnel.
Details the procedure for purging the extruder to clear blockages or residue.
Provides step-by-step instructions for safely removing and replacing the extruder.
Guides the user through the manual bed leveling process for optimal first-layer adhesion.
Explains the importance of first-layer adhesion and factors influencing it.
Describes the command for purging the extruder and cleaning debris.
Explains how to delete GCODE files from the printer's memory.
Details the Free Zeta system command for resuming interrupted prints from a specific height.
Illustrates the interface for the Free Zeta System command.
Explains the two methods for loading GCODE files: USB and Wi-Fi.
Guides the user on how to load GCODE files using a USB pendrive.
Describes the process of uploading GCODE files to the printer via Wi-Fi.
Visually demonstrates loading GCODE from USB and via the printer server.
Provides step-by-step instructions for loading and unloading printing material (pellets).
Continues the material loading/unloading procedure with visual aids.
Explains how to manually control the printer's motors (X, Y, Z, E) for movement and extrusion.
Illustrates the interface for the manual control command of the printer axes.
Covers network connectivity options, including Wi-Fi and wired connections.
Details the steps required to connect the printer to a Wi-Fi network.
Explains how to establish a wired network connection using a static IP.
Guides on accessing and using the printer's web server interface for control.
Lists the various functions available through the printer server interface.
Describes the Resurrection system for recovering interrupted print jobs.
Explains how to set the Z max value, crucial for print bed adhesion and calibration.
Illustrates the interface for setting the Z Max value.
Details the temperature controls for the nozzle, barrel, and firecap for optimal printing.
Displays the interface for managing printer temperatures.
Explains the characteristics and usage of the Vacuum Active Control System.
Continues the VACS explanation with visual aids for gasket and plate placement.
Reiterates safety precautions for additional instructions, emphasizing authorized personnel and PPE.
Provides guidance on safe disposal and dismantling procedures according to regulations.
Offers instructions for handling emergency situations like fires, specifying extinguisher types.
| Filament Diameter | 1.75 mm |
|---|---|
| Print Speed | Up to 150 mm/s |
| Frame Material | Aluminum |
| Heated Bed | Yes |
| Bed Temperature | Up to 120°C |
| Nozzle Diameter | 0.4 mm |
| Material Compatibility | PLA, ABS, PETG, TPU, Nylon, Carbon Fiber, Wood |
| Connectivity | USB, SD Card |
| Software | Simplify3D, Cura |
| Print Technology | Fused Deposition Modeling (FDM) |