42 03/2016 – UM-MT-EN-01
Prepare a Stable Surface
Before the device is installed, the surface must be prepared. The total weight
of the device (with all the accessories and options) is to be considered.
► Prepare a stable and sturdy surface.
► Only install the device on a level, stable, and sufficiently sturdy surface.
If necessary, install an additional base plate/floorboard.
The following further instructions for installation are to be observed:
When installed on upper floors, the device must be placed as far as possible in a
corner of the room so that sufficient stability is guaranteed. The structure of the
building must be checked in advance.
The treadmill should not be installed close to a radiator or other heat source.
Due to the moving parts on the underside, the device must not be placed directly on
thick or high-pile carpeting. In this case, a mat should be placed under the device.
This will prevent lint from entering into the treadmill and at the same time reduce
carpet wear. WOODWAY has appropriate mats available. For more information, call
WOODWAY Customer Service.
With larger devices, particular attention must be paid to the ceiling/floor load capaci-
ty at the installation site. This must be higher than the total weight (weight of the
device plus the dynamic weight of a running person) and approved by an authorized
authority with the treadmill representative.
Position the treadmill to ensure that the power cord can easily be accessed and dis-
connected when needed.
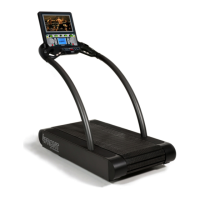
When using the treadmill, especially fast movements (fast running, etc.) increase the
risk of falling. For this reason, a safe fall area of at least 3 ft. x 6.5 ft. (1 x 2 m) must be
maintained behind the treadmill (see Fig. 13 below).
No obstacles may be located in this safe fall area. Objects (e.g. furniture, plants, training
materials, ladders, etc.) may not be placed in this area, and sloping ceilings may not ex-
tend into the safety area. WOODWAY treadmills have a reverse option. The safety area
must therefore also be provided in front of the treadmill.
Fig
.
13
Set-up, clearances