3.5 Control Circuit Wiring
96 YASKAWA SIEPC71061737B GA800 Drive Technical Reference
Table 3.10 Power Supply and Alarm Display
Main Circuit Power Supply External 24 V Power Supply
o2-23
[External 24V Powerloss
Detection]
o2-26
[Alarm Display at Ext. 24V
Power]
Alarm Display
ON ON - -
-
ON OFF 0 [Disabled] -
-
1 [Enabled] - L24v [Loss of External Power 24
Supply]
OFF ON - 0 [Disabled] “Ready” LED light flashes quickly
- 1 [Enabled] EP24v [External Power 24V
Supply]
■ Serial Communication Terminals
Refer to Table 3.11 for a list of serial communication terminals and functions.
Table 3.11 Serial Communication Terminals
Type Terminal Terminal Name Function (Signal Level)
Modbus Communication
D+
Communication
input/output (+)
MEMOBUS/Modbus communications
Use an RS-485 cable to connect the drive.
Note:
Set DIP switch S2 to ON to enable the
termination resistor in the last drive in a
MEMOBUS/Modbus network.
• RS-485
• MEMOBUS/Modbus communication protocol
• Maximum 115.2 kbps
D-
Communication
output (-)
AC Signal ground
0 V
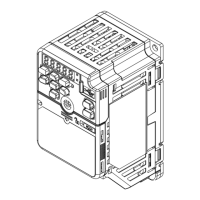
◆ Control Circuit Terminal Configuration
The control circuit terminals are in the positions shown in Figure 3.36.
A - Terminal block (TB5)
B - Terminal block (TB2-3)
C - Terminal block (TB2-2)
D - Terminal block (TB2-1)
E - Terminal block (TB1)
F - Terminal block (TB3)
G - Terminal block (TB4)
Figure 3.36 Control Circuit Terminal Arrangement
The tightening torque for the terminal screws is shown on the reverse side or the lower front side of the front cover.
 Loading...