Installing the Chassis
7705 SAR-M Chassis Installation Guide 87
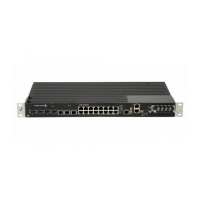
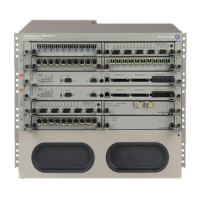
Figure 18: Installing the 7705 SAR-M Chassis in a Rack
Before you begin, verify that:
• the equipment rack is securely installed, anchored, and grounded. Refer to the rack
manufacturer’s documentation for instructions.
• nearby equipment, including breaker panel bus bars and power connectors, is made
safe. Either shut off the power, if possible, or install safety guards or mats over
exposed power points and cables.
Required tools:
• a screwdriver appropriate for the rack-mount screws
For ETSI rack installations, replace the 19-inch rack-mount brackets with the ETSI
rack-mount brackets before installing the chassis. See Installing ETSI Rack-Mount Brackets.
1
21105
T1/E1 Por ts
7
Stat
11
Stat
1
Stat
2
3
Stat
5
Stat
9
Stat
13
Stat
15
Stat
16
2
4
3
+BattA -BattA +BattB -BattB
Mgmt
To D
Lnk Act
Crit.
Maj.
Min.
Stat
ACO/
LT
Sync
In
Sync
Out
Console
Link
Act
7
Link
Act
6
Link
Act
5
4321
Link
Act
Link
Act
Link
Act
Link
Act
BAT A
BAT B
External Alarms
Max, 50 mA
-48/+24 VDC
7705 SAR-M
Table 14: Rack-Mounting Components
Key Description
1Equipment rack
2 Rack-mounting screws
3 7705 SAR-M chassis
4 Rack-mounting bracket