PAGE 18
Section 5 - OperationSection 5 - Operation
Section 5 - OperationSection 5 - Operation
Section 5 - Operation
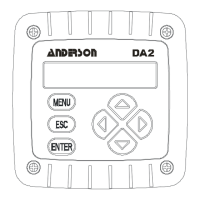
The user interface consists of a two-line LCD display and a keypad with MENU, ENTER, ESC,
ÕÕ
ÕÕ
Õ,
ÖÖ
ÖÖ
Ö,
××
××
×, and
ØØ
ØØ
Ø keys.
5.1 Display5.1 Display
5.1 Display5.1 Display
5.1 Display
By using the keypad, you can display three types of screens:
1. Measure Screens: The normal display mode shows the measured value (conductivity,
% concentration or TDS). Pressing the
ÖÖ
ÖÖ
Ö key sequentially scrolls through these other
measurement readouts:
• Measured process temperature
• Measured value and temperature
• Measured analog output mA value
• Uncompensated conductivity corresponding to % concentration readout (only
shown when transmitter is set to measure concentration)
2. MENU Screens: These top-level and lower-level (submenu) screens within the three
main branches of the menu tree are used to access edit/selection screens for configu-
ration. (EXIT screens at the end of each menu branch enable you to move up one level
in the menu tree by pressing the ENTER key. This is functionally the same as pressing
the ESC key.)
3. Edit/Selection Screens: These screens enter values / choices to calibrate, configure,
and test the transmitter.
5.2 K5.2 K
5.2 K5.2 K
5.2 K
eypadeypad
eypadeypad
eypad
The keypad enables you to move throughout the transmitter menu tree. The keys and their
related functions are:
1. MENU key: Pressing this key with the MEASURE screen displayed shows the “MAIN
MENU CALIBRATE” screen. To display the configure or test/maint top-level main
branch screen, press the
ØØ
ØØ
Ø key. Pressing the MENU key with a menu screen dis-
played always shows the top-level screen in that branch. (Pressing the MENU key also
“aborts” the procedure to change values or selections.)
2. ENTER key: Pressing this key does two things; it displays submenu and edit/selection
screens, and it enters (saves) configuration values/selections.
3. ESC key: Pressing this key always takes the display up one level in the menu tree.
(Example: With any “MAIN MENU” screen displayed, pressing the ESC key once takes
the display up one level to the measure screen.) The ESC key can also “abort” the
procedure to change a value or selection.
4.
ÕÕ
ÕÕ
Õ and
ÖÖ
ÖÖ
Ö keys: Depending on the type of displayed screen, these keys do the
following:
• MEASURE Screen: Changes readout (in continuous loop sequence) to show
different measurements.
• Menu Screens: These keys are non-functional.
• Edit/Selection Screens: Moves cursor left or right to select digit for adjustment with
××
××
× and
ØØ
ØØ
Ø keys.
5.
××
××
× and
ØØ
ØØ
Ø keys: Depending on the type of displayed screen, these keys do the
following: