26 LCX 890 Installation Guide
6. Tighten both screws to hold the wire there.
7. Slip the ground wire through the hole under the screw labeled
–IN and jumper it to the screw labeled –OUT.
8. Tighten both screws to hold the wire there.
9. Slip the shield in under the middle screw labeled SHLD and tighten
the screw to hold it there.
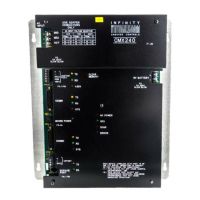
Locating the Inputs on an LCX 890
Find the inputs on the LCX 890 as follows:
1. Open the LCX 890 cabinet door.
Figure 8 shows the locations of the terminals for inputs, outputs, and
momentary switches on the LCX 890.
2. Notice the location of the first 16 inputs along the lower left
quadrant of the upper part of the controller. They are labeled inputs
1 through 16 on the printed circuit board. You must always wire a
switch to any of these inputs.
3. The next eight inputs are along the left side in the vertical center of
the lower part of the controller. They are labeled inputs 17 through
24 on the cover plate. You can wire a thermistor, voltage, or current
input to any of these inputs.
 Loading...