Manual, F/T Sensor, Ethernet Axia
Document #9610-05-Ethernet Axia-09
Pinnacle Park • 1031 Goodworth Drive • Apex, NC 27539 • Tel:+1 919.772.0115 • Fax:+1 919.772.8259 • www.ati-ia.com
20
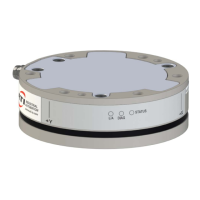
3.3 Installing the Sensor to the Robot
Parts required: Refer to Figure 3.5 and Section 16—Drawings.
Tools required: 4mmhexkeyor4mmlowprolehexkey(partofATIKitP/N9105-IP-2126)
Supplies required: Clean rag, Loctite
®
242(ifapplicable,refertostep3)
1. Clean the mounting surfaces.
2. Attach the mounting interface plate to the robot arm with the mounting fasteners.
NOTICE: When mounting the sensor to the mounting interface plate, mounting the customer
tooling or interface plate to the sensor, consider the following points:
• Screws must have a minimum thread engagement length of 4.5 mm and a maximum
thread engagement less than the threaded depth that is listed in the customer drawing
Section 16—Drawings.
• Unlessotherwisespecied,applyLoctite242tothe(6)M5socketheadcapscrews(class
12.9)sothatthefastenerssecurethesensortothemountingplate.
3. Attach the sensor to the mounting interface plate:
a. Using a 4 mm hex key, secure the sensor to the mounting interface plate with (6) M5 socket head
cap screws (class 12.9). Tighten the fasteners per the specications in the following table.
Table 3.2—Torque Values for Axia Models
Model Torque
Axia80-M8
52in-lbs(5.88Nm)
Axia80-M20
Axia80-M50 75in-lbs(8.47Nm)
4. Once the sensor is installed on the robot, the customer tooling or tool interface plate can be installed.
NOTICE: The tool must not touch any other part of the sensor except the tool side; otherwise,
the sensor will not properly detect loads.
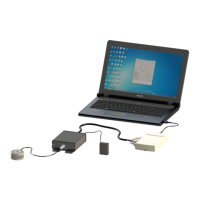
5. Connect the cables to the sensor and customer application:
a. Connect a power and Ethernet cable (ATI P/N 9105-C-ZC22-ZC28-X) to the sensor’s M8
connector. Tighten to 4.43 in-lbs (0.5 Nm).
b. Connect the branched cable (ATI P/N 9105-C-ZC28-U-RJ45S-X) to the cable from step a. Tighten
to 7.08 in-lbs (0.8 Nm).
c. Connect the RJ45 and power connections to the customer application.
NOTICE: For the LED outputs that occur whenever power is applied to the sensor, refer to
Section 4.2.1—Self-Test LED Sequence.
 Loading...