F/T DAQ Installation and Operation Manual
Document #9610-05-1017-06
ATI Industrial Automation, 1031 Goodworth Drive, Apex, NC 27539 USA +1-919-772-0115 www.ati-ia.com
15
1.4.3 Connecting to the Data Acquisition Hardware
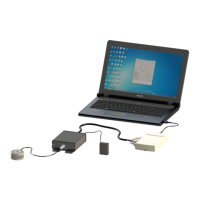
If you are using a NI PCMCIA (a small PC card for laptop computers), you will need to attach
the short adaptor cable to the card. The other end of the adaptor cable connects to the F/T
Power Supply cable.
Connect the 26-pin D-subminiature connector side of the Power Supply cable to the Power
Supply or Interface Power Supply box. Tighten the jackscrews on the connector to insure a
good electrical connection.
Connect the 68-pin connector side of the Power Supply cable to the NI data acquisition
hardware. Tighten the jackscrews on the connector to insure a good electrical connection.
Please note that the PCMCIA adaptor does not use the jackscrews. In this case you must
insure the connectors do not get pulled apart.
Aside:
If you are not using a National Instruments E-Series DAQ board, you will have to
provide your own connector at that end of the cable.
1.4.4 Testing with the ATI DAQ Demo on a Windows
Computer
Install the F/T software by inserting the CD in your computer. The installation program should
start automatically. If it does not start automatically, you will need to run SETUP.EXE found
in the root directory of the CD. Follow the installation instructions given by the program.
View the README.TXT file found in the root directory of the CD.
Copy your transducer’s calibration file from the CD directory \Calibration to the program
directory ATI DAQ FT . The calibration file name is based on the transducers serial number
and is in the format of FTxxxx.CAL.
Run the demo program found in the Start Menu under Programs\ATI DAQ FT\ATI DAQ FT
Demo. In the program you must load the calibration data. Do this by clicking on the menu
File, then Open Calibration. Find the calibration data file you saved earlier and click the Open
button. At this point the program should be displaying two sets of bar graphs; one labeled
Force and the other labeled Torque.
Gently apply load to the transducer without over-ranging the transducer. You should see the
bar graphs respond.
Aside:
The ATI DAQ demo only works in conjunction with National Instruments DAQ
boards.