C
Curtis MurphySep 23, 2025
What is Hysteresis in ATI Technologies Axia80-M20?
- JJose WallaceSep 23, 2025
Hysteresis is caused by mechanical coupling (explained in Drift section) or internal failure.
What is Hysteresis in ATI Technologies Axia80-M20?
Hysteresis is caused by mechanical coupling (explained in Drift section) or internal failure.
What to do if ATI Technologies Axia80-M20 sensor is not streaming measurement data?
Verify the ATI Technologies Accessories sensor is correctly installed. Ensure the robot mounting and tool adapter plates are installed on the proper side of the sensor.
What causes hysteresis in ATI Technologies Axia80-M20 Accessories?
Hysteresis in ATI Technologies Accessories is caused by mechanical coupling or internal failure.
What to do if DHCP is not assigning an IP address for ATI Technologies Accessories?
If DHCP isn't assigning an IP address, it may be due to several reasons: * Ensure the Ethernet LAN is connected during power up. * Verify DHCP is selected as the IP Address Mode on the Communications page. * The DHCP server might be taking too long to respond (over 30 seconds). Remember to power cycle the ATI Technologies Axia sensor after changing any IP Address settings.
How to fix excessive IO exception receive timed out errors with ATI Technologies Axia80-M20?
If you're encountering excessive IO exception errors related to receive timeouts, it indicates an interruption in the Ethernet connection. To resolve this, check the Ethernet cabling and the power supply to the ATI Technologies Axia sensor.
What does HTTP 1.0 401 Error mean on ATI Technologies Axia80-M20 Accessories?
The user tried to access one of the protected pages of the web server. These pages are reserved for ATI Industrial Automation maintenance.
What does it mean if status LED is red then green on ATI Technologies Accessories?
The status LED behavior, being red for the first 20 seconds after power up and then turning green, indicates normal operation.
Why is the sensor not streaming measurement data to customer devices for ATI Technologies Axia80-M20 Accessories?
If the sensor isn't streaming measurement data to customer devices, verify it's correctly installed. Also, ensure the robot mounting and tool adapter plates are installed on the proper side of the sensor.
What to do if demo displays zeros for force and torque values for ATI Technologies Axia80-M20?
If the demo is displaying zeros for force and torque values and question marks for configuration data, check the IP address and restart the demo.
How to reduce electrical noise effects on the ATI Technologies Accessories sensor?
To minimize the impact of electrical noise on the ATI Technologies sensor: * Check the sensor’s ground connections, especially if there's interference from motors or other noise-generating equipment. * Consider using the sensor’s digital low-pass filters if sufficient grounding isn't feasible or doesn't reduce noise. * Verify the power supply is Class 1, featuring an earth ground connection.
Defines DANGER, WARNING, CAUTION, and NOTICE notifications used in the manual.
Advises verifying sensor rating for expected loads and awareness of dynamic forces.
Warns against modification, probing openings, overloading, and contacting IP64 seals.
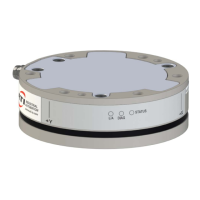
Discusses sensor mounting, tool side attachment, and considerations for interface plates.
Provides guidance on routing the sensor cable, bending radius, and cable management techniques.
Details the process of attaching the sensor to the robot arm and mounting interface plate, including torque values.
Explains the pin assignments for the sensor's M8 and M12 connectors and associated cables.
Outlines the steps for performing an initial and annual accuracy check of the sensor.
Advises on protecting the sensor from moisture, water, and electromagnetic fields to maintain IP64 rating.
Details how to convert raw sensor counts into force and torque values using calibration factors.
Explains the low-pass filter settings, cutoff frequencies, and provides attenuation charts.
Explains how to measure forces and torques at a reference point other than the sensor's origin.
Details the sensor's status code bitmap, describing various error conditions and their meanings.
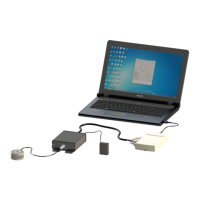
Explains methods for setting up IP addresses, including static and DHCP configurations.
Provides step-by-step instructions for connecting to the sensor's web pages using Windows networking settings.
Provides access to sensor serial number, calibration details, force/torque units, and tool transformation settings.
Allows viewing and editing the system's Ethernet networking options, including IP settings and RDT.
Stresses the need for periodic calibration to maintain traceability and recommends annual accuracy checks.
Lists symptoms related to powering up issues and their potential causes and resolutions.
Addresses common communication problems, such as IP address assignment and network detection.
Identifies common causes for incorrect force/torque readings, including data streaming, range errors, and noise.
Offers tips to optimize network performance and prevent data loss, such as direct connections and OS optimization.
| Brand | ATI Technologies |
|---|---|
| Model | Axia80-M20 |
| Category | Accessories |
| Language | English |