EasyManuals Logo

Automation Direct C-more EA1-T4CL User Manual

Automation Direct C-more EA1-T4CL
181 pages
To Next Page IconTo Next Page
To Previous Page IconTo Previous Page
Page #141 background imageLoading...
Page #141 background image
EA1-TCL-M Hardware User Manual, 2nd Ed., 10/10
9–3
Chapter 9: Replacement Parts
9
®
Customizing the Function Keys Insert Label
4.803
[122.0]
0.563
[14.3]
Units: inches [mm]
0.282
[7.15]
0.709
[18.0]
Typical
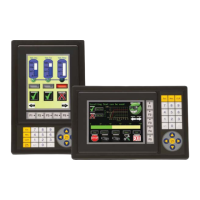
Step 1 - Remove existing
function key label insert
using a small tool such as
jeweler’s screw driver.
Step 2 - Remove the
protective film from the
blank key label insert.
Step 3 - If desired, print and
apply self-adhesive labels to
the blank insert.
Step 4 - Install the new insert
into the slot in the side of the
panel and lock tab into place.
4.20
[106.7]
0.508
[12.9]
Units: inches [mm]
0.650
[16.5]
EA-MG6-S6ML-FKL
EA-MG4-FKL

Table of Contents

Questions and Answers:

Question and Answer IconNeed help?

Do you have a question about the Automation Direct C-more EA1-T4CL and is the answer not in the manual?

Automation Direct C-more EA1-T4CL Specifications

General IconGeneral
BrandAutomation Direct
ModelC-more EA1-T4CL
CategoryControl Panel
LanguageEnglish