Biotage
®
Selekt User Manual | © Biotage 2020
Maintenance
Clean or Release Check Valves
Clean the Pump Check Valves
If the last purification of the day is performed with a
halogenated solvent (e.g. DCM), we recommend that you assign
methanol or a similar solvent to the inlet line used with the
halogenated solvent (see page 7) and flush the system with
at least 30 mL (see page 23) to rinse the halogenated solvent
from the check valves.
Release Stuck Check Valves
Low or inconsistent flow delivery volume and/or superimposed
periodic UV or UV-VIS signals can be signs of stuck check valves.
Warning
»
When releasing a stuck check valve, there is a risk of a small
amount of solvent splashing out.
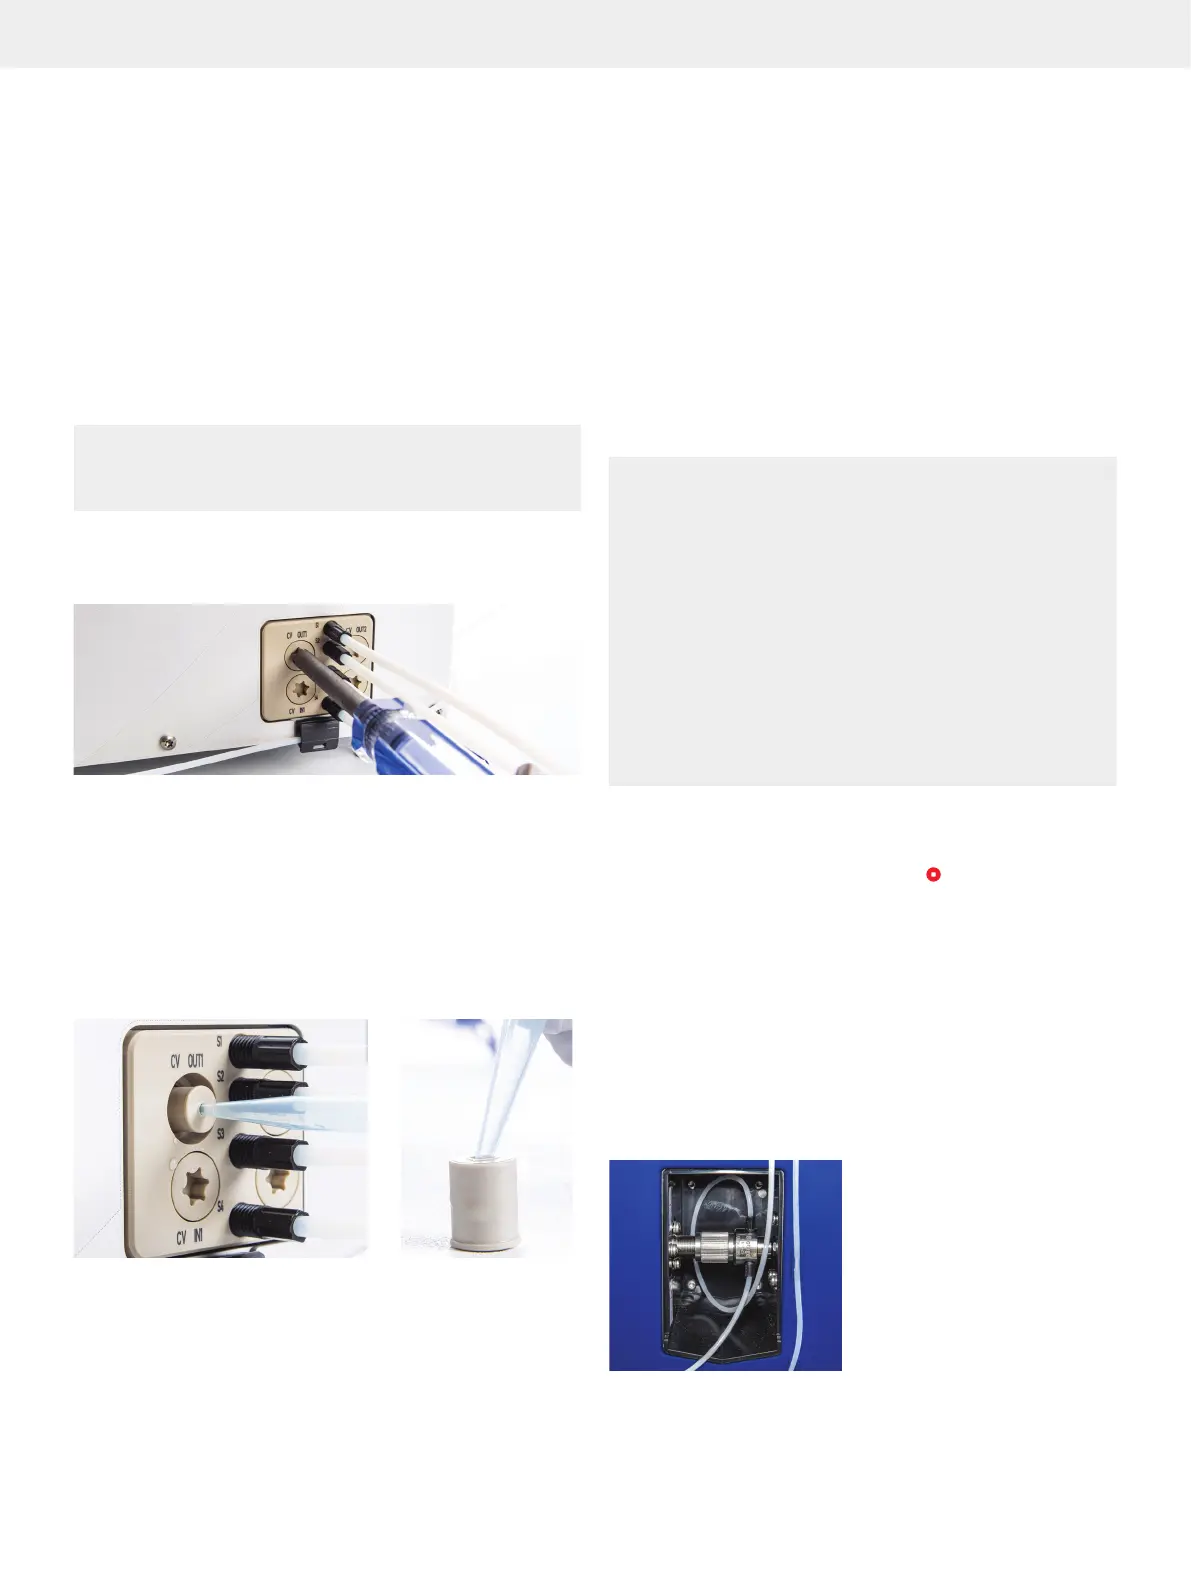
1. Release the pressure by slowly unscrewing the check
valve cap from one of the CV OUT valves using the Torx 50
screwdriver supplied with the system; see Figure 56.
Figure 56. Removing the check valve cap from one of the CV OUT valves.
2. Remove the check valve by pushing an unused pipette tip
or similar into the check valve and then pulling it out; see
Figure 57A.
3. Push on the ball inside the check valve using an unused
pipette tip or similar; see Figure 57B. Ensure that the
ball moves freely. Otherwise, replace the check valve
(P/N 415115SP).
4. Repeat the procedure for the other three check valves.
Figure 57
AA BB
. Release stuck check valves.
Manually Change Between Normal and Reversed Phase
To avoid issues during a solvent change, it is necessary to
perform the change throughout the entire chromatographic
system (i.e. in the reservoir, pump, tubing, and detector).
The procedure is to flush the system (see page 23), with a
series of mutually miscible solvents until a gradual change to the
new solvent is accomplished. If this procedure is not followed,
precipitation may occur not only in the flow cell of the internal
detector but also in other parts of the system. For example,
to change from organic solvents to aqueous solutions, it is
necessary to flush the whole system with acetone or an alcohol.
Leaks
Warning
»
Always handle leakage immediately.
»
Follow all generally-accepted lab safety procedures and
applicable laws and regulations.
»
Always follow local and national safety regulations and the
solvent manufacturer’s safety, handling, storage, and disposal
recommendations; refer to the safety data sheets (SDS).
»
Electrical equipment can introduce ignition hazards. Ensure that
all solvent manufacturers’ recommendations are followed with
respect to handling, ventilation, and operating environment.
»
Personnel working with or near the system must wear protective
clothing, safety gear, and eye protection in accordance with
applicable local and national safety regulations.
»
Shut down the system before replacing any tubing. Use only
tubing designed for the Selekt system and supplied by Biotage.
Shut Down the System at Leakage
If a leakage is observed, shut down the system as follows:
1. If a purification is in progress, press
and then Abort.
2. If a prime or flush is in progress (started by the user),
press Stop.
3. Press Menu, Shut Down, and then Yes to confirm.
4. When the message saying it is safe to turn off the system
appears on the touch screen, turn off the system. The power
switch is located on the left side of the system.
External Leakage
External leakage may occur due to e.g. loose fittings or
damaged tubing. Any leakage in the flow cell of the internal
detector is drained via the drip sheet; see Figure 58.
Figure 58. Drainage of leakage from the flow cell of the internal detector.