Maintenance
All external tubing on the system except for the tubing on the
collection arm can be replaced by the user; a list of spare parts
is available at www.biotage.com.
Note: All tube types, dimensions, and lengths are essential
for the performance of the system. Only replace tubes with the
equivalent tubes designed for the Selekt system and supplied
by Biotage.
If an external leakage is observed:
1. Shut down the system as described above.
2. Disconnect the power cord from the power outlet.
3. Remove the spillage using the appropriate safety
precautions. In the event of leakage from a column, allow
all solvent vapor to dissipate before removing the column.
Do not wipe away any excess solvent from the column
surface as this can generate additional static charge.
4. If using the optional instrument tray, ensure that the tray
and the solvent detector (including the space underneath
the detector) are cleaned and wiped dry. To remove the
solvent detector, unsnap the detector cable from the two
tube clips, open the hatch holding the solvent detector in
position, and pull the detector sideways (see Figure 59).
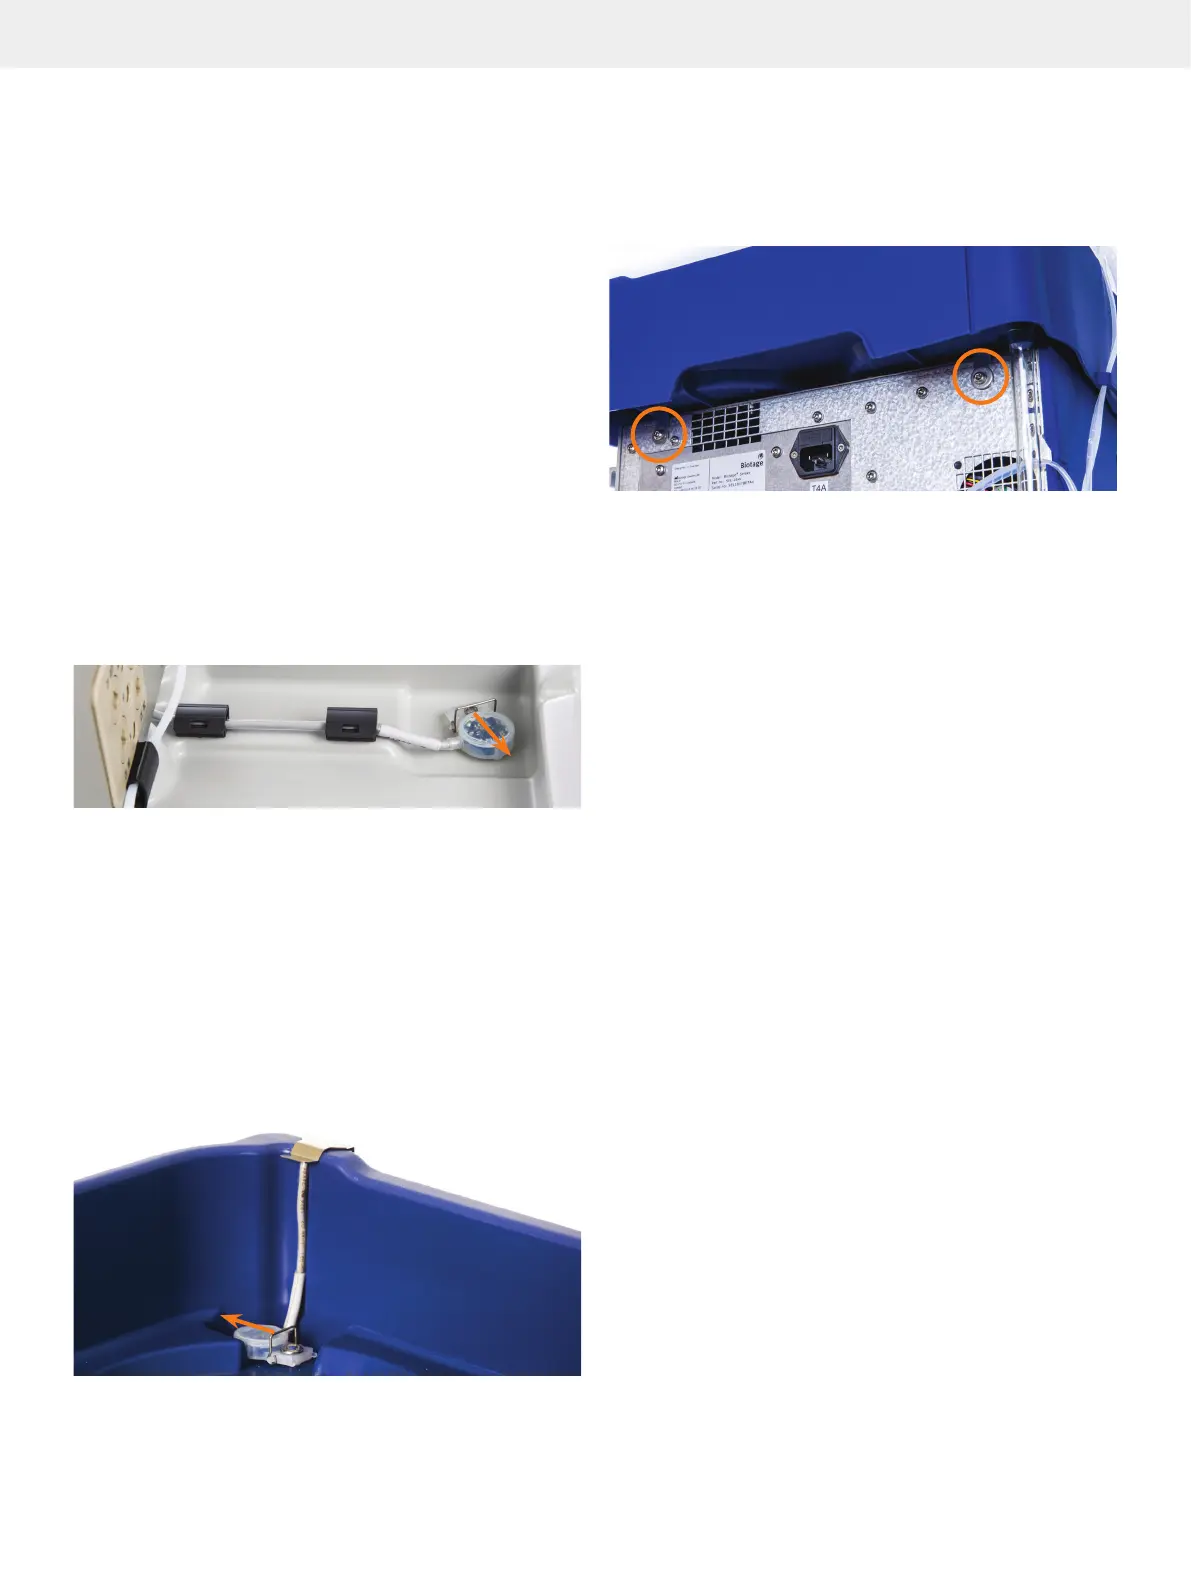
Figure 59
BB
AA
AA
. Instrument tray with a solvent detector. A = tube clips holding
the detector cable and B = the solvent detector hatch open.
5. If using the optional secondary solvent containment:
a. Ensure that the secondary solvent containment and
solvent detector (including the space underneath the
detector) are cleaned and wiped dry. To remove the
solvent detector, remove the cable locking plate, open the
hatch holding the solvent detector in position, and pull
the detector sideways (see Figure 60). If you are using the
solvent containment on the top of the system and need
to remove it to clean it, unscrew (Torx 20) and remove
(slide out) the two brackets at the rear of the system (see
Figure 61). Reassemble by reversing the procedure.
Figure 60
BB
AA
. Secondary solvent containment with a solvent detector.
A = cable locking plate and B = the solvent detector hatch open.
b. If using the secondary solvent containment on the top
of the system, ensure that the drain tube is not damaged
and is properly connected to the drain port at the rear;
see A in Figure 61. The other end shall be inserted into
a waste reservoir.
Figure 61
AA
. The two screws holding the brackets for the optional secondary
solvent containment (circled) and the drain port (A).
6. Check all external tubes and connections for leaks. Use
caution when finger tightening fittings to prevent stripped
threads or crushed ferrules. Replace damaged tubing.
7. Once you have located and resolved the leakage, reconnect
the system to power and turn on the system.
8. Check all tubes and connections for leaks using the flush
function; see page 23. Flush with water or another
suitable solvent.
9. If the problem persists:
a. End the flush by pressing Stop.
b. Shut down the system and disconnect the power cord
from the power outlet.
c. Contact Biotage 1-Point Support.
Internal Leakage
Internal leakage, due to e.g. worn pump seals or tube fittings,
is drained through drain ports underneath the system.
If an internal leakage is observed:
1. Shut down the system as described in “Shut Down the
System at Leakage” on page 32.
2. Disconnect the power cord from the power outlet.
3. Ensure that the leakage is not external; see “External
Leakage” on page 32.
4. Contact Biotage 1-Point Support.