156
Creating Original Arrangements
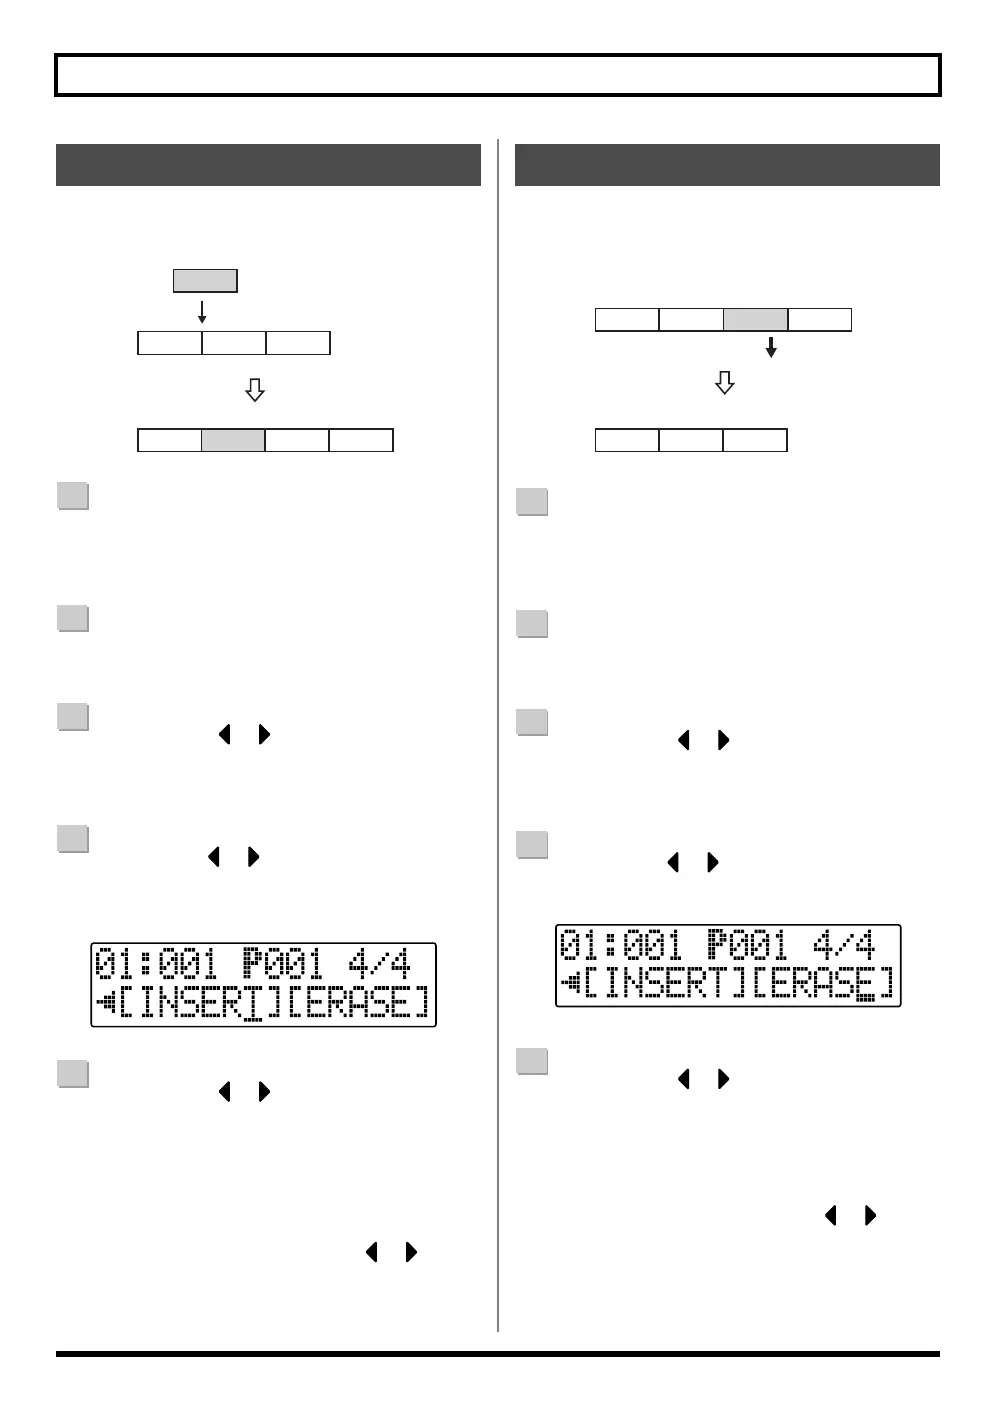
Perform the procedure below to insert a new step at the
current step.
fig.04-550
1
Confirm that [PAD] is not lit, then press [ARRANGE]
so that the button lights.
[ARRANGE] and [RHYTHM ON/OFF] light.
2
Press [RHYTHM EDIT].
The Arrangement Edit screen appears in the display.
3
Press CURSOR [ ] [ ] to move the cursor to
“STEP,” and press [ENTER].
The arrangement's Step Recording screen is displayed.
4
Use CURSOR [ ] [ ] and the TIME/VALUE dial
to set the location (step number) where the data is to
be inserted.
fig.04-560
5
Press CURSOR [ ] [ ] to move the cursor to
“INSERT,” and press [ENTER].
“Insert!” appears in the display, indicating the selected
step has been copied and inserted. When this is
completed, the Step Recording screen automatically
returns to the display.
* To cancel the operation, press CURSOR [ ] [ ] to
return to the Arrangement Edit screen.
This erases the content of the currently selected step. The
content of the following steps are brought forward to fill the
erased step.
fig.04-570
1
Confirm that [PAD] is not lit, then press [ARRANGE]
so that the button lights.
[ARRANGE] and [RHYTHM ON/OFF] light.
2
Press [RHYTHM EDIT].
The Arrangement Edit screen appears in the display.
3
Press CURSOR [ ] [ ] to move the cursor to
“STEP,” and press [ENTER].
The arrangement's Step Recording screen is displayed.
4
Use CURSOR [ ] [ ] and the TIME/VALUE dial
to set the step you want to erase.
fig.04-680
5
Press CURSOR [ ] [ ] to move the cursor to
“ERASE,” and press [ENTER].
“Erase!” appears in the display, and the Step
Recording screen returns to the display.
* No further data can be deleted when only Step 1 remains.
To cancel the operation, press CURSOR [ ] [ ] to
return to the Arrangement Edit screen.
Inserting Steps
Intro Verse Fill
Verse
Verse
Insert
Step 1 Step 2 Step 3
Intro
Verse Fill
Step 1
Step 2 Step 3 Step 4
Erasing Steps
Intro Verse Fill
Verse
Erase
Step 1 Step 2
Verse
Step 4Step 3
Intro
Verse
Step 1
Step 2 Step 3


 To Next Page