7. Plug remote carbonator power cord into electrical outlet.
8. Open No. 3 dispensing valve and dispense until carbonated water is dispensed.
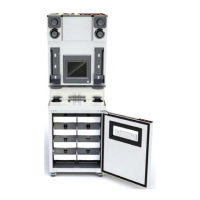
UNIT WITH BUILT-IN COLD CARBONATOR
One of the Unit plain water inlet lines is intended for connection to a plain water source to dispense a still (non-
carbonated) drink from No. 3 dispensing valve as shown in Figure 3. To dispense a carbonated drink from No. 3
dispensing valve, it’s plain water inlet line must be connected to the capped cross fitting (carbonated water) lo-
cated behind the Unit front access panel as shown in Figure 6.
Unit New Installation.
1. Remove two screws (if applicable) securing front access panel to Unit, then remove panel.
2. Locate the No. 3 dispensing valve plain water inlet line that was intended for connection to a plain water
source.
3. Install SWIVEL NUT and NIPPLE on the plain water line and secure with TUBING CLAMP.
4. Remove cap from the cross fitting in the carbonated water line (see Figure 6), then connect plain water line
to the cross fitting. The No. 3 dispensing valve will now be capable of dispensing a carbonated drink.
5. Install Unit front access panel.
Unit Already in Service.
1. Unplug Unit power cord from electrical outlet.
2. Remove two screws (if applicable) securing front access panel on Unit, then remove panel.
3. Shut off CO
2
and water inlet supply line sources.
4. Relieve CO
2
gas pressure on carbonated water system by pulling up on carbonator tank relief valve.
5. Disconnect No. 3 dispensing valve plain water inlet line from the plain water source.
6. Extend plain water inlet line to capped cross fitting, in carbonated water line behind the front access panel
(see Figure 6), then cut off the plain water line.
7. Install SWIVEL NUT and NIPPLE on plain water line and secure with TUBING CLAMP.
8. Remove cap from cross fitting in the carbonated water line, then connect No. 3 dispensing valve plain wa-
ter inlet line to the cross fitting.
9. Cap off plain water source line.
10. Open CO
2
shutoff valve, then open water inlet supply line shutoff valve.
11. Plug Unit power cord into electrical outlet.
12. Open No. 3 dispensing valve and dispense until carbonated water is dispensed.
13. Install Unit front access panel.
REPLENISHING CO
2
SUPPLY
WARNING: CO
2
displaces oxygen. Strict attention must be observed in the prevention of
CO
2
(carbon dioxide) gas leaks in the entire CO
2
and soft drink system. If a CO
2
gas leak is
suspected, particularly in a small area, immediately ventilate the contaminated area before
attempting to repair the leak. Personnel exposed to high concentration of CO
2
gas will experience
tremors which are followed rapidly by loss of consciousness and suffocation.
NOTE: When indicator on CO
2
cylinder primary CO
2
regulator assembly 1800-psi gage is in shaded
(‘‘change CO
2
cylinder’’) portion of dial, CO
2
cylinder is almost empty and should be changed.