Home
DGSHAPE
Cutter
monoFab SRM-20
Page 75
DGSHAPE monoFab SRM-20 - Page 75
128 pages
Manual
Save Page as PDF
To Next Page
To Next Page
To Previous Page
To Previous Page
Loading...
Cr
eating a MODELA Player 4 F
ile
75
Proc
edure
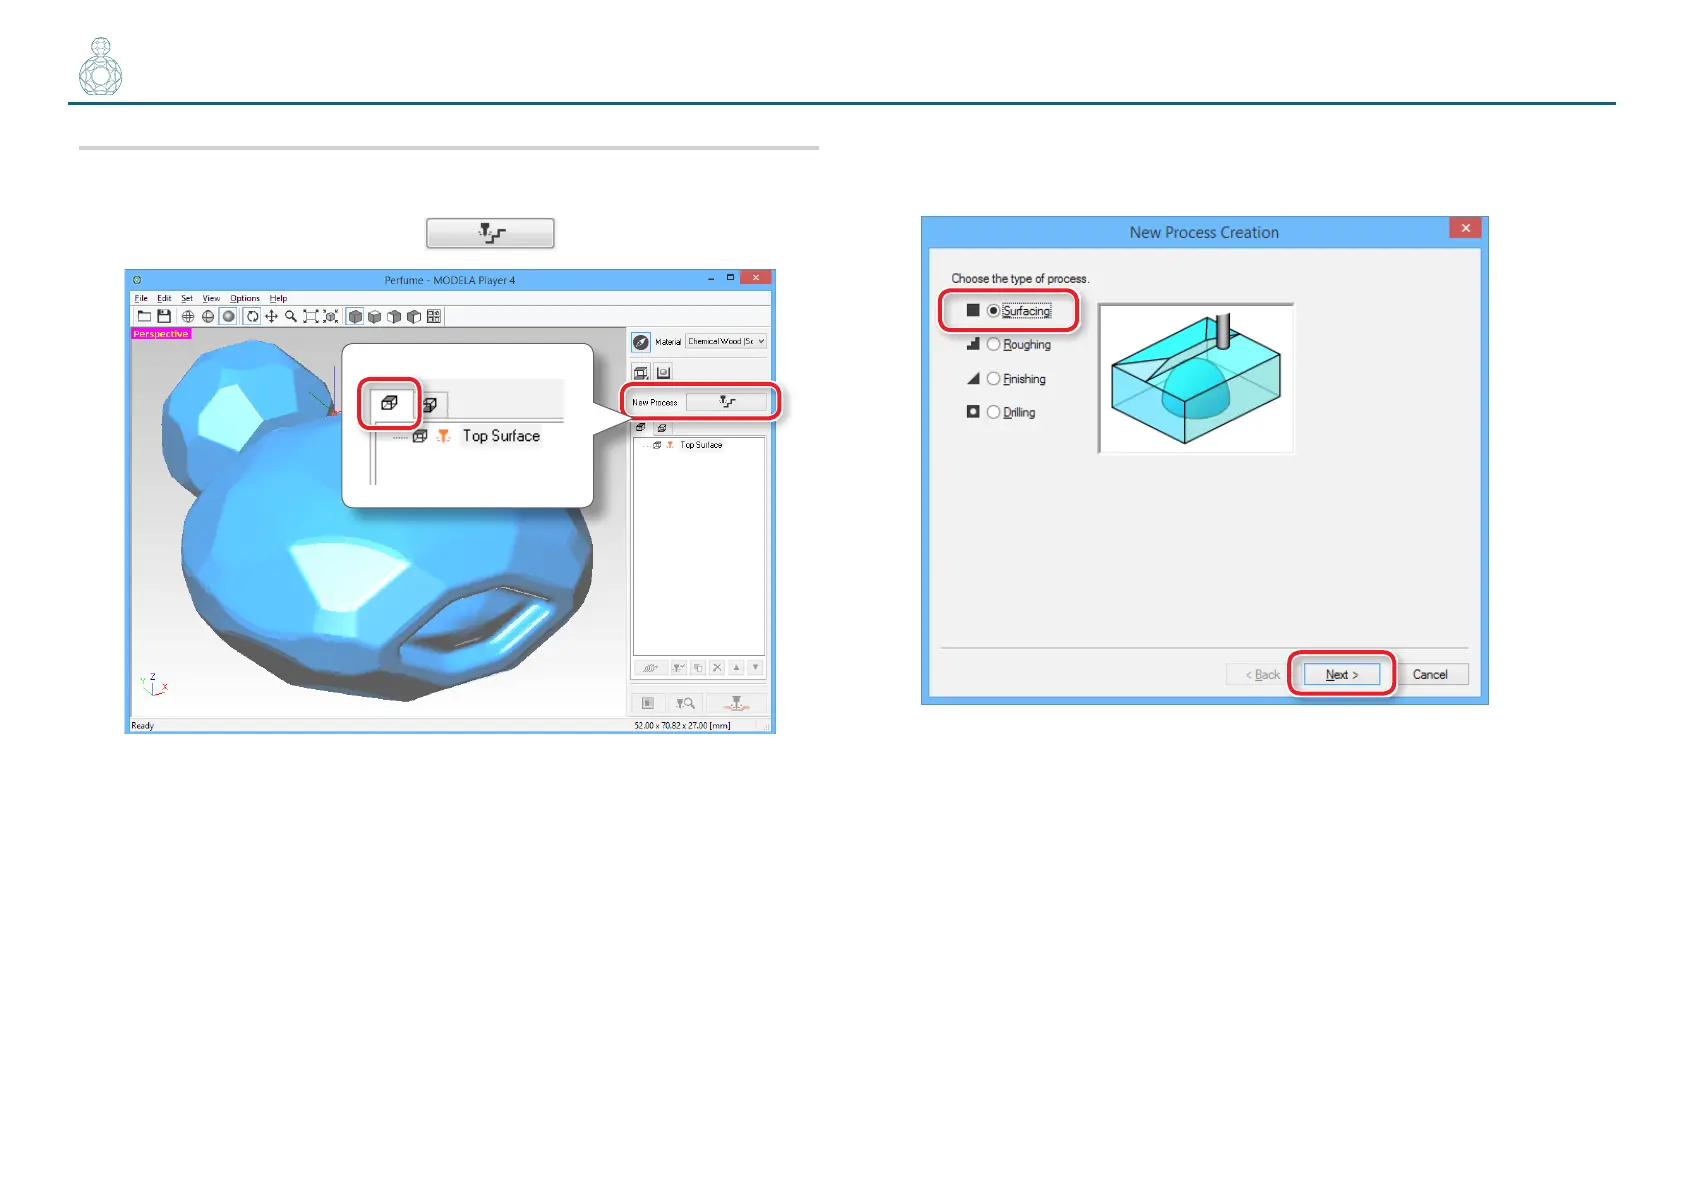
1.
Cr
eate the sur
face lev
eling process of the scrap boar
d.
Select the top sur
face, then click
[New Pr
ocess]
.
2.
Set the type of process
.
Select
[Sur
facing]
, then click
[Next]
.
74
76
Table of Contents
Main Page
Table of Contents
2
Contents
2
Preparing the Machine
4
Preparing the Machine
5
Flow Diagram
5
STEP 4 : Register the Cutting Tool You Want to Use
5
STEP 1 : Turning the Power on
6
STEP 2 : the Machine Run-In
7
STEP 3 : Confirm the Command Set
9
(When You Are Using SRP Player)
10
STEP 4 : Register the Cutting Tool You Want to Use
10
STEP 5 : Attach the Cutting Tool
11
Guide for Cutting with SRP Player
14
The Flow of Double-Sided Cutting
15
Items Necessary for Cutting
16
Items to Prepare Yourself
18
Preparing the Material
19
STEP 1 : Attach the Material to the Scrap Board
19
STEP 2 : Install the Cutting Tool
21
STEP 3 : Set the Origin Point
22
STEP 4 : Level the Scrap Board Surface
26
STEP 5 : Perform the Surface Leveling of the Material
28
STEP 6 : Level the Bottom Surface of the Material
30
Creating an SRP Player File
31
STEP 1 : Measure the Thickness of the Material
31
STEP 2 : Determine the Size and Orientation of the Model
32
STEP 3 : Determine What to Do
35
STEP 4 : Create the Cutting Data
37
STEP 5 : Preview the Result of Cutting
40
Cutting (Double Sided)
41
STEP 1 : Set the Origin Point
41
STEP 2 : Perform the Roughing
42
STEP 3 : Perform the Finishing
47
STEP 4 : Set the Drilling Process
52
STEP 5 : Drill the Scrap Board
56
STEP 6 : Reverse the Material
60
STEP 7 : Cut the Bottom Surface
62
STEP 8 : Remove the Cut Material
63
STEP 9 : Turning the Power off
64
Guide for Cutting with MODELA Player 4
65
The Flow of Double-Sided Cutting
66
The Flow of One Side Cutting
66
Items Necessary for Cutting
67
Items to Prepare Yourself
69
Creating a MODELA Player 4 File
70
STEP 1: Load the Cutting Data
70
STEP 2 : Set the Machine Selection
70
STEP 3 : Set the Origin Point of the Model and Orientation
71
And Orientation
71
STEP 4 : Set the Material
72
STEP 5 : Set the Number of Cutting Surfaces
72
STEP 6 : Set the Margin
73
STEP 7 : Set the Surface Leveling Process of the Scrap Board
74
STEP 8 : Confirm the Cutting Preview
81
STEP 9 : Set the Surface Leveling Process of the Material
83
Of the Material
83
STEP 10 : Set the Roughing Process
88
STEP 11 : Set the Finishing Process
93
STEP 12 : Set the Drilling Process
97
STEP 13 : Set the Bottom Surface Process
103
Cutting (Double Sided)
105
STEP 1 : Attach the Material to the Scrap Board
106
STEP 2 : Set the Origin Point
108
STEP 3 : Perform the Surface Leveling of the Scrap Board
112
STEP 4 : Perform the Surface Leveling of the Material
115
STEP 5 : Perform the Roughing
116
STEP 6 : Perform the Finishing
118
STEP 7 : Perform the Drilling in the Material
120
STEP 8 : Perform the Drilling in the Scrap Board
122
STEP 9 : Reverse the Material
123
STEP 10 : Cut the Bottom Surface
126
STEP 11 : Remove the Cut Material
126
STEP 12 : Turning the Power off
127