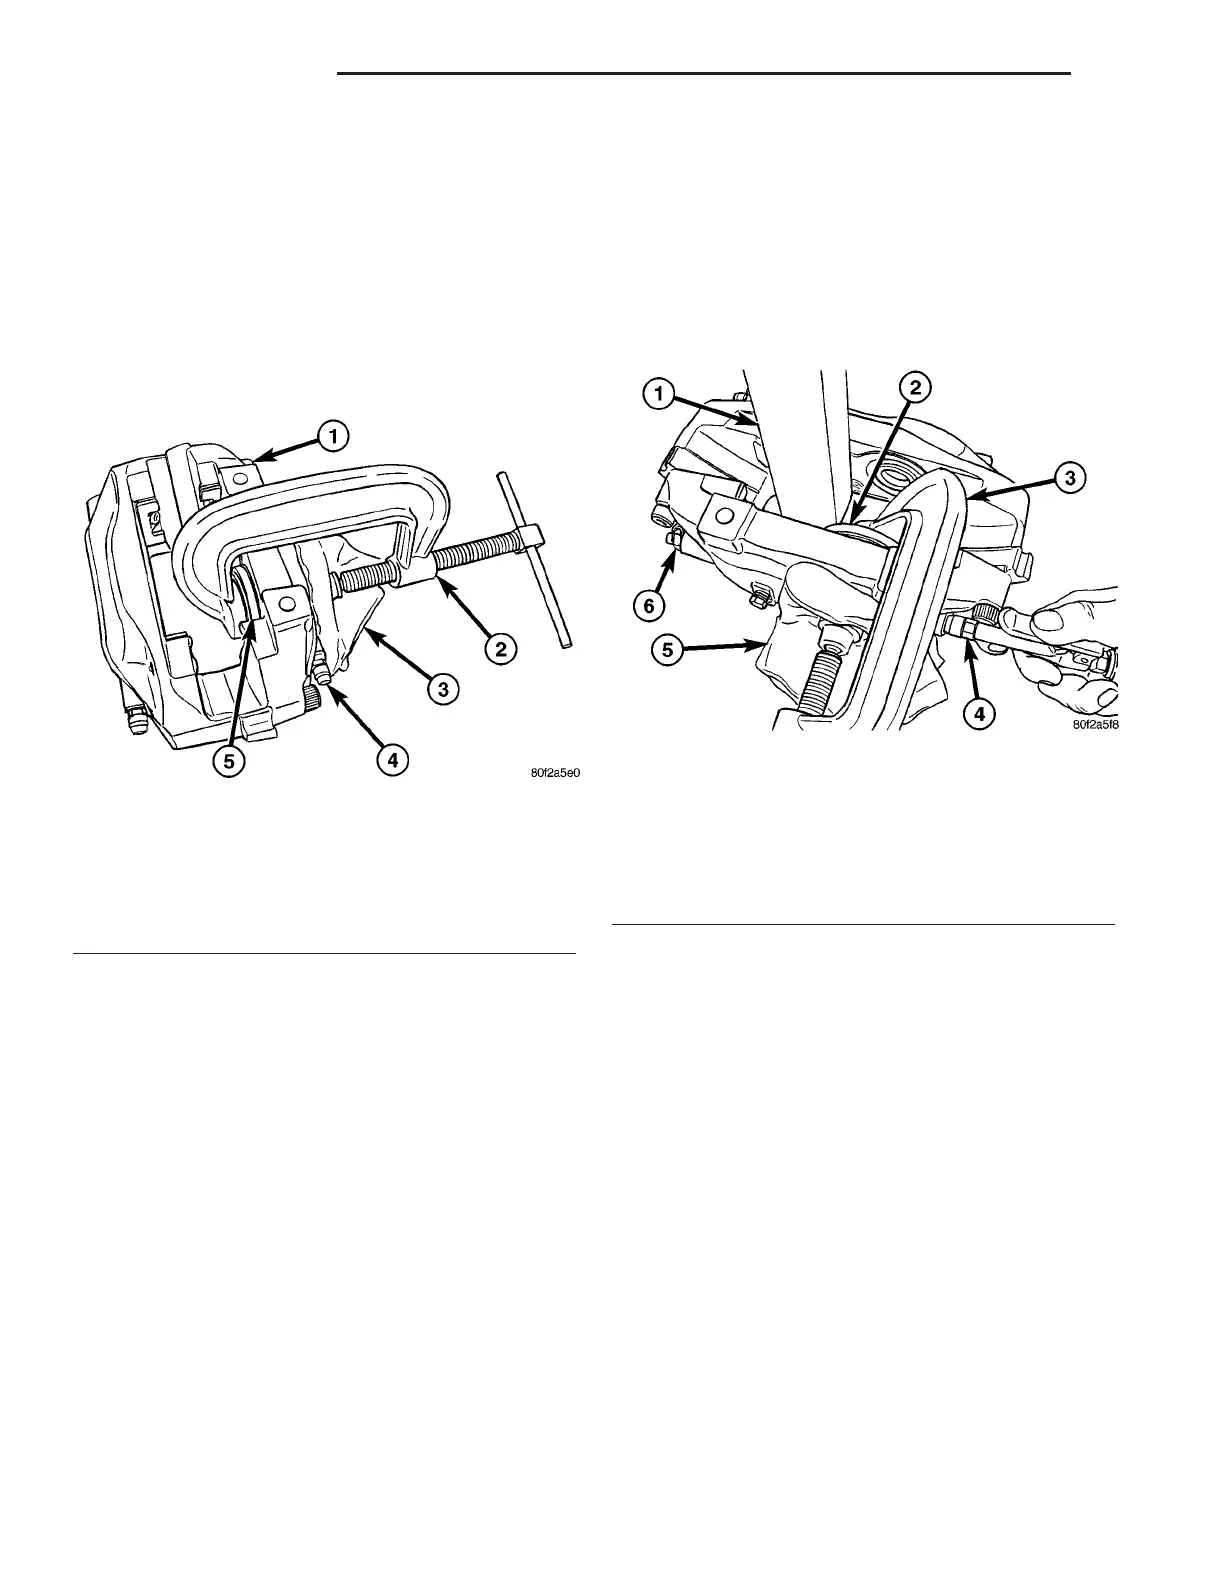
(5) Install C-clamp over inboard caliper piston
nearest to bleeder screw as follows:
(a) Lay shop towel over outside of inboard cali-
per half to protect finish (Fig. 22).
(b) Place Installer, Special Tool 6454, over piston
and boot nearest to bleeder screw and hold in
place. Either side of Installer will work.
(c) Place C-clamp over tool and towel as shown
and tighten C-clamp (Fig. 22). DO NOT USE
EXCESSIVE FORCE; excessive force could damage
caliper or piston.
(6) Place an appropriate size block of wood inside
center area of caliper, in front of first piston to be
removed. Block of wood should be large enough to
allow piston to exit piston bore just far enough for
piston to be pulled out remaining distance by hand,
but not exit the bore completely (Fig. 23).
WARNING: DO NOT PLACE FACE OR HANDS NEAR
PISTONS OR INTO CENTER AREA OF CALIPER
WHEN USING COMPRESSED AIR TO REMOVE PIS-
TONS FROM BORE OF CALIPER. PERSONAL
INJURY CAN RESULT FROM SUCH ACTION.
WARNING: UNDER NO CONDITIONS SHOULD HIGH
PRESSURE AIR BE USED TO REMOVE PISTON
FROM CALIPER BORE. PERSONAL INJURY CAN
REULT FROM SUCH ACTION.
(7) Using a rubber tipped air nozzle, apply short
bursts of low pressure compressed air to caliper
transfer port to force piston from bore.
(8) Remove block of wood from center area of cali-
per.
(9) Remove piston from caliper bore, but leave pis-
ton dust boot in place.
(10) Transfer C-clamp and Installer to cover piston
boot and bore where piston was just removed (Fig.
23). It may be necessary to place a small piece of
rubber over hole in center of Installer to seal off
installer.
(11) Place block of wood inside center area of cali-
per, in front of second piston to be removed (Fig. 23).
(12) Using a rubber tipped air nozzle (Fig. 23),
apply short bursts of low pressure compressed air to
caliper transfer port to force piston from bore.
(13) Remove block of wood from center area of cal-
iper.
(14) Remove piston from caliper bore.
(15) Remove C-clamp and Installer.
(16) Remove piston dust boots from empty piston
bores of caliper. To do so, carefully pry each boot from
its retaining groove using a small screwdriver. The
screwdriver must be inserted between outer edge of
dust boot and caliper (Fig. 24). Do not insert
screwdriver into bore of caliper to remove boot;
scoring of bore may occur.
(17) Remove piston seal from each empty piston
bores using a trim stick or other suitable tool (Fig.
25). Do not use a screwdriver or other metal
tool; scoring of bore or burring of seal groove
may occur.
(18) Remove bleeder screw from inboard half of
caliper.
Fig. 22 Clamp Installed Over Inboard Piston Nearest
Bleeder Screw
1 - TRANSFER TUBE PORT
2 - C-CLAMP
3 - SHOP TOWEL
4 - BLEEDER SCREW
5 - INSTALLER 6454
Fig. 23 Clamp Installed Over Inboard Piston Boot
Near Transfer Port
1 - BLOCK OF WOOD
2 - INSTALLER 6454
3 - C-CLAMP
4 - RUBBER TIPPED AIR NOZZLE
5 - SHOP TOWEL
6 - BLEEDER SCREW
5 - 18 BRAKES - BASE ZB
DISC BRAKE CALIPER - FRONT (Continued)





 To Next Page