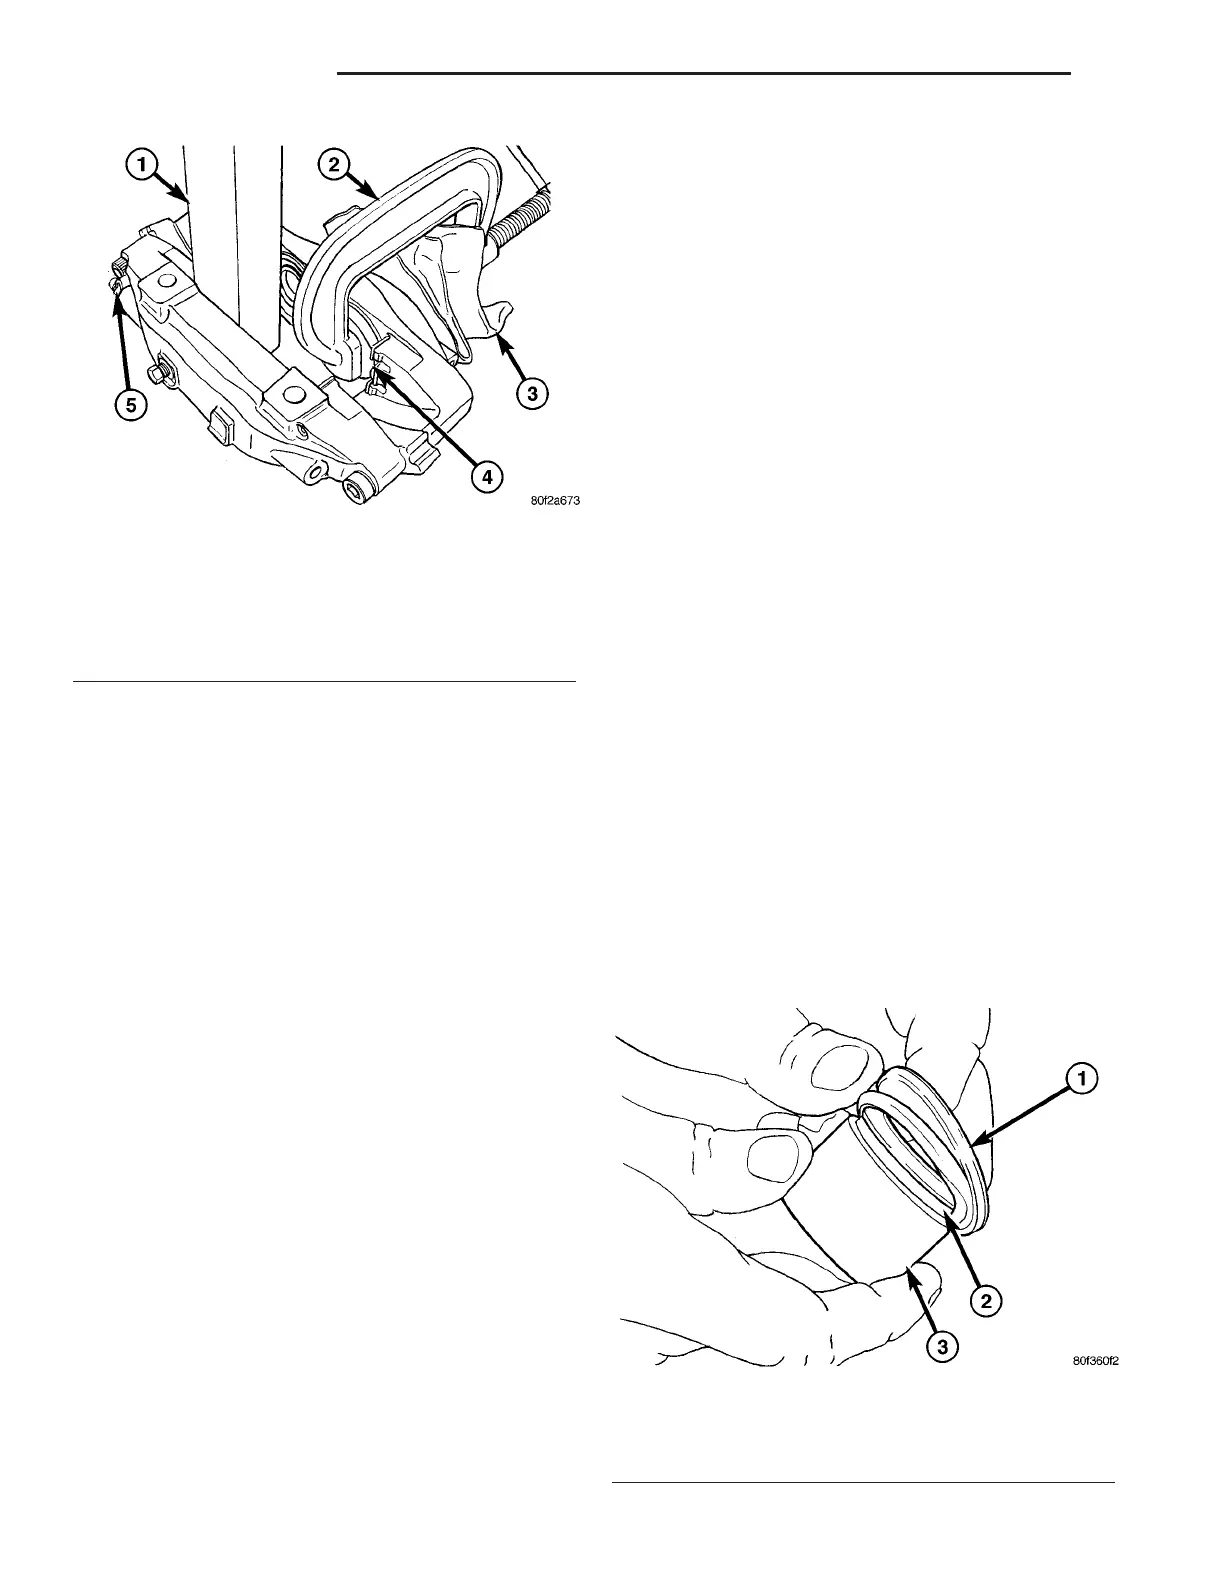
(26) Place the piece of wood inside center area of
caliper, in front of piston to be removed (Fig. 27).
(27) Using a rubber tipped air nozzle, apply short
bursts of low pressure compressed air to caliper
transfer port to force piston from bore.
(28) Remove piece of wood from center area of cal-
iper.
(29) Remove piston from caliper bore.
(30) Remove C-clamp and Installer.
(31) Remove piston dust boots from empty piston
bores of outboard half of caliper. To do so, carefully
pry each boot from its retaining groove using a small
screwdriver. The screwdriver must be inserted
between outer edge of dust boot and caliper (Fig. 24).
Do not insert screwdriver into bore of caliper
to remove boot; scoring of bore may occur.
(32) Remove piston seal from each empty piston
bore of outboard half of caliper using a trim stick or
other suitable tool (Fig. 25). Do not use a screw-
driver or other metal tool; scoring of bore or
burring of seal groove may occur.
(33) Remove bleeder screw on outboard half of cal-
iper.
(34) Thoroughly clean each of the four pistons
using Mopart Non-Clorinated Brake Parts Cleaner,
alcohol or other suitable solvent and wipe dry using a
lint free towel. Inspect all surfaces of each piston for
any signs of corrosion or scoring. If any corrosion on
piston cannot be removed using these products, or if
piston is scored, replace piston. Do not sand piston
to remove corrosion or scoring.
CAUTION: Do not attempt to hone piston bores of
this caliper. If bores cannot be cleaned using appro-
priate solvents, caliper must be replaced.
(35) Clean piston bores of caliper using Mopart
Non-Clorinated Brake Parts Cleaner, alcohol or
another suitable solvent saturated into a lint free
towel. Once thoroughly cleaned, wipe each bore dry
using a clean lint free towel. Inspect all surfaces
inside caliper bores for any signs of corrosion or scor-
ing. If any corrosion inside piston bores cannot be
removed using these products, or if any bore is
scored, the caliper assembly must be replaced.
(36) Using compressed air, blow out piston bores of
caliper to remove any particles that may be left from
cleaning procedure and to ensure bore is dry.
(37) Proceed to Assembly to assemble caliper.
(Refer to 5 - BRAKES/HYDRAULIC/MECHANICAL/
DISC BRAKE CALIPER - ASSEMBLY)
ASSEMBLY
NOTE: Perform Step 1 through Step 4 for each pis-
ton and bore of caliper. Keep in mind there are two
different size pistons, bores, seals and boots used
on each caliper.
(1) Dip NEW piston seal in fresh clean Mopart
brake fluid conforming to DOT 4 specifications. By
hand, gently work seal into seal groove in caliper pis-
ton bore until the seal is properly seated.
(2) Lightly coat inside of NEW dust boot with
fresh clean Mopart brake fluid conforming to DOT 4
specifications. Install dust boot on caliper piston (Fig.
28). Be sure dust boot is completely seated in retain-
ing groove of caliper piston.
Fig. 27 Clamp Installed Over Outboard Piston Boot
Near Transfer Tube Port
1 - BLOCK OF WOOD
2 - C-CLAMP
3 - SHOP TOWEL
4 - INSTALLER 6454
5 - BLEEDER SCREW
Fig. 28 Installing Dust Boot On Piston
1 - DUST BOOT
2 - RETAINING GROOVE
3 - PISTON
5 - 20 BRAKES - BASE ZB
DISC BRAKE CALIPER - FRONT (Continued)





 To Next Page