CAUTION: Never use reclaimed brake fluid or fluid
from an container which has been left open. An
open container will absorb moisture from the air
and contaminate the fluid.
CAUTION: Never use any type of a petroleum-based
fluid in the brake hydraulic system. Use of such
type fluids will result in seal damage of the vehicle
brake hydraulic system causing a failure of the
vehicle brake system. Petroleum based fluids are
items such as engine oil, transmission fluid, power
steering fluid etc.
MASTER CYLINDER
STANDARD PROCEDURE - MASTER CYLINDER
BLEEDING
CAUTION: When clamping the master cylinder in a
vise for bleeding, carefully tighten the vise just
enough to hold the master cylinder from moving.
Excessive pressure can damage the master cylin-
der.
(1) Clamp master cylinder in a vise.
NOTE: The master cylinder outlet ports use ISO
style flares and metric threads. Special Tool Pack-
age 8822 includes ISO style flare adapters with met-
ric threads to be used in conjunction with Bleeder
Tubes, Special Tool Package 8358.
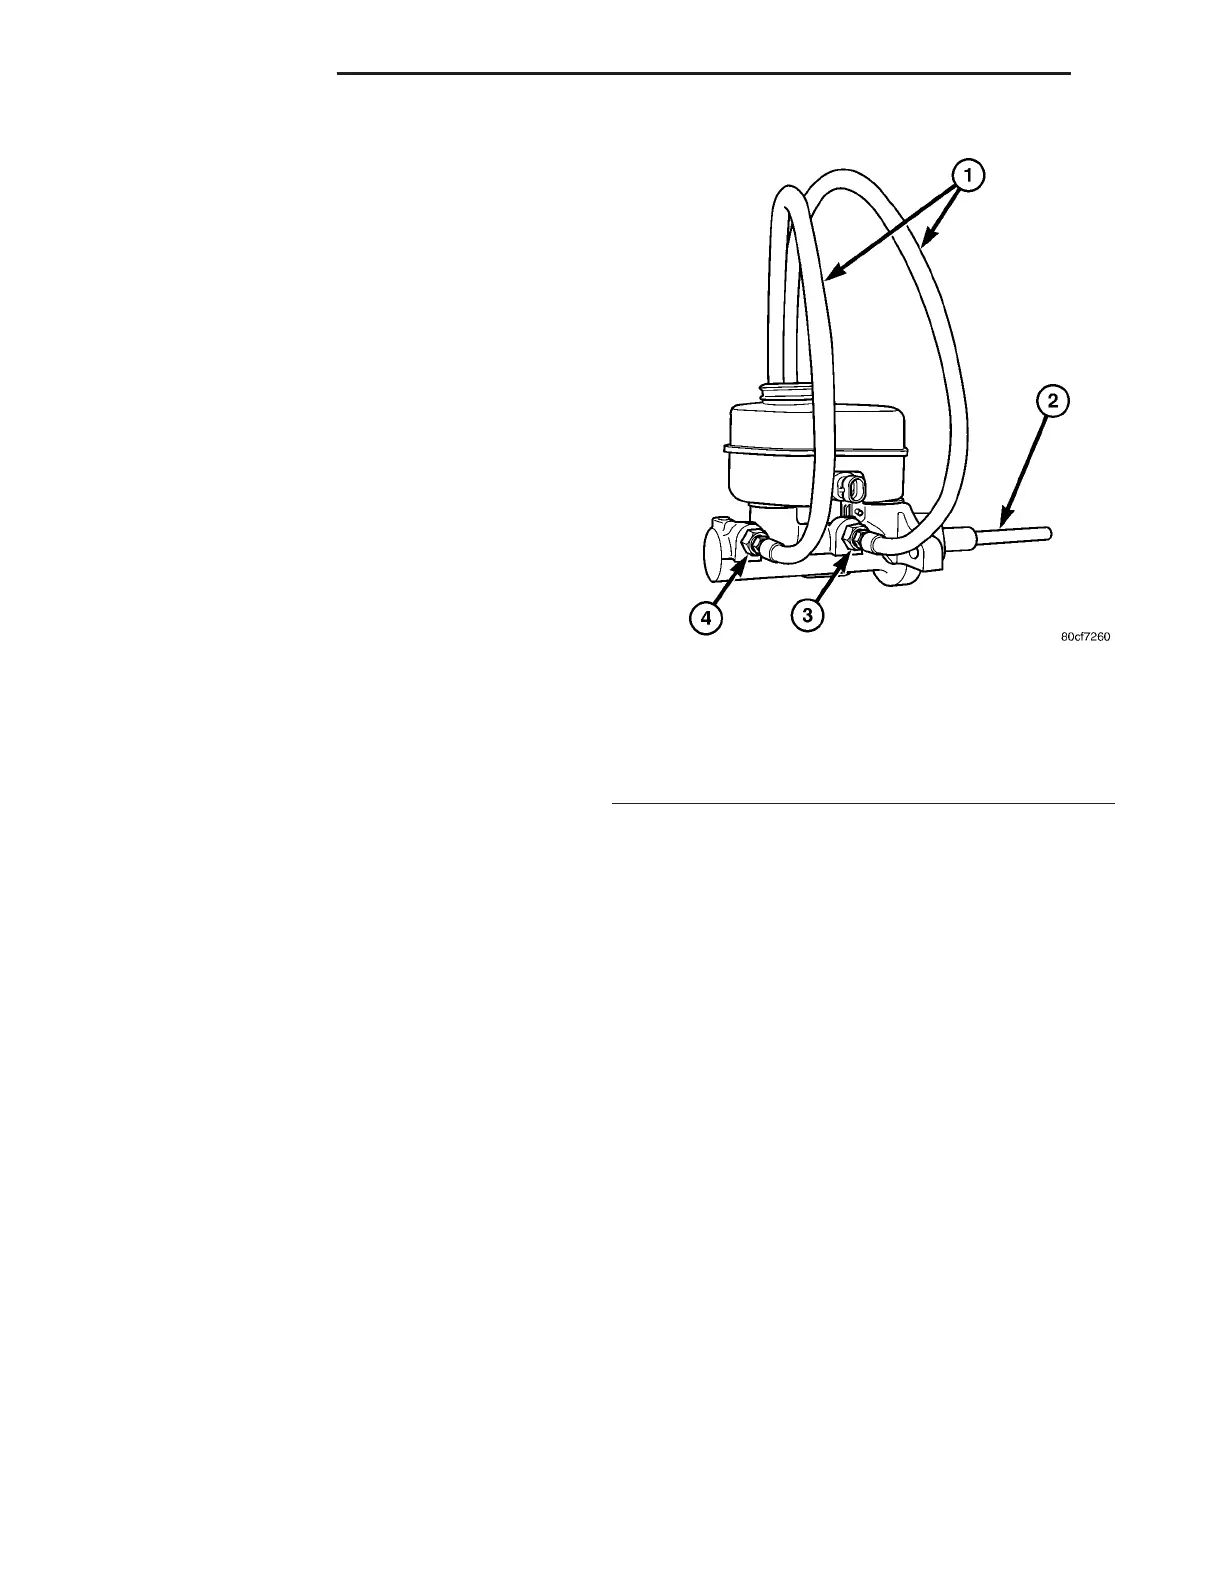
(2) Attach special tools for bleeding master cylin-
der in the following fashion:
(a) Thread Adapter, Special Tools 8822–1, into
the primary outlet port. Tighten Adapter to 17 N·m
(145 in. lbs.) torque.
(b) Thread Adapter, Special Tool 8822–2, into the
secondary outlet port. Tighten Adapter to 17 N·m
(145 in. lbs.) torque.
(c) Thread one Bleeder Tube, Special Tool
8358–1, into each Adapter. Tighten each tube to 17
N·m (145 in. lbs.) torque. Flex bleeder tubes and
place open ends into mouth of fluid reservoir as far
down as possible (Fig. 33).
NOTE: Make sure open ends of bleeder tubes stay
below surface of brake fluid once reservoir is filled
to proper level to avoid ingesting air while bleeding.
(3) Fill reservoir with brake fluid conforming to
DOT 4 Mopart Brake Fluid or equivalent. If DOT 4
is not available, DOT 3 is acceptable. Make sure fluid
level is above tips of bleeder tubes in reservoir.
(4) Using a wooden dowel (Fig. 33), depress master
cylinder pistons slowly, then allow pistons to return
to released position. Repeat several times until all air
bubbles are expelled. Make sure fluid level stays
above tips of bleeder tubes in reservoir while bleed-
ing.
(5) Remove bleeder tubes and adapters from mas-
ter cylinder. Plug master cylinder outlets and install
filler cap.
(6) Remove master cylinder from vise and install
on power brake booster. (Refer to 5 - BRAKES/HY-
DRAULIC/MECHANICAL/MASTER CYLINDER -
INSTALLATION)
REMOVAL
NOTE: Review all Warnings and Cautions. (Refer to
5 - BRAKES - WARNING)
(1) With the engine not running, pump the brake
pedal several times to remove all vacuum from power
brake booster.
(2) Open hood.
(3) Disconnect battery negative (-) terminal.
(4) Disconnect brake fluid level switch wiring con-
nector (Fig. 34).
Fig. 33 Master Cylinder Set Up For Bleeding
(Typical)
1 - BLEEDER TUBES 8358-1
2 - WOODEN DOWEL
3 - ADAPTER 8822-1
4 - ADAPTER 8822-2
5 - 24 BRAKES - BASE ZB
FLUID (Continued)














 To Next Page