Do you have a question about the FAAC A1400 AIR and is the answer not in the manual?
Declares conformity of the automated machine with EU directives and standards.
Declares conformity of automation kits/products with EU directives and standards.
Declares incorporation of partly completed machinery for specific models.
Declares incorporation of partly completed machinery for specific models.
Outlines essential safety instructions for installation and use.
Explains the various symbols used throughout the manual.
Specifies the intended applications and limitations of the A1400 AIR systems.
Lists forbidden uses and conditions for the automation system.
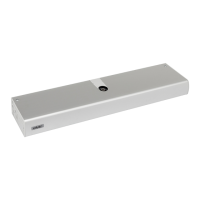
Describes the location and importance of the identification plate.
Details the identification plate for the A1400 AIR KIT DM configuration.
Details pre-installation checks for the automation system and opening.
Provides guidelines for the proper routing and connection of electrical cables.
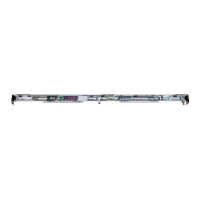
Details the preparation of the self-supporting head section for installation.
Describes the assembly of mechanical stops and other components.
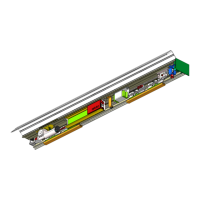
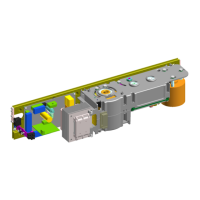
Illustrates and describes the installation of the electronics module.
Explains the installation of safety cables and spacers.
Details the installation procedure for the motor.
Describes the installation of the return pulley.
Details the installation of the optional motor release monitor.
Explains how to test the operation of the XB LOCK motor block.
Instructions for drilling the cover for component access.
Details the installation of the closed door monitor sensor.
Describes the installation of the emergency battery kit.
Guides on assembling the frame using TK50 profiles and preliminary operations.
Provides instructions for fastening the fixed leaves.
Refers to mounting mobile leaves as per another section.
Details the process of installing glass into the leaves.
Describes attaching the head section to the upper profile.
Details the assembly of the frame for TK20 profiles.
Refers to mounting mobile leaves as per another section.
Describes attaching the head section to the upper profile.
Covers preliminary steps before installing the head section.
Explains the procedure for fastening the head section to a wall.
Explains how to mount the lower shoes for different leaf types.
Details mounting profiles onto the door leaves.
Describes mounting the optional lower sweeper.
Provides step-by-step instructions for installing the door leaves.
Details the procedure for mounting and tensioning the drive belt.
Describes the mounting of side profiles for casing closure.
Details the installation of brackets to close the casing.
Details the installation of the XB LOCK motor block.
Explains how to adjust the XB LOCK motor block.
Describes how to align the XB LOCK motor block with the motor.
Details the installation of the XM LOCK motor block.
Explains mounting cable gland guides to prevent cable interference.
Illustrates and describes the E1SL electronic module and its connections.
Details the motor and encoder connection terminals.
Details connections for optional motor blocks, intercom, and battery.
Explains how to connect the motor and encoder.
Details the installation and programming of the optional XB LOCK motor block.
Explains the connection and configuration of XFA button photocells.
Details the connection and configuration of inputs E1 and E2.
Explains the configuration of configurable outputs O1 and O2.
Guides through the initial power-on and system setup process.
Details various operating modes like Automatic, Manual, Night, and their configurations.
Details the configuration options for J22 outputs.
Explains how the system detects and responds to obstacles during operation.
Describes anti-intrusion and PULL&GO functions.
Details the ELASTIC KIT for anti-panic opening.
Explains the Energy Saving function for reduced opening/closing times.
Explains how the system displays alerts, errors, and warnings.
Details the procedure and conditions for performing system setup.
Explains the reset procedure for the control board.
Guides on restoring the control board to its factory default settings.
Explains how to update the system firmware using a USB device.
Details how to download system data and configuration to a USB device.
Explains the INTERMODE function for network communication.
Details the INTERLOCK function for synchronized door operation.
Guides on the assembly and testing of the LK EVO accessory.
Explains how to navigate the LK EVO selection menu.
Guides on the assembly and testing of the KS EVO accessory.
Explains how to navigate the KS EVO selection menu.
Guides on the assembly and testing of the SDK EVO accessory.
Explains how to switch on and use the SDK EVO accessory.
Describes the SDK EVO Home Page and its elements.
Explains how to reset or lock/release the SDK EVO.
Details the password entry procedure for SDK EVO functions.
Guides on navigating the SDK EVO operating mode selection menu.
Explains how to access and navigate the SDK EVO function menu.
Lists and explains system errors and their potential causes.
Lists and explains current system alerts and warnings.
Details cycle counting features and maintenance requests.
Guides on setting the system's date, time, and daylight saving.
Guides on selecting the display language for the SDK EVO.
Details the main programming menu for system configuration.
Explains how to program timer functions for automated operation.
Details password management for user and installer access.
Displays system firmware versions and device information.
Outlines the schedule and procedures for routine maintenance tasks.
Lists components and their replacement intervals based on cycles or time.
Explains how to estimate cycles for maintenance when data is lost.
Provides safety instructions specifically for maintenance technicians.
Details the procedure for replacing key components like belts and motors.
Explains the procedure for replacing the emergency battery.
Guides on replacing the electronic control board.
Details the procedure for replacing fuses on the control board.
Provides instructions for cleaning the automation system components.
Outlines functional checks to ensure correct operation after maintenance.
Provides installation diagrams for A1400 AIR H100-H140 models.
Illustrates installation with a carriage leaf spacer.
Provides installation diagrams for A1400 AIR H140 glass leaf configurations.
Details component positions for A1400 AIR support profiles.
Details component positions for A1400 AIR DM support profiles.
| Max opening angle | 110° |
|---|---|
| Control Voltage | 24 Vdc |
| Power Supply | 230V AC ±10%, 50/60Hz |
| Opening Speed | Adjustable |
| Closing Speed | Adjustable |
| Safety Features | Obstacle detection |
| Operating Temperature | -20°C to +55°C |
| Power Consumption | 150 W |