A1400 AIR 93 532129 04 - Rev.B
103
2
1
1
3
3
3
4
14:30
102
5
6
V RX TX G
J8
V RX TX G G K
SDK EVO
8
V
V RX
RX
TX
TX
G
G
U/UTP CAT.5
4x2xAWG24
E1SL
Translation of the original instructions
ENGLISH
system data and current statuses
icons in Home Page
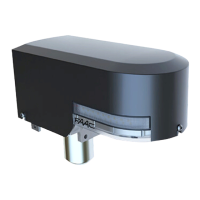
20. SDK EVO
fw version 3.0 or later
20.1 ASSEMBLY AND TESTING
1. Separate the parts 102 (the 2 screws have to be loosened
102-
).
2. Break the cable knockout 102-
.
3. Mark the points on the wall 102-
and fasten the support
using suitable screws.
F
BEFORE CONNECTING THE DEVICE, disconnect the power supply and the
emergency battery of the automation.
*An optional connection can be made on SDK EVO to terminals G and K
with a key command. 102-
. The functions that may be selected
from SDK EVO are: Block or Without User Password. Refer to paragraph
“SDK EVO key” 102.
4. Connect up the E1SL board 102-
5. The connection must be made using a 4-pair twisted cable
U/UTP CAT.5 4x2xAWG24 with a 0.5 mm section102-
. The
maximum distance is 50 m.
6. Assemble the parts (the 2 screws must be tightened 102-
).
7. Fasten using the screw 102-
and insert the screw cover
102-
).
20.2 SWITCHING ON AND USE
1. Turn power on to the E1SL electronic board.
2. The device launches the program and displays:
SDKEVO
then:
BOOTLOADER
0.0
SDKEVO
bootloader
version
3. The device is ready for use when the HOME PAGE is displayed.
4. The modes of operation of the automation can be selected and set
using the buttons under the activation icons (Home Page 104).
A1400 AIR THUR 20/03/14
AUTO TWODIR TOTAL

 Loading...