150718 PLYFLY rev A_GoKart | Aug ust 7, 2 015 5 :08 PM
Chapter 10
10
STEP
Recommended tools
DESCRIPTION REFERENCE
Dead blow Hammer
or mallet
Electric Driver
Required hardware
№ DESCRIPTION REFERENCE
20
Spax Screw
1 #8, 1‑1/2” L
PN 12519
1
Green Elastic Cord
3/16” OD, 18” L
PN 12 517
Required wooden parts
DESCRIPTION REFERENCE
Part 53
Fairing Left
PLYWOOD SHEET 4
Part 54
Fairing Right
PLYWOOD SHEET 4
Part 55
Fairing Front
PLYWOOD SHEET 4
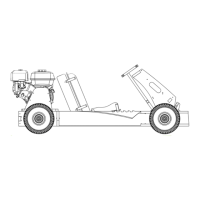
Part 10 Install the fairings
INSTRUCTIONS
1. Place the front tab of part 53 into the slot located on
part 40.
Note the location of the tab on part 40.
2. Using the mallet, tap part 53 into the recess.
3. Secure part 53 to the assembly using screws.
‒ Use 7 screws.
‒ Total of 7 locations.
4. Repeat steps 1 through 3 on the opposite side using
part 54.
5. Thread the green elastic cord, from the top through left
hole located in part 16 of
2
.
Note the part 16
6. Tie an overhand knot on the bottom side.
7. Thread the green elastic cord, from the top through right
side hole located in part 16 of
2
.
Note the location of part 16.
8. Pull green elastic cord tight and tie overhand knot on
the underside.
9. Align part 55 to the front of
2
.
Note the location of the orientation of part 55.
10. Screw part 55 to the assembly using 6 screws.
‒ Use 6 screws.
‒ Total of 6 locations
FINISHED!! TIME TO RIDE!!
Note If you received a 1/4” plywood sheet that is nished on one side
and intend to paint the fairings; reverse wooden parts 53-55 (so the
unnished side is facing outward and ready to receive paint). For more
information on Visual reference of the plywood sheets, see page 61.
53
40
16
16
2
55
2
59
PlyFly Go‑Kart Instruction Guide • 2015 Release