Adjustments and tool changes
2.
Secure the saw arbour against rotation.
Insert the locking pin into the hole on the circular saw table.
Turn the circular saw shaft until the locking pin engages.
3.
Loosen the clamping screw with a fork wrench.
L
eft screw thread, loosen by turning clockwise.
4.
Remove the clamping bolt and grooving tool flange.
5.
Remove the grooving tool.
F
it the saw insert board and saw blade
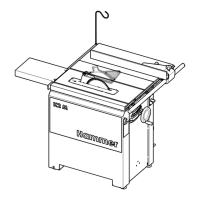
Fig. 20: Operational readiness - Saw blade work
1 Insert board
2 Saw guard
3 Spring catches
4 Thumb nut
1.
Mount the rear flange.
2.
Install the saw blade in the machine. ⮫
Chapter 1.4.1 ‘Installing the saw
blade in the machine’ on page 14
3.
Fit the riving knife. ⮫Chapter 1.4.3 ‘Fit /change the riving knife’
on page 17
4.
Inserting the insert board.
Hook the insert board into the machine table on the right (front).
Engage the insert board on the left (rear) in the snap springs.
🡆
Ensure that the insert board locks in place correctly on the right and the
le
ft side.
5.
Fitting and adjusting circular saw guard. ⮫
Chapter 1.6 ‘Fitting and
adjusting circular saw guard’ on page 25