5. Grasp the replacement fan tray with the screws on the right side of your palm. Slide the fan
tray into the slot until you feel resistant.
6. Tighten the screws on the fan tray.
Notes: To prevent over-heating, you should install the replacement fan tray within
one minute after the existing fan tray is removed. If the system detects over-heat-
ing, it will automatically switch off the power supply.
Replacing a Dustproof Net
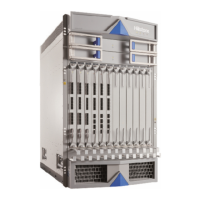
Replacing a Dustproof Net of SG-6000-X10800
The dustproof net should be installed inside the air inlet of SG-6000-X10800. The dustproof net
should be installed inside the plastic panel or above the fan tray of SG-6000-X10800. You are sug-
gested to install the dustproof net for the device to prevent intrusion of dust.
If the dustproof net is used for a long time, the dust will be accumulated in the dustproof net and
block the air inlet. To prevent overheating, you are suggested to replace the dustproof at least
once every three months.
To replace the dustproof net, take the following steps:
1. Wear an electrostatic discharge (ESD) strap around your bare wrist and connect the strap to
an ESD point on the chassis. See ESD Prevention.
Chapter 5 Hardware Maintenance and
Replacement
148
 Loading...