This document contains proprietary and confidential information of Integra LifeSciences Corporation. Integra’s confidential information may not be used, disclosed or reproduced without the prior wrien consent of Integra LifeSciences Corporation.
CUSA® Clarity System Service and Maintenance Manual Page 60 of 117 0645403-2-EN
Equipment/Tools Description
Digital Manometer Fisher 3461 or Fluke PV350 or Equivalent
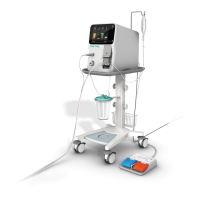
CUSA Clarity 36 kHz Handpiece Integra Ref. C7036
CUSA Clarity 36 kHz tip Integra Ref. C7414
Handheld digital tachometer Testo 470 or DT2236 or equivalent
Reflective tape for the digital tachometer RS Components P/N: 845-9731
CUSA Clarity footswitch Integra Ref. C7002
CUSA Clarity Quick Connect Tubing Set (Single pack) Integra Ref. C7300EA
T Connector RS Component P/N: 795-405
Contamination guard Integra Ref. C7005
Waste canister Bemis BEH484410 or equivalent
Table 7-9 Electrical Safety Test Record Assessment Equipment and Tools
7.9.2 Required Equipment and Tools
7.9.3 Test Conditions
Perform the electrical safety test at the ambient temperature, humidity, and atmospheric pressure at the testing site.
7.9.4 Test Procedures
Test Setup
• Turn on the console
• Connect the footswitch and handpiece
• Connect a contamination guard and the canister
• Open the cartridge door and stick the reflective tape on the border of the pump head
• Place the cartridge on the pump head, close the door and connect the aspiration tubing set to the canister
• Aach the T connector in line between the distal end of the aspiration tubing set and the handpiece suction port
• Connect the third port of the T connector to the Digital Manometer.
• From the Setup Task menu press the Start Prime buon – wait until the prime is completed
Ultrasound Test
• From the Setup Task menu press Start Test buon
• When the test is completed, press Details buon
• Record that the Tip Frequency Optimization passed the test in IT0739A CUSA Clarity GS&R End User Functional Test Datasheet (Appendix A).
 Loading...


