10
30
31
31
31
AB
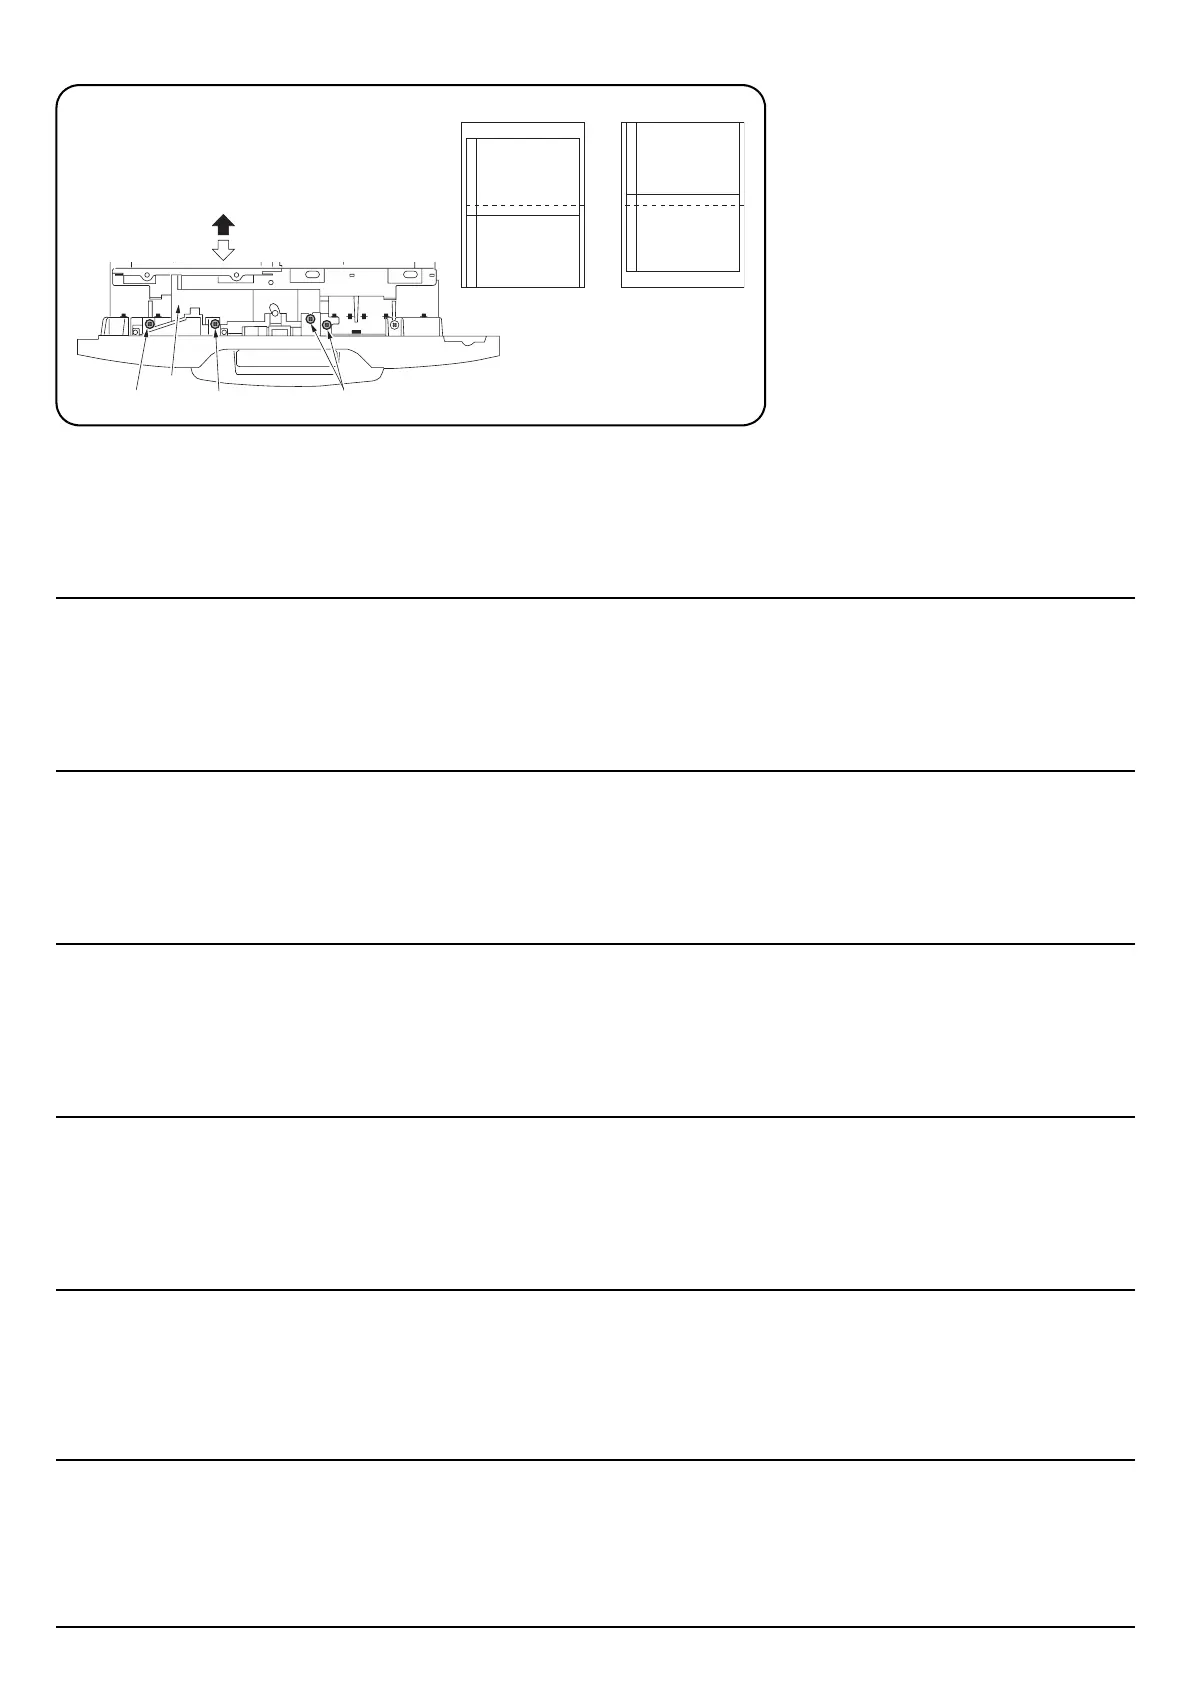
センターライン調整
4. ペーパーフィーダのカセットを引き出し、調整板 (30) のビス (31)3 本を緩める。
A、B:テストパターン
5. A 画像の場合、矢印()の向きに調整板 (30) を動かし、ビス (31)3 本を締め付ける。
B 画像の場合、矢印(Ö)の向きに調整板 (30) を動かし、ビス (31)3 本を締め付ける。
6. 再度、テストパターン出力をおこなう。
7. 用紙のセンターとテストパターンのセン
ターが基準値内になるまで、手順4~6を繰
り返す。
<基準値>左右ずれ:1.5mm 以下
Adjusting the center line
4. Pull out the cassette of the paper feeder and loosen the three screws (31) securing the adjuster
(30).
A and B: test pattern output examples
5. If the test pattern output looks like A, move the adjuster (30) in the direction of the black arrow
() and retighten the three screws (31).
If the test pattern output looks like B, move the adjuster (30) in the direction of the white arrow
(Ö) and retighten the three screws (31).
6. Output a test pattern again.
7. Repeat steps 4 to 6 until the centers of the
paper and the test pattern meet the
reference value.
<Reference value> Deviation to the left or
right: 1.5 mm or less
Réglage de la ligne médiane
4. Tirer le magasin du bureau papier vers soi et desserrer les trois vis (31) fixant le dispositif de
réglage (30).
A et B: exemples de sortie de mieres
5. Si la sortie de mire ressemble à A, déplacer le dispositif de réglage (30) dans la direction de la
flèche noire () et resserrer les trois vis (31).
Si la sortie de mire ressemble à B, déplacer le dispositif de réglage (30) dans la direction de la
flèche blanche (Ö) et resserrer les trois vis (31).
6. Reproduire une nouvelle mire.
7. Répéter les étapes 4 à 6 jusqu’à ce que le
centre du papier et celui de la mire
correspondent à la valeur de référence.
<Valeur de référence> Déviation vers la
gauche ou la droite : 1,5 mm ou moins
Ajuste de la línea central
4. Abra el casete del alimentador de papel y suelte los tres tornillos (31) que aseguran el regulador
(30).
A y B: ejemplos de salidas de patrones de prueba
5. Si la salida del patrón de prueba es parecida a A, mueva el regulador (30) en la dirección que
indica la flecha negra () y vuelva a apretar los tres tornillos (31).
Si la salida del patrón de prueba es parecido a B, mueva el regulador (30) en la dirección que
indica la flecha blanca (Ö) y vuelva a apretar los tres tornillos (31).
6. Saque un patrón de prueba nuevamente.
7. Repita los pasos 4 a 6 hasta que los centros
de papel y el patrón de prueba cumplan con
el valor de referencia.
<Valor de referencia> Desviación a la
izquierda o derecha: 1,5 mm o menos
Ein
stellen der Mittenlinie
4. Ziehen Sie die Papierlade des Papiereinzugs heraus und lösen Sie die drei Schrauben (31), die
den Anpasser (30) halten.
A und B: Beispiele von Testmusterausgaben
5. Wenn die Testmusterausgabe wie A aussieht, bewegen Sie den Anpasser (30) in Richtung des
schwarzen Pfeils () und ziehen Sie die drei Schrauben (31) wieder fest.
Wenn die Testmusterausgabe wie B aussieht, bewegen Sie den Anpasser (30) in Richtung des
weißen Pfeils (Ö) und ziehen Sie die drei Schrauben (31) wieder fest.
6. Drucken Sie erneut ein Testmuster aus.
7. Wiederholen Sie die Schritte 4 bis 6, bis die
Mitte des Papiers und des Testmusters mit
dem Bezugswert übereinstimmt.
<Bezugswert> Abweichung nach links oder
rechts: maximal 1,5 mm
Regolazione della linea centrale
4. Estrarre il cassetto dell’unità di alimentazione della carta ed allentare le tre viti (31) assicurando il
regolatore (30).
A e B: esempi di stampa del modello di prova
5. Se la stampa del modello di prova ha l’aspetto A, spostare il regolatore (30) nella direzione della
freccia nera () e serrare nuovamente le tre viti (31).
Se la stampa del modello di prova ha l’aspetto B, spostare il regolatore (30) nella direzione della
freccia bianca (Ö) e serrare nuovamente le tre viti (31).
6. Stampare nuovamente un modello di prova.
7. Ripetere i passi da 4 a 6 fino a quando i
centri della carta e del modello di prova
rientrano nei limiti del valore di riferimento.
<Valore di riferimento> Deviazione a sinistra
o a destra: fino a 1,5 mm
中心线的调整
4. 拉出供纸工作台的供纸盒,再松开调整板 (30) 上的 3 个螺丝 (31)。
A, B 测试图案
5. 测试图案为 A 时,按箭头()方向移动调整板 (30), 并紧固 3 个螺丝 (31)。
测试图案为 B 时,按箭头(Ö)方向移动调整板 (30), 并紧固 3 个螺丝 (31)。
6. 再次进行测试图案的输出。
7. 反复操作步骤 4 至 6,直到复印纸的中心与测
试图案的中心为标准值内为止。
〈标准值〉左右偏移∶ 1.5mm 以下
 Loading...