7
2
1
1
X’X
+2mm
-
2mm
X’
X
18.Use four screws (1) to reinstall the back
cover (2) which was removed from the docu-
ment finisher in step 1.
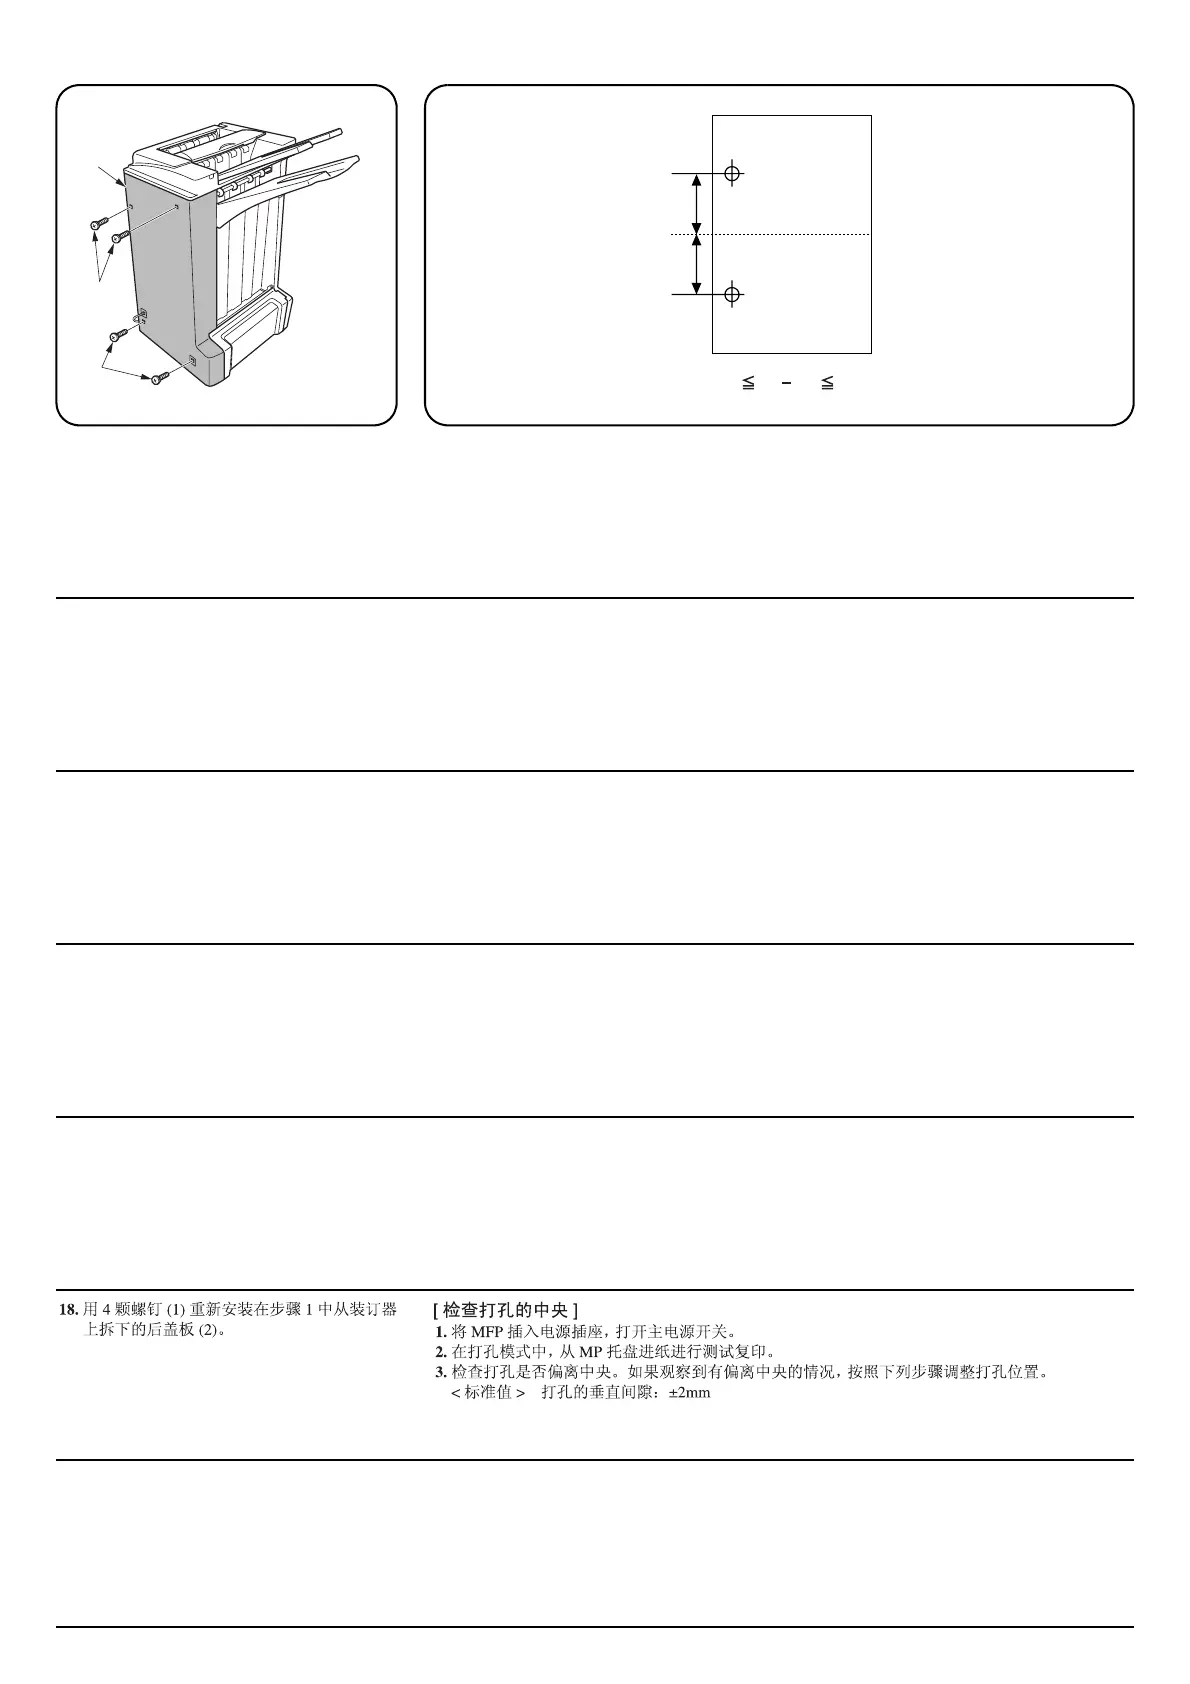
[Checking the center of the punch hole]
1. Plug the MFP into a power outlet, and turn on its main power switch.
2. In the punch mode, perform a test copy with paper fed from the MP tray.
3. Check for any off-centering in the punch holes. If any off-centering is observed, follow the proce-
dure below to adjust the hole position.
<Reference value> Vertical gap of the punch holes: ±2 mm
18.Utiliser quatre vis (1) pour réinstaller le capot
arrière (2) retiré du finisseur de document à
l’étape 1.
[Vérification du centre des perforations]
1. Brancher le MFP dans une prise secteur et mettre son interrupteur d’alimentation principal sous
tension.
2. Dans le mode perforation, effectuer une copie de test avec du papier alimenté depuis le plateau
multifonction.
3. Vérifier tout décentrage des perforations. Si des décentrages se produisent, suivre la procédure
ci-dessous pour ajuster la position de perforation.
<Valeur de référence> Espace vertical des perforations: ±2 mm
18.Utilice cuatro tornillos (1) para volver a insta-
lar la cubierta posterior (2) que fue quitada
del finalizador de documentos en el paso 1.
[Comprobación del centro del agujero perforado]
1. Enchufe la MFP en una toma de corriente y conecte su interruptor de alimentación principal.
2. En el modo de perforación, haga una copia de prueba con papel alimentado desde la bandeja
MP.
3. Compruebe que no haya ningún agujero perforado descentrado. Si lo hay, siga el procedimiento
de abajo para ajustar la posición del agujero.
<Valor de referencia> Separación vertical de los agujeros perforados: ±2 mm
18.Verwenden Sie die vier Schrauben (1), um
die hintere Abdeckung (2) zu befestigen,
welche in Schritt 1 vom Dokument-Finisher
entfernt wurde.
[Überprüfen der Stanzlöcherzentrierung]
1. Schließen Sie den MFP an das Netz an und schalten Sie das Gerät ein.
2. Führen Sie im Lochungsmodus einen Test aus, wobei das Papier vom MP-Fach aus zugeführt
wird.
3. Prüfen Sie auf nicht zentrierte Löcher. Sollte dies der Fall sein, folgen Sie dem nachfolgendem
Verfahren, um die Lochposition zu korrigieren.
<Bezugswert> Vertikalabstand der Stanzlöcher: ±2 mm
18.Utilizzare quattro viti (1) per reinstallare il
pannello posteriore (2) rimosso dalla finitrice
nel passo 1.
[Verificare la centratura dei fori di perforazione]
1. Inserire il cavo di alimentazione della fotocopiatrice nella presa di corrente e accendere l’interrut-
tore principale.
2. In modalità di perforazione, eseguire una copia di prova con la carta alimentata dal vassoio MP.
3. Verificare che i fori di perforazione siano correttamente centrati. Nel caso in cui non lo siano, ese-
guire la procedura indicata qui di seguito per regolarne la posizione.
<Valore di riferimento> Distanza verticale dei fori di perforazione: ±2 mm
18.手順 1 で外したドキュメントフィニッシャ
の後カバー(2) をビス (1)4 本で元通り取り
付ける。
[ パンチ穴のセンター位置確認 ]
1. MFP 本体の電源プラグをコンセントに差し込み、メインスイッチを ON にする。
2. パンチモード、手差し給紙でテストコピーを行う。
3. パンチ穴のセンター位置のずれを確認する。パンチ穴が中心からずれていた場合、次の手順で調
整を行う。
<基準値> パンチ穴のずれ:± 2mm
 Loading...