Diagnostics information 2-13
7013-XXX
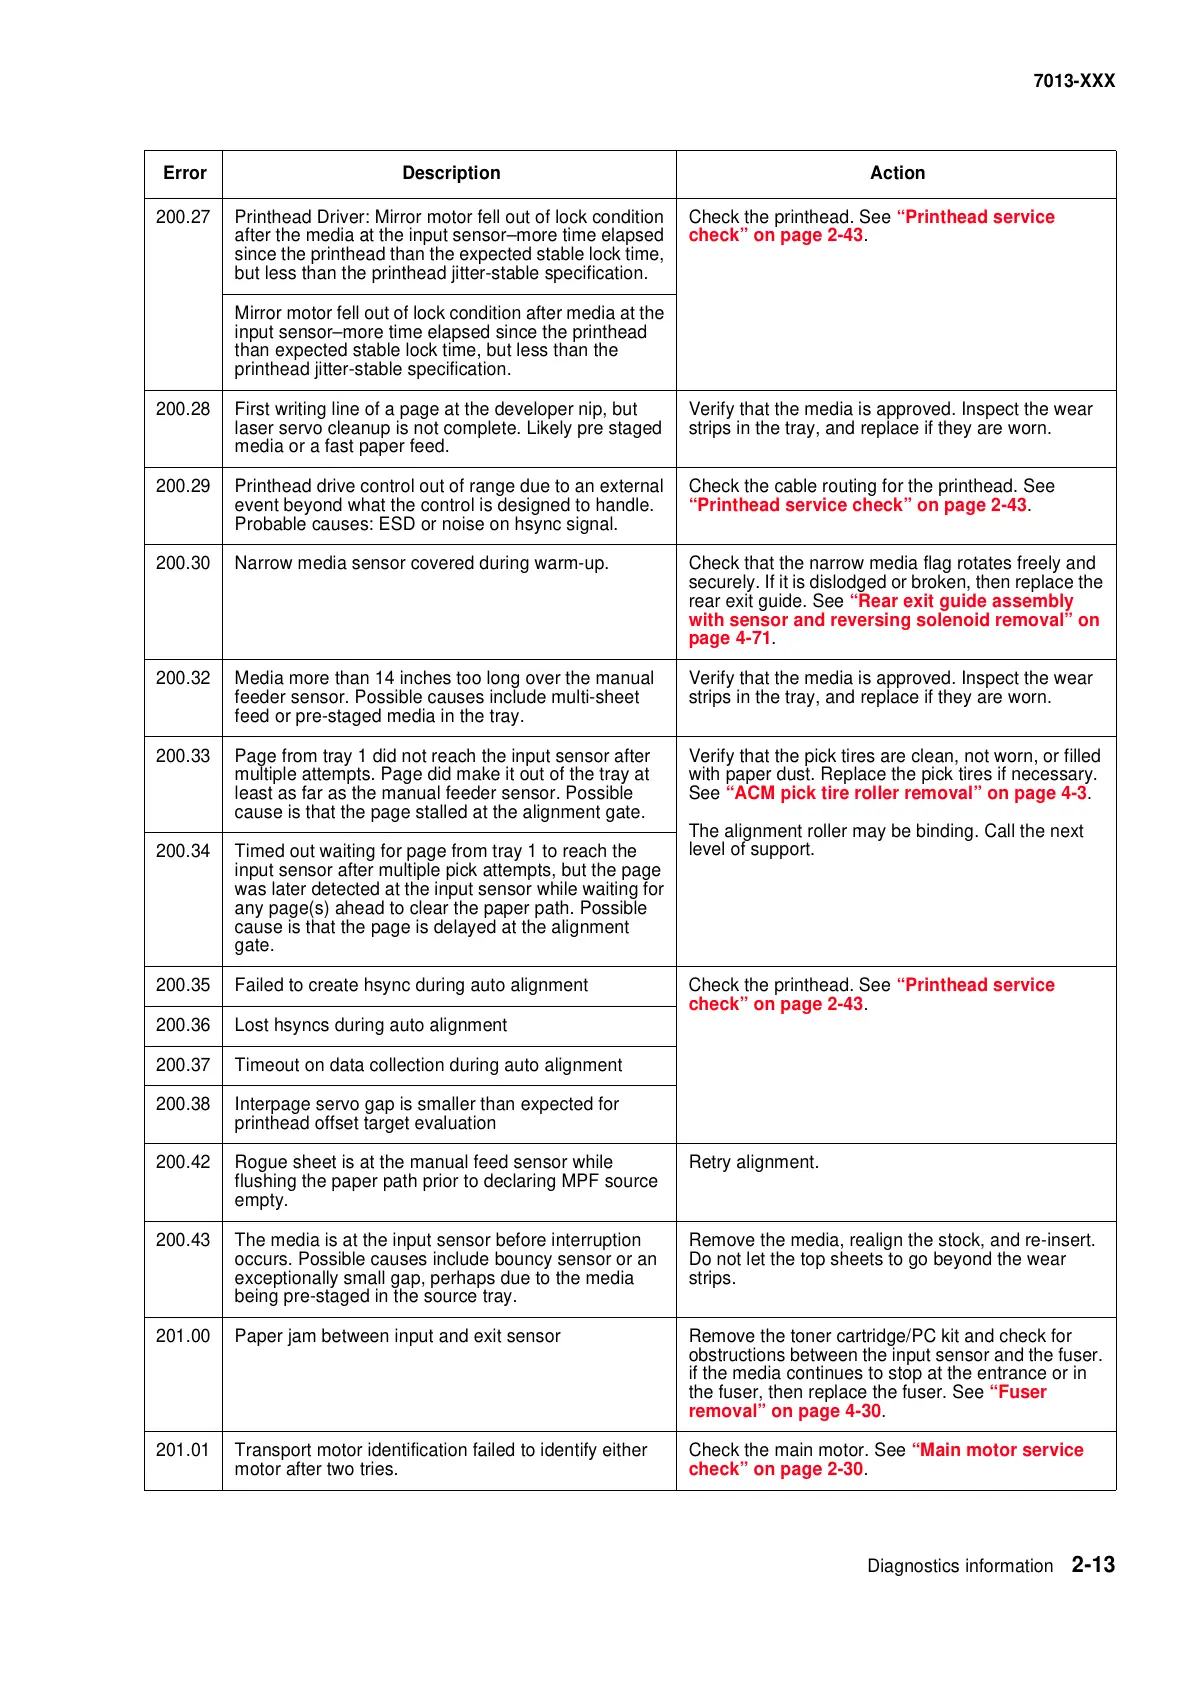
200.27 Printhead Driver: Mirror motor fell out of lock condition
after the media at the input sensor–more time elapsed
since the printhead than the expected stable lock time,
but less than the printhead jitter-stable specification.
Check the printhead. See “Printhead service
check” on page 2-43.
Mirror motor fell out of lock condition after media at the
input sensor–more time elapsed since the printhead
than expected stable lock time, but less than the
printhead jitter-stable specification.
200.28 First writing line of a page at the developer nip, but
laser servo cleanup is not complete. Likely pre staged
media or a fast paper feed.
Verify that the media is approved. Inspect the wear
strips in the tray, and replace if they are worn.
200.29 Printhead drive control out of range due to an external
event beyond what the control is designed to handle.
Probable causes: ESD or noise on hsync signal.
Check the cable routing for the printhead. See
“Printhead service check” on page 2-43.
200.30 Narrow media sensor covered during warm-up. Check that the narrow media flag rotates freely and
securely. If it is dislodged or broken, then replace the
rear exit guide. See “Rear exit guide assembly
with sensor and reversing solenoid removal” on
page 4-71.
200.32 Media more than 14 inches too long over the manual
feeder sensor. Possible causes include multi-sheet
feed or pre-staged media in the tray.
Verify that the media is approved. Inspect the wear
strips in the tray, and replace if they are worn.
200.33 Page from tray 1 did not reach the input sensor after
multiple attempts. Page did make it out of the tray at
least as far as the manual feeder sensor. Possible
cause is that the page stalled at the alignment gate.
Verify that the pick tires are clean, not worn, or filled
with paper dust. Replace the pick tires if necessary.
See “ACM pick tire roller removal” on page 4-3.
The alignment roller may be binding. Call the next
level of support.
200.34 Timed out waiting for page from tray 1 to reach the
input sensor after multiple pick attempts, but the page
was later detected at the input sensor while waiting for
any page(s) ahead to clear the paper path. Possible
cause is that the page is delayed at the alignment
gate.
200.35 Failed to create hsync during auto alignment Check the printhead. See “Printhead service
check” on page 2-43.
200.36 Lost hsyncs during auto alignment
200.37 Timeout on data collection during auto alignment
200.38 Interpage servo gap is smaller than expected for
printhead offset target evaluation
200.42 Rogue sheet is at the manual feed sensor while
flushing the paper path prior to declaring MPF source
empty.
Retry alignment.
200.43 The media is at the input sensor before interruption
occurs. Possible causes include bouncy sensor or an
exceptionally small gap, perhaps due to the media
being pre-staged in the source tray.
Remove the media, realign the stock, and re-insert.
Do not let the top sheets to go beyond the wear
strips.
201.00 Paper jam between input and exit sensor Remove the toner cartridge/PC kit and check for
obstructions between the input sensor and the fuser.
if the media continues to stop at the entrance or in
the fuser, then replace the fuser. See “Fuser
removal” on page 4-30.
201.01 Transport motor identification failed to identify either
motor after two tries.
Check the main motor. See “Main motor service
check” on page 2-30.
Error Description Action