SECTION 3
OPERATING THE PRINTER
46
User Interface Menu
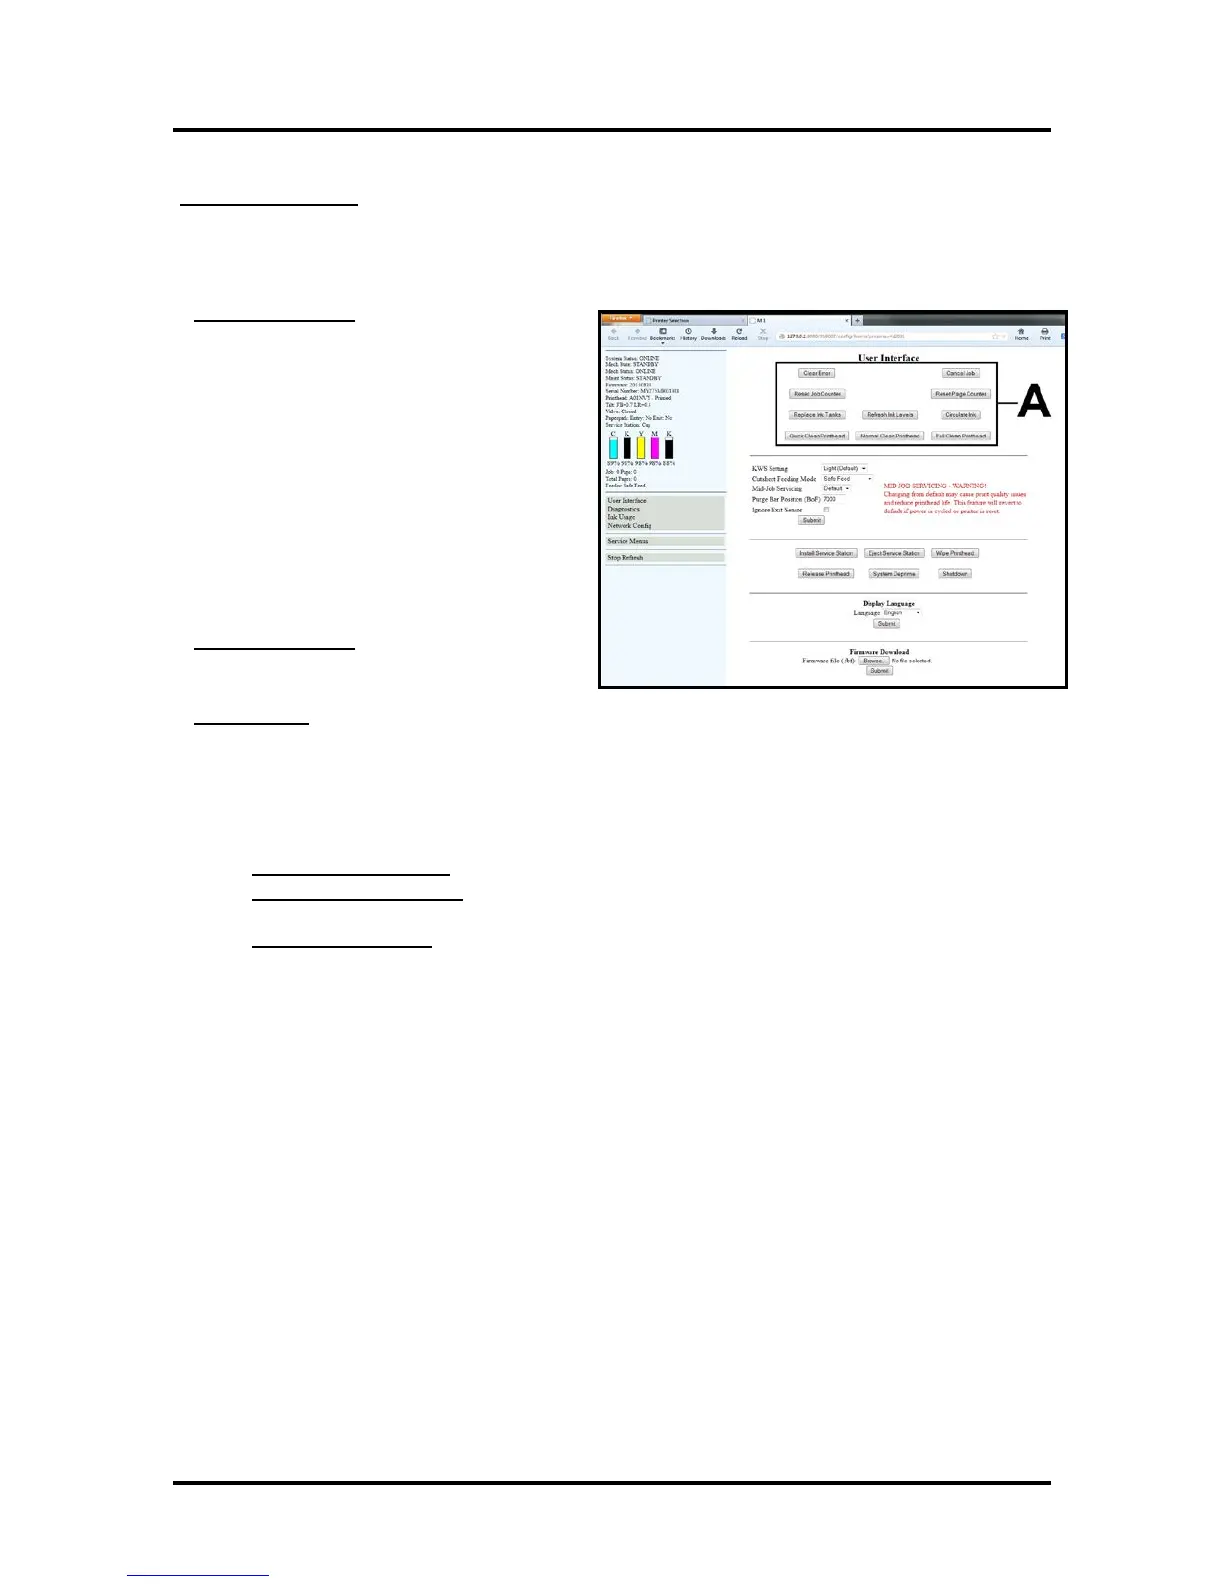
[A] User Interface Buttons: Let you perform routine maintenance and operating tasks.
You can use these buttons to Clear Errors, Cancel a Job, Reset the Job Counter, and Reset the Page
Counter. You can also:
Replace Ink Tanks – Disconnects Printer
communication with Ink Tanks; allowing for
the safe removal or install of Ink Tanks.
Previously the printer had to be powered-down
before Ink Tanks could be safely removed or
installed.
Press the “Replace Ink Tanks” button before
removing/installing Ink Tanks.
Press the “Continue” button only after verifying
that the Ink Tanks have been properly installed
and the Ink Tank Latches are secure.
WARNING: If the above procedure is not
followed; damage to the Ink Tanks may result,
rendering them unusable.
Refresh Ink Levels – Used to update or
confirm the ink levels shown at the left side of
the screen.
Circulate Ink – May be used to help purge air from the lines and prime the system.
Cleaning Buttons: Provide 3 levels of cleaning for the Printhead Cartridge. Use these features to help
recover printhead nozzles that are not firing.
Note: The Memjet printhead contains 70,400 nozzles. Each nozzle is a fraction of the diameter of a
human hair. Under normal use; it is not uncommon for a small percentage of nozzles to become clogged.
The following buttons work the same way as the three “… Clean Printhead” buttons in the Printer Driver:
• Quick Clean Printhead – Circulates ink, wipes and cleans the Printhead Cartridge.
• Normal Clean Printhead – Runs cleaning and wiping routine twice for better flushing and
cleaning.
• Full Clean Printhead – Runs the cleaning routine multiple times for the most thorough flushing
and cleaning of the Printhead.
Tip: If using these cleaning features has no effect or increases the nozzle clogging issue; this may be
an indication that the printhead and or “wiper roller” may need to be replaced.
Due to the fact that a dirty/worn/damaged “wiper roller” can cause damage to a new printhead; it is
recommended that the “wiper roller” be replaced whenever the printhead is replaced. Please contact
your service representative to have them perform this procedure.
Tip: Do NOT use the above features to try to reduce “scuff marks” and image smudging/smearing.
Using these features will normally aggravate these issues.
“Scuff marks” (black lines/streaks) can occur when the media makes contact with the printhead.
Smudging/smearing can occur when the wet image makes contact with the printhead or other areas.
The most common head to media contact areas are the high points (bows, bends, flaps) on the media
and the trailing edge of the media.
Things that may help reduce scuff marks and image smudging/smearing:
- Check to be sure the “Head Media Guide” is properly installed. Try adding/removing “PPS Spacers”.
See section titled “Envelope Printing Attachment Kit” for more details.
- Check to be sure the Head Media Guide, printhead surface, lip of cap (capping station) and other
surfaces are clean. Clean using distilled water and a lint free cloth.
- Try feeding the media in a different orientation. Rotate piece 90, 180, 270 degrees.
- Try to use media that is flat (not warped, bowed or bent). Be sure flaps are folded crisply.

 Loading...


