XF Camera System Manual |
Using Lens Cast Calibration
Some lenses on a technical camera are positioned very close to the sensor
surface of the IQ Digital Back, which can result in color cast and luminance
uniformity issues which ultimately eect image quality. Tilt and shift
movements can also introduce, or accentuate, the issue. The LCC (Lens Cast
Calibration) tool in Capture One Pro is designed to correct for the color and
luminance uniformity conflicts by analysing and applying a correction made
from a LCC capture.
To use the LLC tool, you will need to make an LCC capture. An LCC capture is
a photograph of an evenly-lit semi-transparent card, used as a reference image
within Capture One’s LCC Tool. In order to create an accurate LCC profile, the
reference capture should ideally be made with the same lens, aperture setting,
and light conditions as the images you wish to correct. In order to
accommodate for the loss of light from the semi-transparent card, it is
suggested to decrease your shutter speed by two stops. Tilt and shift
adjustments on a camera must also match for the best results.
Creating an LCC profile in Capture One
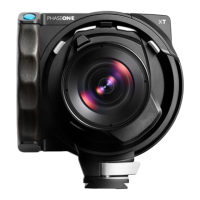
1. Once you have made an LCC reference capture, select the RAW file it in
Capture One and go to the LCC tool. Then click on Create LCC.
2. Enable the Wide Angle Lens with Movements option if you are using a
wide-angle lens and some degree of movements like tilt or shift lens. You can
also enable the Include Dust Removal Information option to create a map
which automatically removes dust. Note that this will increase processing time.
3. Click Create. Capture One now analyzes the reference image and creates an
LCC profile.
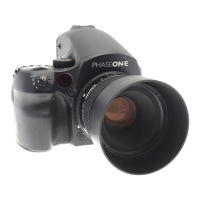
4. When completed, the reference image used will be labelled with LCC in the
browser to help you keep track of your profiles. The created LCC Profile will be
applied automatically to the reference shot, letting you check immediately
whether it was successful. It should show an evenly exposed light grey image
without a color cast, vignetting or dust spots if you have selected that option.
It may be necessary to white balance the image to evaluate the proper
application of the LCC.
Workflow tip: If you have multiple LCC reference shots to calibrate, you can
save time by selecting them all and click on Create, then Capture One Pro will
work through them one by one.
Applying an LCC profile
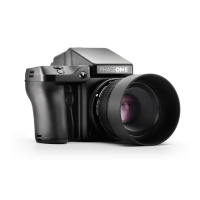
You apply an LCC profile to an image by first selecting the LCC reference shot
and then the image in the Browser, then go the the Adjustments menu and
select Apply LCC. You can also right-click on the image in the Browser and
select Apply LCC.
Note that you can select multiple images and apply the same LCC profile to
them all by using the same process.
Adjusting the LCC profile eect
Once an LCC profile has been applied, you can fine-tune its eect on the
image with the LCC Tool. You can turn the color cast correction on and o
with the Color Cast option as well as the Dust Removal if any dust was found
on the reference image. You can also control the correction of Light Fallo
with Enable Uniform Light and the Uniform Light slider. You might, for
example, want to dial the correction down a bit to 75% with the slider in order
to retain some of the light fallo.
Phase One LCC Plate
1 2 3