The button also has a push-button function: to ne-tune the increment of the changes, you can
also press the push-button down before turning, it also has a push-button function. For further
renement, press the FN key and then rotate. So you can enter in steps of 1.0, 0.1, 0.01 and in
some places also 0.001. The step sizes are adjusted according to what is to be entered.
Changing cycles
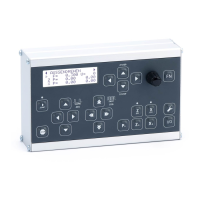
To change to another cycle, press the LEFT or RIGHT keys.
Move axes
To move the axes manually there are two control crosses, SLOW JOG and FAST JOG. SLOW JOG
moves the axes slowly, FAST JOG moves the axes fast (rapid traverse). How fast and how slow
can be set in the settings.
Move to positions
You can approach exact positions: The Z axis always stops moving from right to left at 0 and at
ZP. Moving from left to right, it does not stop, you must always move to positions to the left
so that the backlash of the leadscrew is always balanced. The X axis stops at 0 and at XP in the
direction of material processing. For internal turning this is in the direction of the user, for ex-
ternal turning it is away from the user.
Step-by-step movement
You can also move the axes step by step using the STEPZ and STEPX keys. Press the STEPZ key
for longer than 1 second to switch to the step mode of the Z axis. Press and hold the STEPX key
to switch to the step mode of the X axis. You can then move step by step with the rotary knob
in 0.1mm increments, press the rotary knob while turning you move in 0.01mm increments.
Manual movement
We recommend to leave the handwheels mounted, because then you can still drive manually.
To allow this, you can deactivate the respective axes with XOFF and ZOFF, the motors are then
switched to a freewheel and you can „crank“ by hand. In some cycles this can be done during a
cycle, e.g. for thread repair or in gear mode.
Attention: As soon as you issue a movement command at the ELS, the axis is automatically
reactivated!
Settings
You can set many parameters and thus adapt the control to your machine. To do this, press the
SETTINGS button.
Parametermenu
In many cycles there is a parameter menu which allows further settings. For example, you can
select the cutting strategy and the ank angle in the thread cycle and the taper ratio or the
cutting radius in the taper cycle. You reach the parameter menu by using the DOWN key to
navigate downwards beyond XP. You can exit the menu by navigating up again or by pressing
the LEFT key.
Cooling/Lubrication:
After starting a cycle, the COOL OUTPUT is activated and the set delay is waited until the cut be-
gins. LED1 ashes during the delay. After the end of the cycle, the output is switched o again.
53