Calibration and Maintenance UMSITRPSD3-1
November 2005
7-14
6. Separate the measuring cell from the enclosure.
• Differential construction - Clamp the end cap portion of the measuring cell in a bench vise with
the transmitter in an upright position. Use wood blocks to protect the end caps from damage by
the vise. Rotate the enclosure clockwise while watching the measuring board and cable to be sure
that they rotate freely.
• Gauge construction - Use an open-end wrench to rotate the cell counterclockwise while watching
the measuring board and cable to be sure that they rotate freely. Wrench size will depend upon
the type of process connection.
7. As the measuring cell and enclosure separate, guide the measuring cell board through the neck of the
enclosure and set the enclosure aside.
8. Clean all process material and other contamination from the entire assembly and pack the assembly
for return or disposal. Include applicable MSDSs (Material Safety Data Sheets).
Installation
1. Unpack the replacement measuring cell.
If a greased O-ring is packed separately, go to step 2. If the O-ring is installed on the measuring cell
tube, in a groove next to the threaded portion of the tube, go to step 3. Keep the greased O-ring clean
and be careful not to wipe away the grease.
2. Pass the measuring cell board and measuring cell cable through the O-ring. Seat the O-ring in the
groove in the measuring cell neck adjacent to the threaded portion of the neck. Keep the greased O-
ring clean and be careful not to wipe away the grease.
3. Differential Construction only - Position the measuring cell in a bench vise with the measuring cell’s
tube pointing up. Use wood blocks to protect the end caps from damage.
4. Carefully pass the measuring cell board and cable through the enclosure neck and into the enclosure.
5. Screw the measuring cell into the enclosure. As the assembly is rotated, be certain that the measuring
cell cable and board rotate freely.
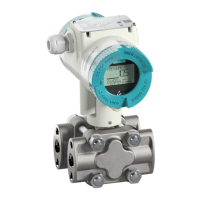
• Differential construction - Rotate the enclosure clockwise until the following conditions are met.
• the enclosure setscrew should be in-line with the raised area in the center of the process
flange; see Figure 7-4
• the enclosure rotation arrow should be to the left of the enclosure setscrew
• the neck dimension shown in Figure 7-4 is correct
• Gauge construction - Using an open-end wrench, rotate the measuring cell until the following
conditions are met.
• the enclosure setscrew should be in-line with the enclosure rotation arrow
• the neck dimension shown in Figure 7-4 is correct
 Loading...