5-24
Initiation
R
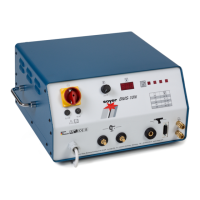
5.3.2 Connection of stud welding pistol
• Connect welding cable of welding pistol or welding head to the welding
cable socket (item 11, chapter
5.1) and lock by turning to the right until stop.
• Insert control cable into control cable socket (item 10, chapter 5.1) and
secure by locking the spring bands.
• Please observe the connecting instructions given in the operating instruc-
tions for the welding pistols.
5.3.3 Mains supply
• Connect mains cable to power supply.
Ꮨ MORTAL DANGER
Only connect stud welder to authorized earthed sockets.
5.4 Adjustment of lift
The adjustment of lift is only possible for stud welding pistols or
☞ welding heads with magnet (e.g. PS-3, PS-3A).
The lift on the stud welding pistol or welding head is adjusted as follows:
• Switch on main switch (item 2, chapter 5.1).
• Press function key "Lift adjustment" (item 6, chapter 5.1).
The LED "Lift" (item 7.1, chapter 5.2.2) lights up. Charging voltage returns to
"0"
• Position pistol on workpiece.
• Press pistol switch. Stud holder lifts off the workpiece and lift can be ad-
justed. To protect the magnet, the lift test is only carried out for 1.5 secs.
The measure of the lift adjustment must be determined in welding tests. The
welding pistol has then to be adjusted accordingly. For further information
please refer to the respective operating instructions of the welding pistol or
welding head.
The function "Lift adjustment" is terminated by pressing once again the func-
tion key "Lift adjustment " (item 6, chapter 5.1).