Maintenance—2230 Service
S CAUTION <
When checking a diode, do not use an ohmmeter
scale that has a high internal current. High current
may damage a diode. Checks on diodes can be per
formed in much the same manner as those on
transistor emitter-to-base junctions. Do not check
tunnel diodes or back diodes with an ohmmeter; use
a dynamic tester, such as the TEKTRONIX S76
Curve Tracer.
DIODES. A diode can be checked for either an open or
a shorted condition by measuring the resistance between
terminals with an ohmmeter set to a range having a low
internal source current, such as the R X 1 kfl range. The
diode resistance should be very high in one direction and
much lower when the meter leads are reversed.
Silicon diodes should have 0.6 V to 0.8 V across their
junctions when conducting; Schottky diodes about 0.2 V
to 0.4 V. Higher readings indicate that they are either
reverse biased or defective, depending on polarity.
RESISTORS. Check resistors with an ohmmeter. Refer
to the “ Replaceable Electrical Parts” list for the tolerances
of resistors used in this instrument. A resistor normally
does not require replacement unless its measured value
varies widely from its specified value and tolerance.
INDUCTORS. Check for open inductors by checking
continuity with an ohmmeter. Shorted or partially shorted
inductors can usually be found by checking the waveform
response when high-frequency signals are passed through
the circuit.
CAPACITORS. A leaky or shorted capacitor can best
be detected by checking resistance with an ohmmeter set
to one of the highest ranges. Do not exceed the voltage
rating of the capacitor. The resistance reading should be
high after the capacitor is charged to the output voltage of
the ohmmeter. An open capacitor can be detected with a
capacitance meter or by checking whether the capacitor
passes ac signals.
12. Repair and Adjust the Circuit
If any defective parts are located, follow the replace
ment procedures given under “Corrective Maintenance" in
this section. After any electrical component has been
replaced, the performance of that circuit and any other
closely related circuit should be checked. Since the power
supplies affect all circuits, performance of the entire instru
ment should be checked if work has been done on the
power supplies or if the power transformer has been
replaced. Readjustment of the affected circuitry may be
necessary. Refer to the “ Performance Check” and
“ Adjustment Procedure," Sections 4 and 5 of this manual
and to Table 5-1 (Adjustment affected by repairs).
DIAGNOSTICS
Introduction
A list of the instrument diagnostic tests is shown in
Table 6-8. The diagnostics are run automatically during
power-up and/or manually via the menu. The location in
the menu of each test is shown in Figure 6-4. Only the
digital storage portion of the instrument is checked. Cir
cuitry checked, and/or used by each test is shown in
Table 6-9. During a normal power-up, only the first error of
each test is displayed. If the CURSORS SELECT C1/C2
button is held in during power-up (invoking extended
DIAGNOSTICS) the first 15 errors from all tests are
displayed. If the instrument contains the RS-232-C Option,
an ASCII version of all errors found during power-up is
sent to the option. In addition to displaying the errors on
the crt, the errors are also displayed on U4119 (see
Table 6-10). Timing for the error codes displayed on
U4119 is shown in Figure 6-5. A list of all possible error
messages is shown in Table 6-11.
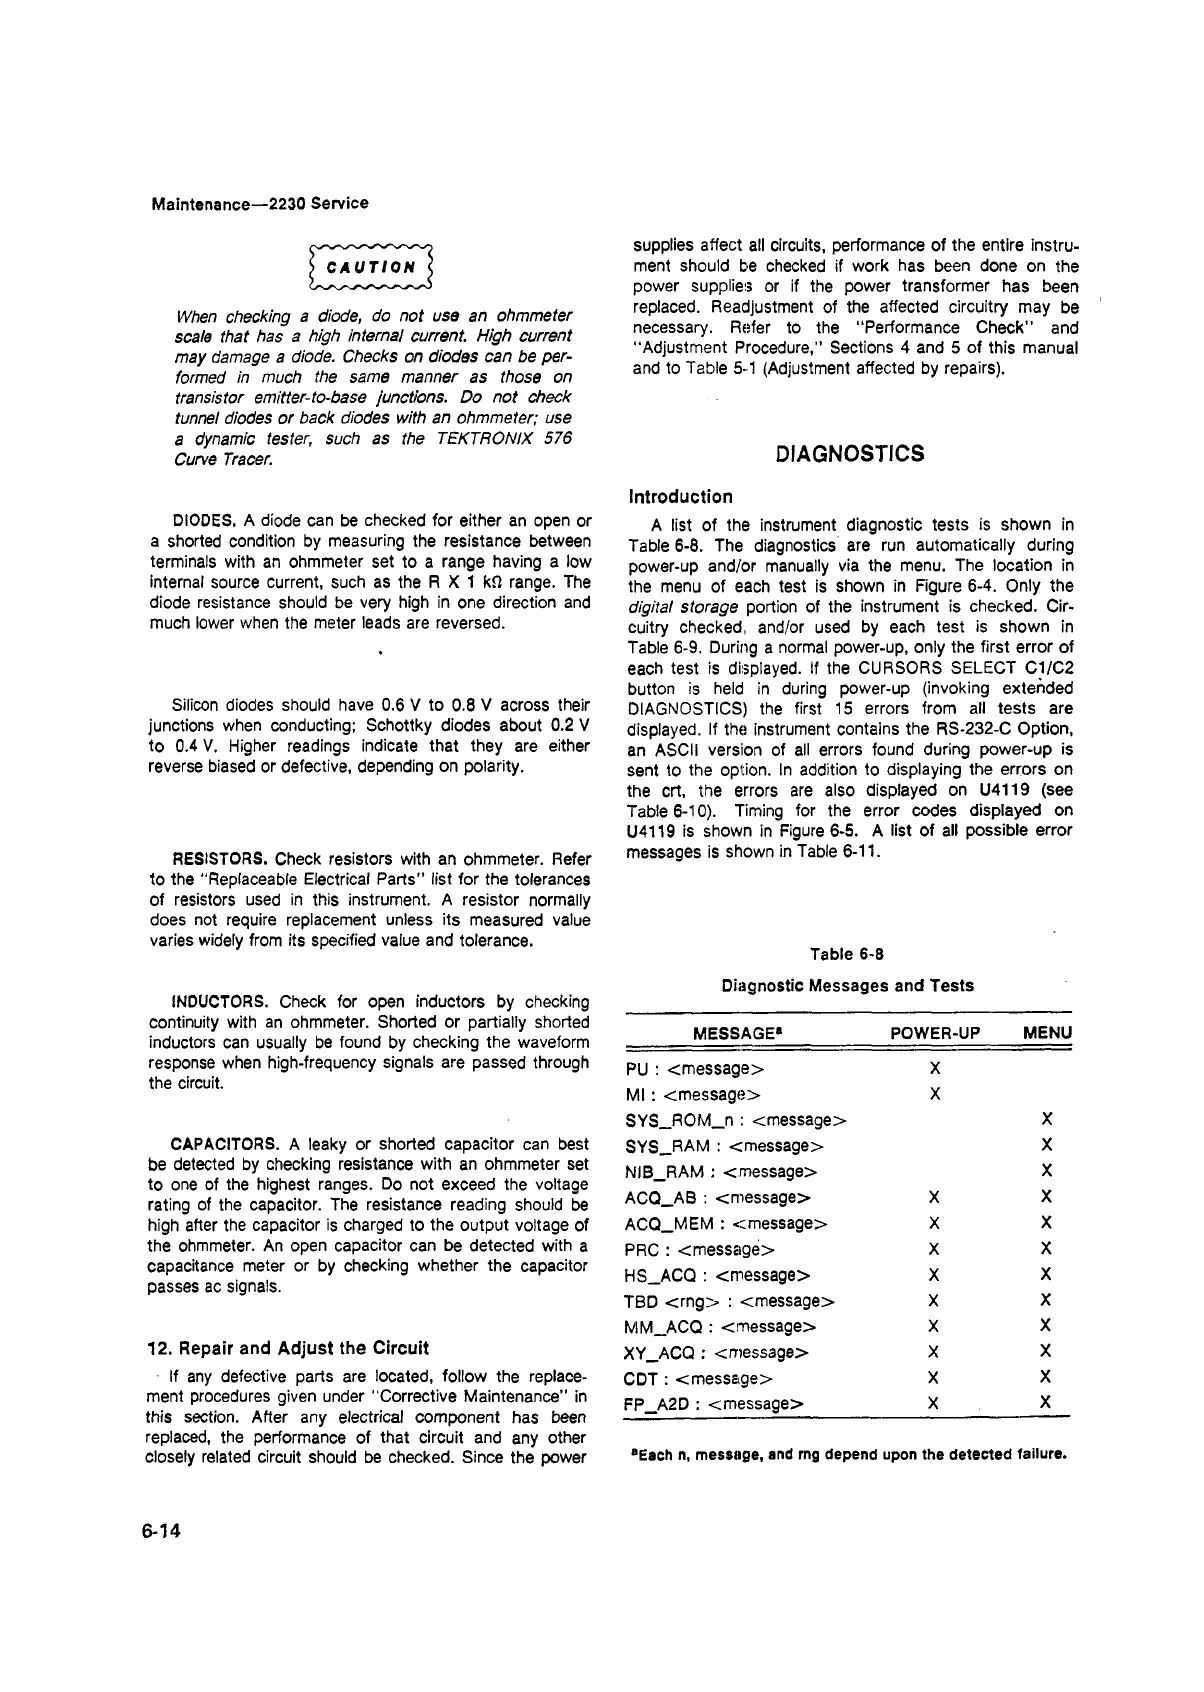
Table 6-8
Diagnostic Messages and Tests
MESSAGE*
POWER-UP MENU
PU : <message>
X
M l: <message>
X
SYS_ROM_n : < message >
X
SYS_RAM : <message>
X
NIB_RAM : <message>
X
ACQ_AB : <message>
X
X
ACQ_MEM : <message>
X
X
PRC : <message>
X
X
HS_ACQ : <message>
X
X
TBD <rng> : <message>
X
X
MM_ACQ : <message>
X
X
XY_ACQ : <message>
X
X
CDT : <message>
X
X
FP_A2D : <message>
X
X
aEach n, message, and rng depend upon the detected failure.
6-14