35
BASIC OPERATIONS
BASIC OPERATIONS
PRINT-OUT OF MEASUREMENT VALUES
PRINT-OUT OF MEASUREMENT VALUES
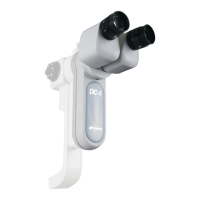
This instrument can print out measurement values by a printer.
1 Check the Measurement screen is on.
2 Tap the button on the control panel.
Measurement values on the monitor are printed out.
After being printed out, the measurement values on the screen are deleted automati-
cally.
NOTE
• To avoid a paper jam in the printer, do not feed the paper if it is partly cut
or wrinkled.
• To avoid discoloring of the printer paper (particularly the recording area)
during storage, use a polypropylene bag and not one containing plasti-
cizer (PVC, etc.).
• To avoid discoloring of the printer paper (particularly the recording area)
after pasting, use water-soluble glue and not one containing solvent.
• Since the printer paper is thermosensitive, it is not suitable for keeping
records for a long period. If necessary, prepare copies separately.
NOTE
• When the cylindrical refractive power is "0," the direction of astigmatic
axis and measurement values are not displayed/printed.
• When a red line is printed at the end of the printer paper, replace it with a
new one. For details about the replacement of printer paper, see
"PRINTER PAPER SETTING" on page 20. 58mm wide printer paper
(example: TP-50KJ-R, Nippon Paper) is recommended.
• "CLOSE PRT COVER" is indicating that the printer cover is left opened,
ensure that the printer cover is completely closed.
• When auto print is setting is "ON" in the initial setting, measurement is
performed under Auto mode, and measurement results are printed out
automatically. (See page 48.)
• When the Auto cut setting is off and you need to cut a printer form, the
way is that erase the measurement value by tapping the
button, and tap the button. (See page 50.)