Overview, Continued
Immediate. If a confirmed alarm exists (i.e., two detectors on separate zones for a cross
zoned system or a single detector in a single alarm system), the RACs activate immediately
upon release of the abort switch.
10s/Remaining. When the abort switch is released, the delay used is whichever is greater --
the remaining time left on Automatic Release Delay Timer or 10 seconds.
IRI Abort -- Cross Zoned System Only (Does not comply with UL 864). When a
single alarm is present, pressing the abort switch prevents the RACs from activating. If a
second alarm condition occurs while the Abort switch is still pressed, the automatic release
timer resets to whatever value has been configured for it and begins to count down, stopping
at 10 seconds. When the abort switch is released, the panel starts the release timer
countdown.
Original Delay (Does not comply with UL 864). Releasing the abort switch resets the
delay timer interval to the value set for the Automatic Release Delay Timer.
Method Description
Text-Based
Programming
The seventh prompt, shown below, asks you to set the abort switch operation.
[07] ABORT SWITCH RELEASE OPERATION:
1 = Immediate Release
d*2 = Max of (10 sec or remaining time)
3 = IRI
4 = Original delay
(d=default, *=current setting)
Select Number(X=exit):
Enter the number corresponding to the value you want to select and press the carriage return.
Refer to “Programming Stage 1 Alarm Operation” for a description of the next programming step.
Front Panel
Programming
Use the Reset key to scroll through the selections. When the desired choice is illuminated, press
the ACK key to save the selection in memory and move to the next programming step.
Programming Abort Switch Operation,
Continued
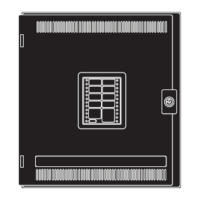
Overview
When sixth LED from top on
left side of the display is lit, it
indicates that the Abort
Switch operation is being
programmed.
These LEDs represent
the available selections.
Use the RESET key to
move through the
choices.
Press ACK when the
illuminated LED
corresponds to the
desired choice.
Yellow Trouble LED
indicates panel is in
programming mode. Green
LED is AC Power.
Note: If you select the
NYC Abort application,
the LED corresponding
to NYC Abort is lit and no
change to this option is
allowed.
 Loading...