SPEEDGATE Installation and Maintenance Manual Revision 1 - MAY 2023
73
PHOTO EYE ALIGNMENT
1. Remove front cover and, when necessary, loosen the two alignment screws. Make sure the green
transmier LED remains lit. Place the black sunshield (alignment cone) on the receiver(s) and angle to
achieve alignment with the transmier.
2. The photo eye transmier and receiver green LEDs will be lit when powered. Conrm receiver LED is
sll on, and use the LEDs to verify photo eye alignment. Refer to “Table 9. Vericaon of Photo Eye
Alignment” on page 74.
3. Install and adjust sunshield on receiver(s) to reduce the eects of solar interference or crosstalk.
4. Ensure DIP switch seng 3 is ON.
5. When the photo eye is successfully aligned place the photo eye cover back on.
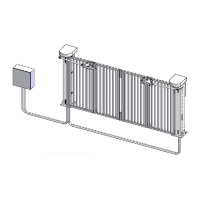
Photo Eye Alignment
To test alignment, photo eyes must be installed in columns. If two pairs of photo eyes have been supplied
with a gate, ensure that the transmit/receive photo eyes are mounted accordingly – transmier above
receiver on one column; receiver above transmier on the opposing column.
The SpeedGate-designated height for boom-mounted photo eyes is 24” (61cm) above grade and, for the
top pair (if included in the installaon), 60” (152cm) above grade. Photo eyes are commonly mounted
within 5” (13cm) of the gate panels in the closed posion.
The cover should not be placed back on the photo eye unl the photo eyes are aligned.
NORMAL OPERATION: All LEDs need to be solid green. When obstrucon in-between
photocells occurs, the green LED on the receiver will start blinking.