101510 Rev. AG Page 3–
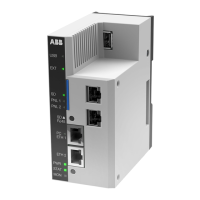
Figure 3-30 Assembled Power/Communication Assembly
23) At the NGC termination panel, trim and strip the wire ends.
24) Remove the power field termination J1 connector from the termination panel.
25) Using the wiring instructions in Figure 3-31
, install each wire into the correct
terminal and replace the connector on the board.
26) Trim and strip wire ends located in the external outlet box.
27) Remove the power field termination J3 connector from the outlet box panel.
28) Using the wiring instructions in Figure 3-31
, install each wire into the correct
terminal and replace the connector on the board.
29) Remove the DC power switch box cover.
30) Remove the switch mounting screws and remove the switch.
31) Cut a 3’ length of power (+) wire.
Optionally, communication wires may be run directly to the
spare conduit hub located on the bottom of the outlet box
assembly. Follow requirements of national and local codes.
For the purpose of this manual, assume that communication
wiring will be included with the power wiring in one conduit
run.
32) Tape the 3’ power (+) wire, ground and communication wire ends together.
33) Feed through the conduit hub located on the bottom of the DC power switch box,
past the cover opening, around the elbow and out.
34) Continue pulling wire until approximately 2’ of wire is extending out of the DC
power switch box.
Be careful to not pull the 3’ power (+) wire past the DC power
switch box opening.
NGC8200
INSULATED ENCLSOSURE WALL
MOUNTING BRACKET
FLEXABLE CABLE ASSEMBLY
DC POWER SWITCH
OUTLET BOX ASSEMBLY
CONDUIT SEAL-TO BE COMPLETED BY CUSTOMER