EasyManua.ls Logo

Brother MFC-8880DN Service Manual

Brother MFC-8880DN
652 pages
To Next Page IconTo Next Page
To Previous Page IconTo Previous Page
Page #200 background imageLoading...
Page #200 background image
4-21
Confidential
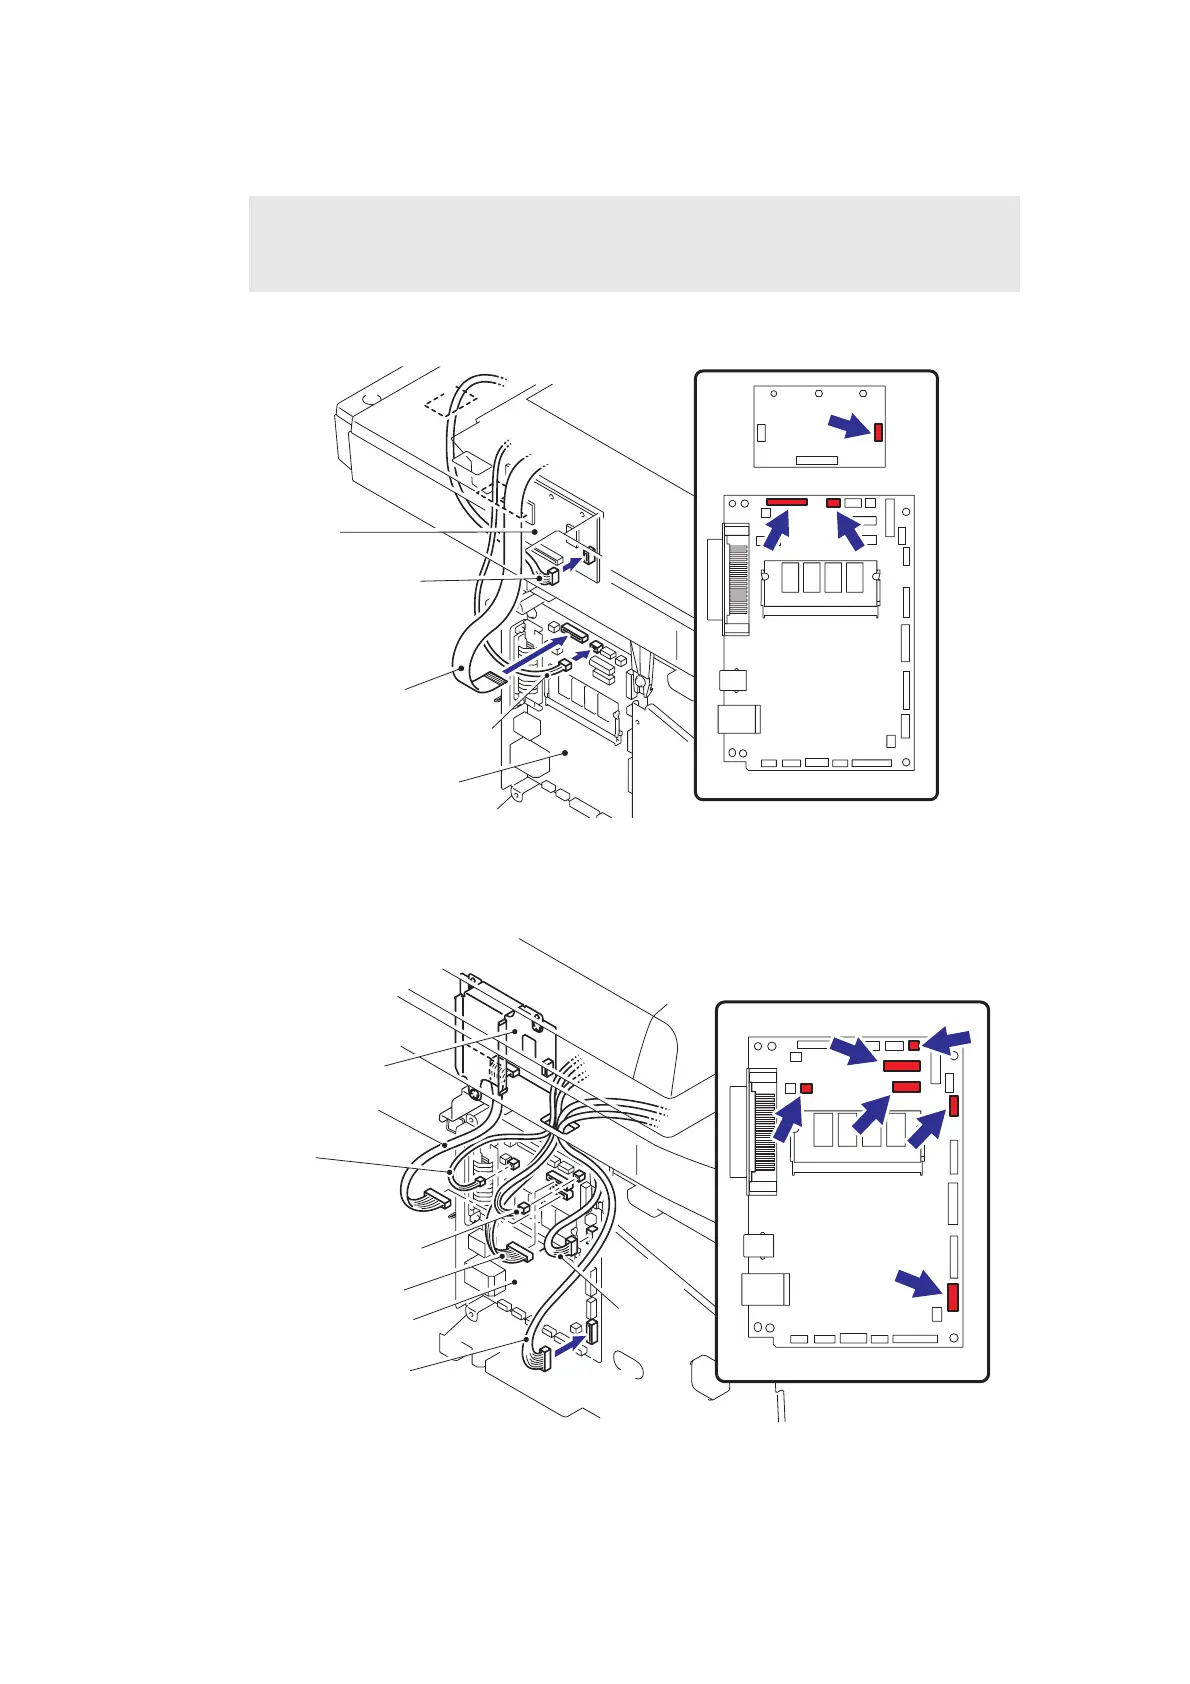
(17) Connect the connectors of the Home Position sensor harness and FFC cable into the
Main PCB.
(18) Connect the connector of the Scanner motor harness into the Driver PCB.
Fig. 4-32
(19) Connect the six connectors of the each harness into the Main PCB.
Fig. 4-33
Note :
When connecting flat cable(s), do not insert them at an angle. After insertion, check
that the cables are not at an angle.
Driver PCB
Driver PCB
Scanner motor harness
FFC cable
Home position sensor harness
Main PCB
Main PCB
Driver PCB
Battery harness
Speaker harness
NCU harness
USB HOST
harness ASSY
Driver harness
Panel PCB harness
Main PCB
Main PCB

Table of Contents

Other manuals for Brother MFC-8880DN

Questions and Answers:

Brother MFC-8880DN Specifications

General IconGeneral
Print technologyLaser
Maximum resolution1200 x 1200 DPI
Economical printingYes
Time to first page (black, normal)8.5 s
Print speed (black, normal quality, A4/US Letter)30 ppm
Scan toE-mail, E-mail Server, File, FTP, Image, OCR, USB
Scanner typeFlatbed & ADF scanner
Grayscale levels256
Input color depth24 bit
Maximum scan resolution19200 x 19200 DPI
Optical scanning resolution600 x 2400 DPI
Copier resize25 - 400 %
Maximum copy resolution1200 x 600 DPI
Maximum number of copies99 copies
N-in-1 copy function (N=)2, 4, 9, 16
Time to first copy (black, normal)10.5 s
Copy speed (black, normal quality, A4)30 cpm
FaxingMono faxing
Fax memory500 pages
Modem speed33.6 Kbit/s
Fax speed dialing (max numbers)300
Total input capacity250 sheets
Total output capacity150 sheets
Auto document feeder (ADF) input capacity50 sheets
Internal memory64 MB
Card reader integratedNo
Sound power level (standby)30 dB
Sound pressure level (printing)56 dB
DisplayLCD
Market positioningBusiness
Dimensions (WxDxH)531 x 451 x 475 mm
All-in-one functionsCopy, Fax, Print, Scan
Maximum internal memory0.576 GB
Color all-in-one functionsScan
Maximum print size216 x 356 mm
Paper tray media typesPlain paper, Recycled paper
ISO A-series sizes (A0...A9)A4, A5, A6
ISO B-series sizes (B0...B9)B5, B6
Maximum ISO A-series paper sizeA4
Standard interfacesEthernet
USB 2.0 ports quantity1
AC input frequency50 - 60 Hz
Power consumption (standby)85 W
Power consumption (PowerSave)18 W
Power consumption (average operating)680 W
Maximum duty cycle- pages per month
Package weight22100 g
Mac operating systems supportedMac OS X 10.3 Panther, Mac OS X 10.4 Tiger, Mac OS X 10.5 Leopard, Mac OS X 10.6 Snow Leopard, Mac OS X 10.7 Lion
Server operating systems supportedWindows 2000 Advanced Server, Windows 2000 Server, Windows Server 2003, Windows Server 2003 x64, Windows Server 2008, Windows Server 2008 R2, Windows Server 2008 x64
Windows operating systems supportedWindows 2000, Windows 2000 Professional, Windows 7 Home Premium, Windows 7 Home Premium x64, Windows 7 Ultimate, Windows Vista Business, Windows Vista Business x64, Windows Vista Home Basic, Windows Vista Home Basic x64, Windows Vista Home Premium, Windows Vista Home Premium x64, Windows Vista Ultimate, Windows Vista Ultimate x64, Windows XP Home, Windows XP Home x64, Windows XP Professional, Windows XP Professional x64

Summary

CHAPTER 1 SPECIFICATIONS

1. COMPONENTS

Lists the main physical components of the machine.

2. SPECIFICATIONS LIST

Details technical specifications for printing, functions, connectivity, and more across models.

2.1 Printing

Provides detailed printing specifications, including method, resolution, speed, and consumables.

2.2 Functions

Outlines the controller functions, interfaces, emulation, and network connectivity for different models.

2.6 Paper

Details paper handling capabilities, media types, weights, and sizes supported by the machines.

CHAPTER 2 THEORY OF OPERATION

1. OVERVIEW

Provides a block diagram of the machine's main sections and their interconnections.

3. MECHANICS

Explains the mechanical workings of the printer, scanner, and ADF units with diagrams.

3.1 Cross-section Drawing

Illustrates the internal printer parts and their arrangement.

3.2 Scanner Mechanism

Describes the operation of the document scanner unit and ADF for CCD and CIS models.

3.3 Paper Feeding

Details the paper paths and feeding mechanisms from various trays.

CHAPTER 3 ERROR INDICATION AND TROUBLESHOOTING

2.1.1 Error messages appearing on the LCD

Lists error messages displayed on the LCD, their types, actions, and corresponding page references.

3.2 Error Code Cause and Remedy

Details error codes, their causes, and specific remedies for troubleshooting.

4. PAPER FEEDING PROBLEMS

Provides solutions for common paper feeding issues like no feeding, double feeding, and paper jams.

5.3 Troubleshooting for Image Defect

Guides on troubleshooting various print image defects like light prints, faulty registration, and dark output.

9. TROUBLESHOOTING OF THE CONTROL PANEL

Addresses issues related to the control panel, such as no display or non-responsive buttons.

CHAPTER 4 PERIODICAL MAINTENANCE

1.1 Periodical Maintenance Parts

Lists parts requiring periodic replacement for maintaining product quality and their approximate life.

1.2 Procedures to Replace Periodical Maintenance Parts

Provides step-by-step instructions for replacing the Fuser unit, Laser unit, and Paper feeding kits.

CHAPTER 5 DISASSEMBLY/REASSEMBLY

1. SAFETY PRECAUTIONS

Outlines essential safety warnings and precautions to follow before performing maintenance work.

9. DISASSEMBLY PROCEDURE

Details the step-by-step process for disassembling various parts of the machine.

9.1 Paper Tray

Details the removal of the paper tray and its components.

9.4 Fuser Unit

Provides instructions for removing and replacing the Fuser unit.

9.8 ADF Unit

Details the disassembly procedures for the Automatic Document Feeder (ADF) unit for CCD and CIS models.

CHAPTER 6 ADJUSTMENTS AND UPDATING OF SETTINGS, REQUIRED AFTER PARTS REPLACEMENT

1. IF YOU REPLACE THE MAIN PCB

Details the necessary steps after replacing the Main PCB, including firmware rewriting and driver installation.

CHAPTER 7 SERVICE MODE

1. ENTRY INTO THE MAINTENANCE MODE

Explains how to access the machine's maintenance mode using control panel buttons.

4. DETAILED DESCRIPTION OF MAINTENANCE-MODE FUNCTIONS

Provides detailed explanations of various maintenance mode functions and their codes.

4.15 Fine Adjustment of Scan Start/End Positions (Function code 54)

Describes how to adjust scanning start and end positions for ADF and document scanner units.

4.16 Acquisition of White Level Data and CCD Scanner Area Setting (Function code 55)

Explains obtaining white level data and setting the CCD scanner area.

4.24 Counter Reset After Replacing the Fuser Unit, Laser Unit and Paper Feed Kit (Function code 88)

Provides instructions to reset counters after replacing key components like the Fuser, Laser, and Paper Feed Kits.

APPENDIX 1 WORKER SWITCH (WSW)

FIRMWARE SWITCHES (WSW)

Lists and describes the functions and settings of various firmware switches.

APPENDIX 4 SCREW CATALOGUE

Related product manuals