106
In this mode, you set both the shutter speed and aperture as desired. To
determine the exposure, refer to the exposure level indicator in the
viewfinder or use a commercially-available handheld exposure meter.
This method is called manual exposure.
* <a> stands for Manual.
1
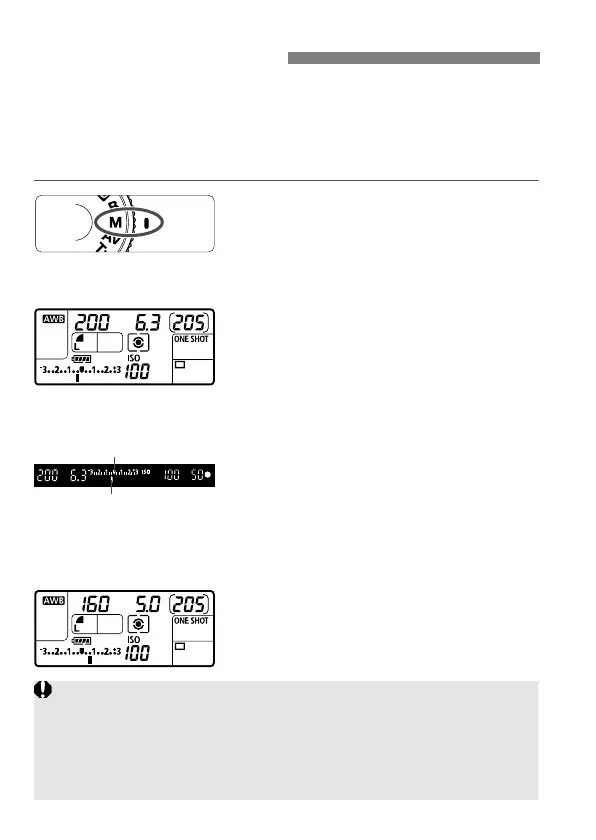
Set the Mode Dial to <a>.
2
Set the ISO speed (p.64).
3
Set the shutter speed and aperture.
To set the shutter speed, turn the
<6> dial.
To set the aperture, set the Quick
Control Dial switch to <J>, and turn
the <5> dial.
4
Focus the subject.
Press the shutter button halfway.
The exposure setting will be displayed
in the viewfinder and on the LCD panel.
The exposure level mark <s> lets you
see how far you are from the
standard exposure level.
5
Set the exposure and take the picture.
Check the exposure level and set the
desired shutter speed and aperture.
a:
Manual Exposure
Exposure level mark
Standard exposure index
If the [2 Auto Lighting Optimizer] (p.77) is set to anything other than
[Disable], the image may still look bright even if a darker exposure has
been set.
If ISO Auto is set, the ISO speed setting will change to suit the shutter
speed and aperture to obtain a standard exposure. Therefore, you may
not obtain the desired exposure effect.


 To Next Page